# Agent Playground
Source: https://docs.intervo.ai/agent-playground
Learn how to configure, test, and deploy your voice and chat agents using the powerful settings in the Intervo.ai Agent Playground.
# A Deep Dive into the Agent Playground
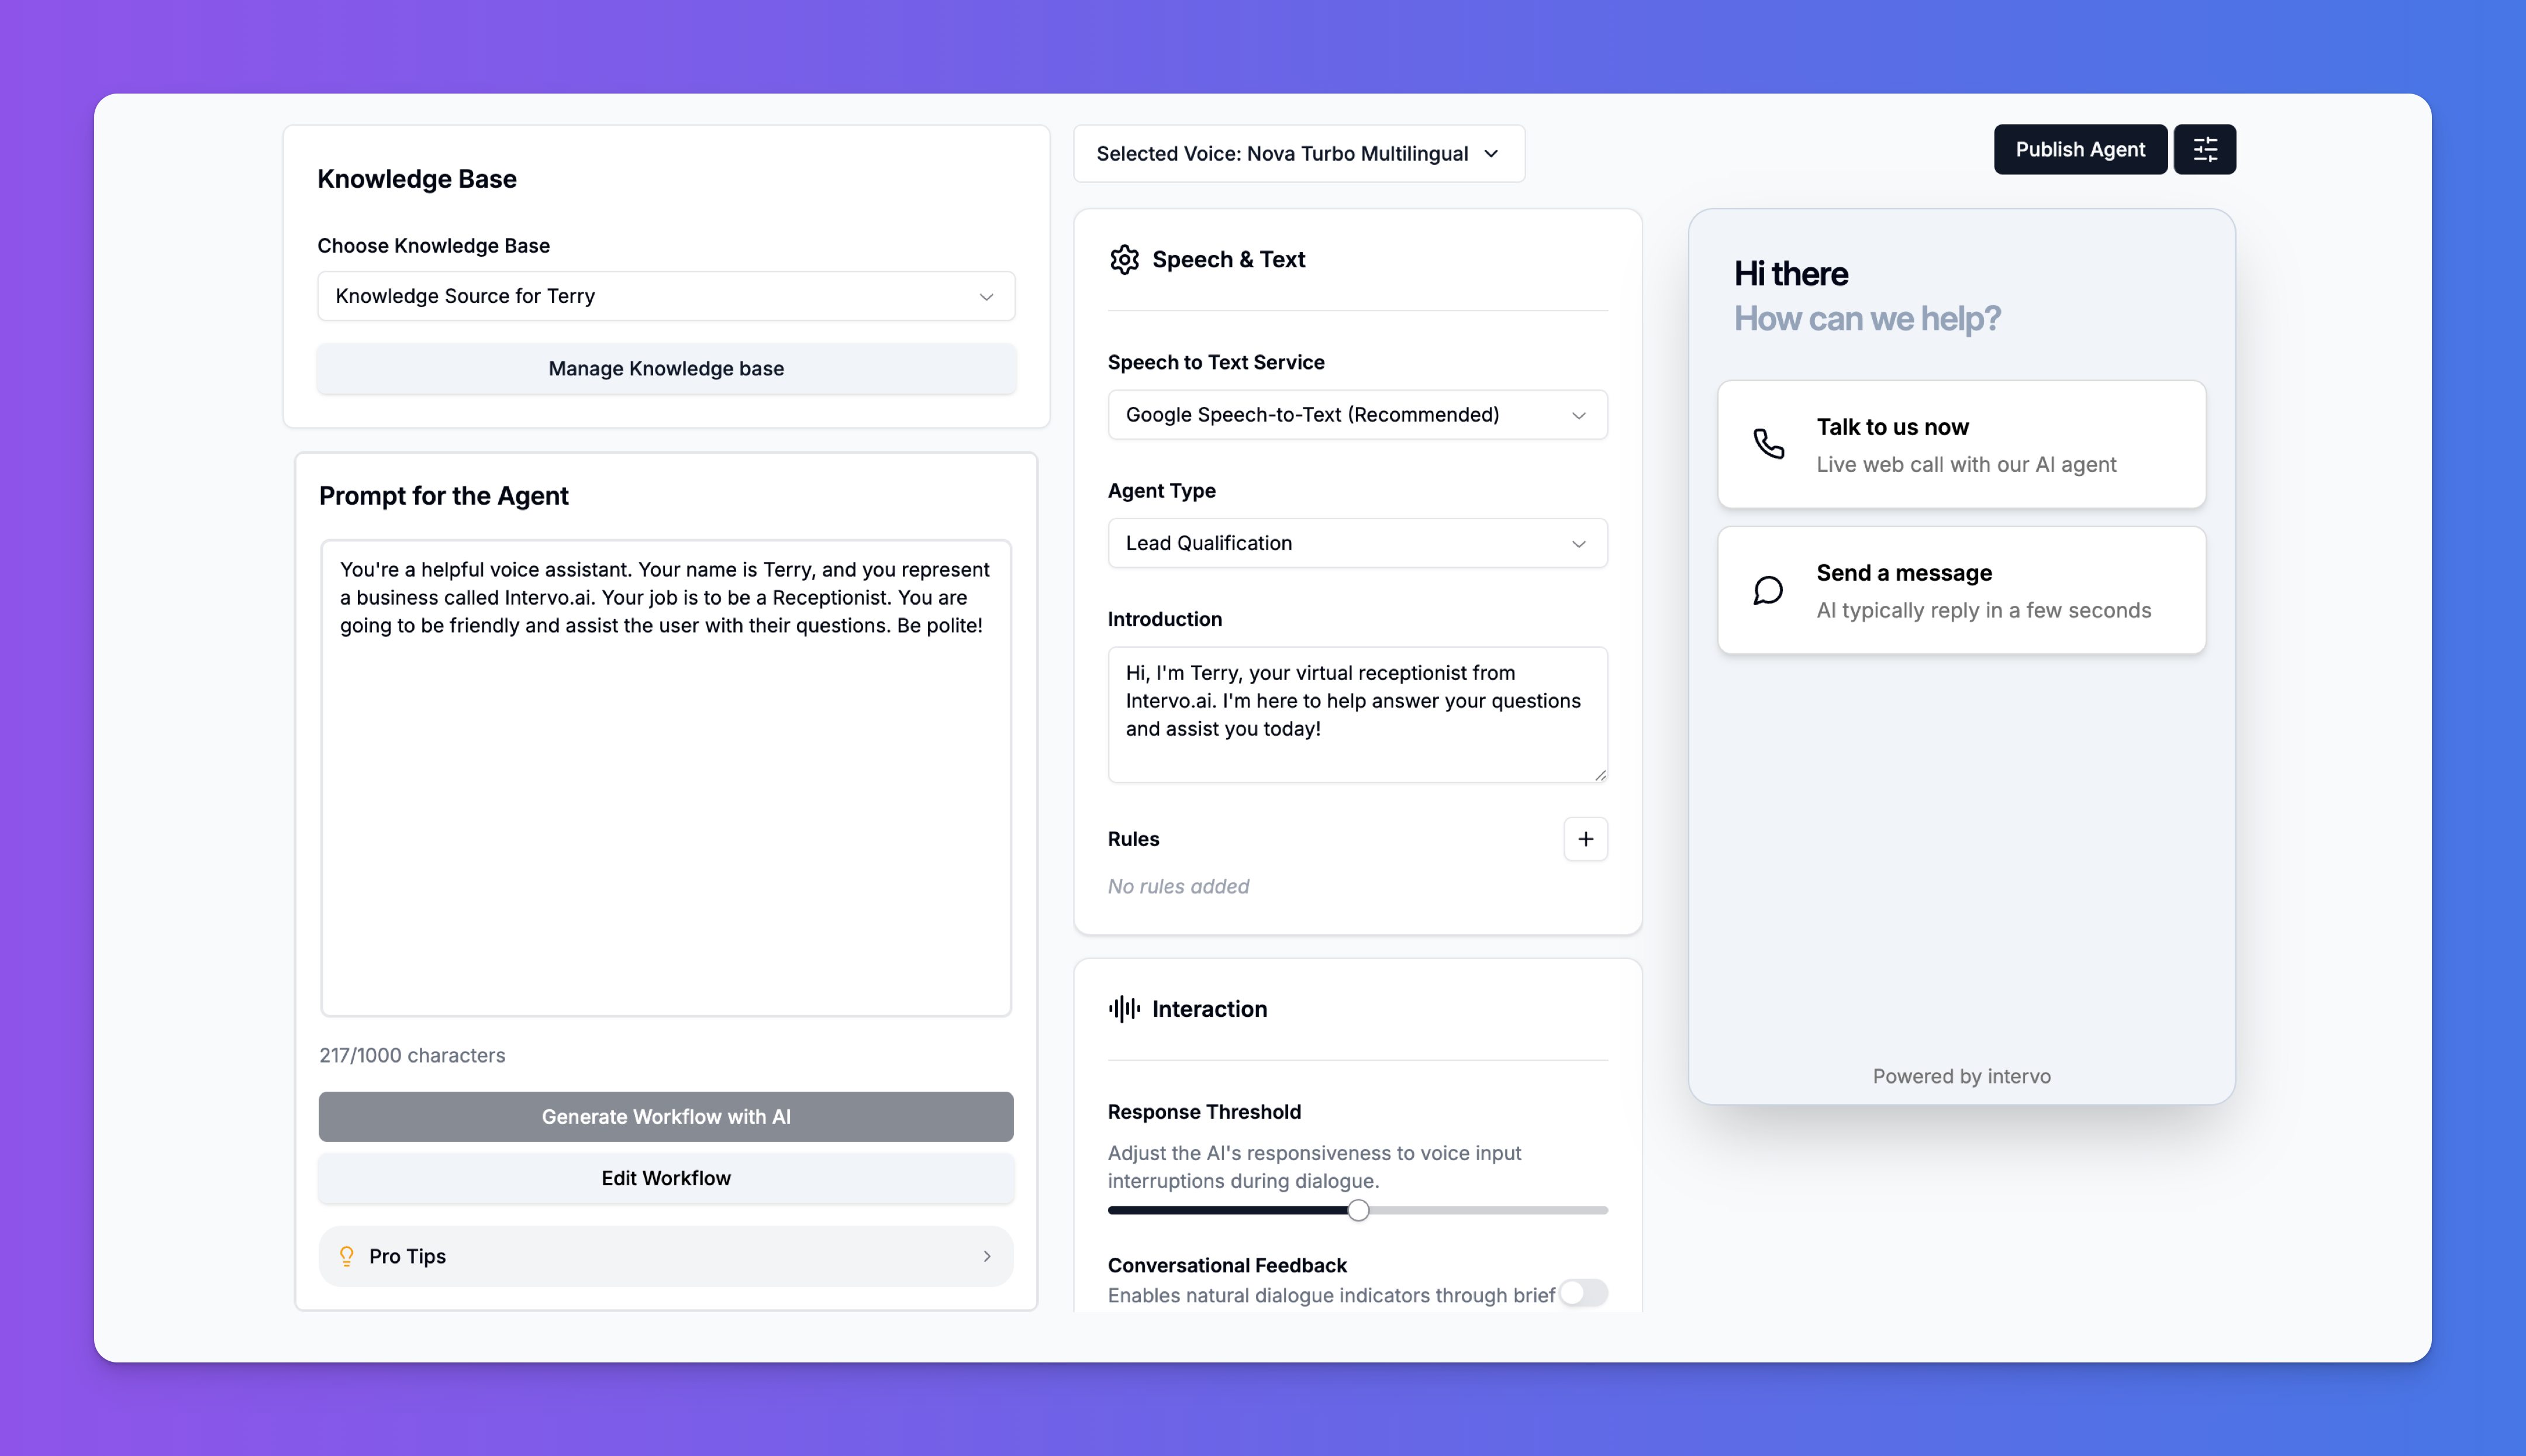
The **Agent Playground** is the central hub where you bring your AI agent to life. It’s a powerful, interactive studio designed for configuring every aspect of your agent's personality, knowledge, voice, and behavior. From here, you can fine-tune your agent and test its responses in real-time before deploying it to your website widget, phone system, or other platforms.
This guide provides a comprehensive walkthrough of every setting available in the playground.
 ***
## Understanding the Layout
The Agent Playground is organized into three main panels for an efficient workflow:
1. **The Agent's Brain (Left Panel)**: This area contains the core intelligence of your agent—its knowledge and primary instructions.
2. **The Agent's Behavior (Center Panel)**: This is where you configure the agent's voice, interaction style, and technical parameters.
3. **Live Preview (Right Panel)**: This interactive panel allows you to chat or speak with your agent to test its responses and behavior instantly.
***
## 1. The Agent's Brain: Knowledge and Prompt
This left-most panel defines *what* your agent knows and *who* it is.
### Knowledge Base
This section connects your agent to its source of truth.
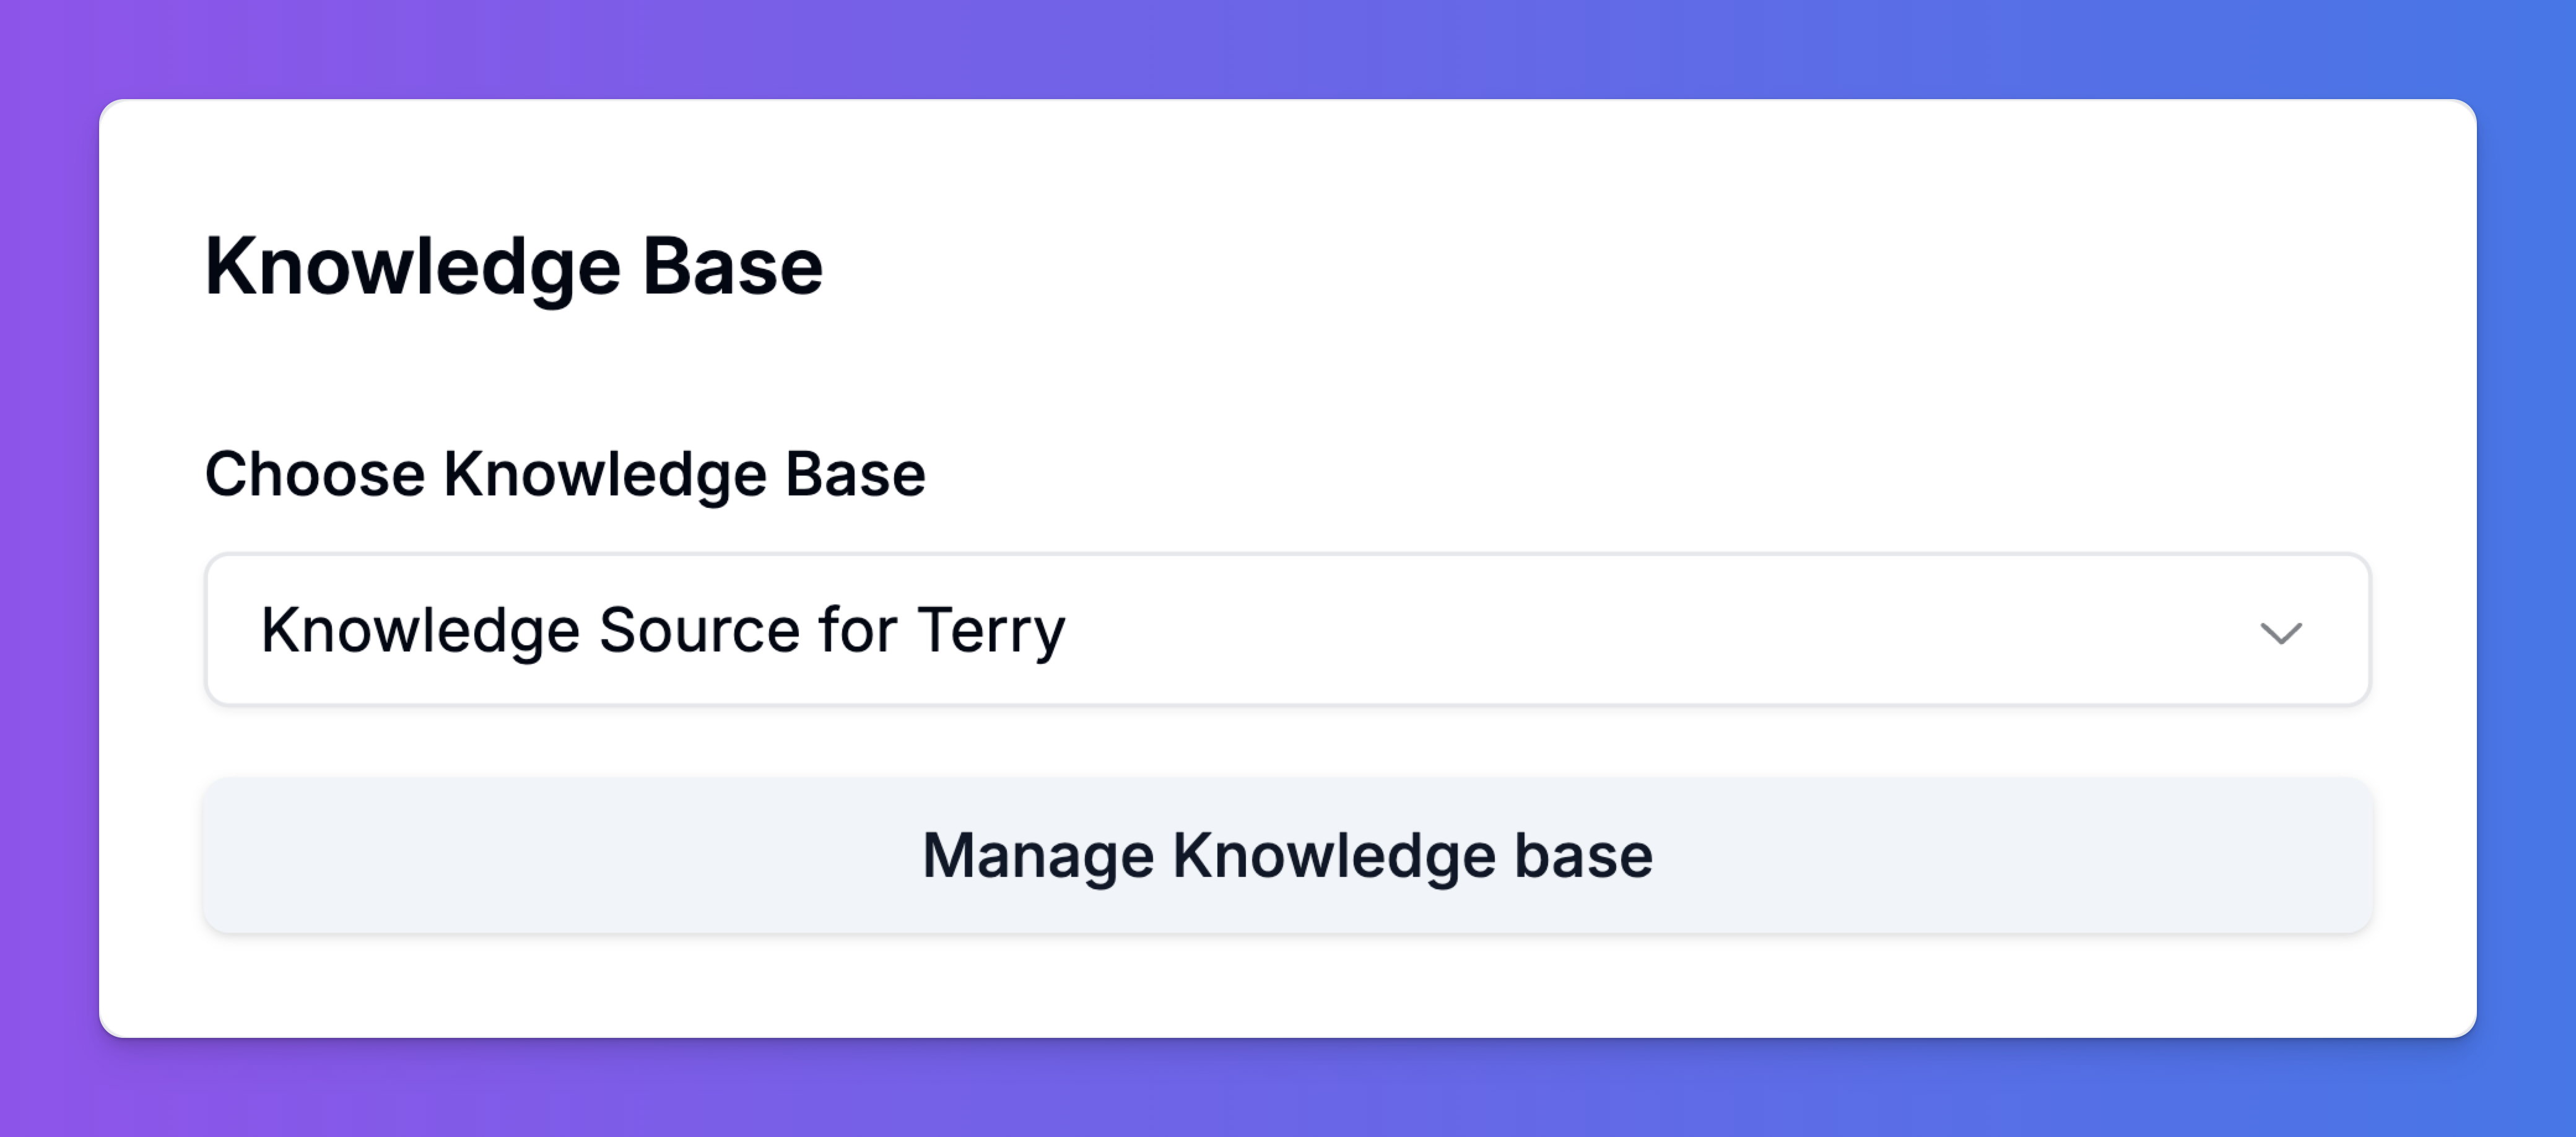
* **Choose Knowledge Base**: Use the dropdown to select from your pre-existing Knowledge Bases. You can create different knowledge sources for different roles (e.g., "Sales KB," "Support KB") and assign them here.
* **Manage Knowledge base**: Clicking this button takes you to the dedicated Knowledge Base editor, where you can add and manage content from files, websites, text snippets, and FAQs.
> For a detailed guide on creating a knowledge source, please see our article, "Mastering Your Agent's Knowledge Base."
***
## Understanding the Layout
The Agent Playground is organized into three main panels for an efficient workflow:
1. **The Agent's Brain (Left Panel)**: This area contains the core intelligence of your agent—its knowledge and primary instructions.
2. **The Agent's Behavior (Center Panel)**: This is where you configure the agent's voice, interaction style, and technical parameters.
3. **Live Preview (Right Panel)**: This interactive panel allows you to chat or speak with your agent to test its responses and behavior instantly.
***
## 1. The Agent's Brain: Knowledge and Prompt
This left-most panel defines *what* your agent knows and *who* it is.
### Knowledge Base
This section connects your agent to its source of truth.
* **Choose Knowledge Base**: Use the dropdown to select from your pre-existing Knowledge Bases. You can create different knowledge sources for different roles (e.g., "Sales KB," "Support KB") and assign them here.
* **Manage Knowledge base**: Clicking this button takes you to the dedicated Knowledge Base editor, where you can add and manage content from files, websites, text snippets, and FAQs.
> For a detailed guide on creating a knowledge source, please see our article, "Mastering Your Agent's Knowledge Base."
 ### Prompt for the Agent & Workflow
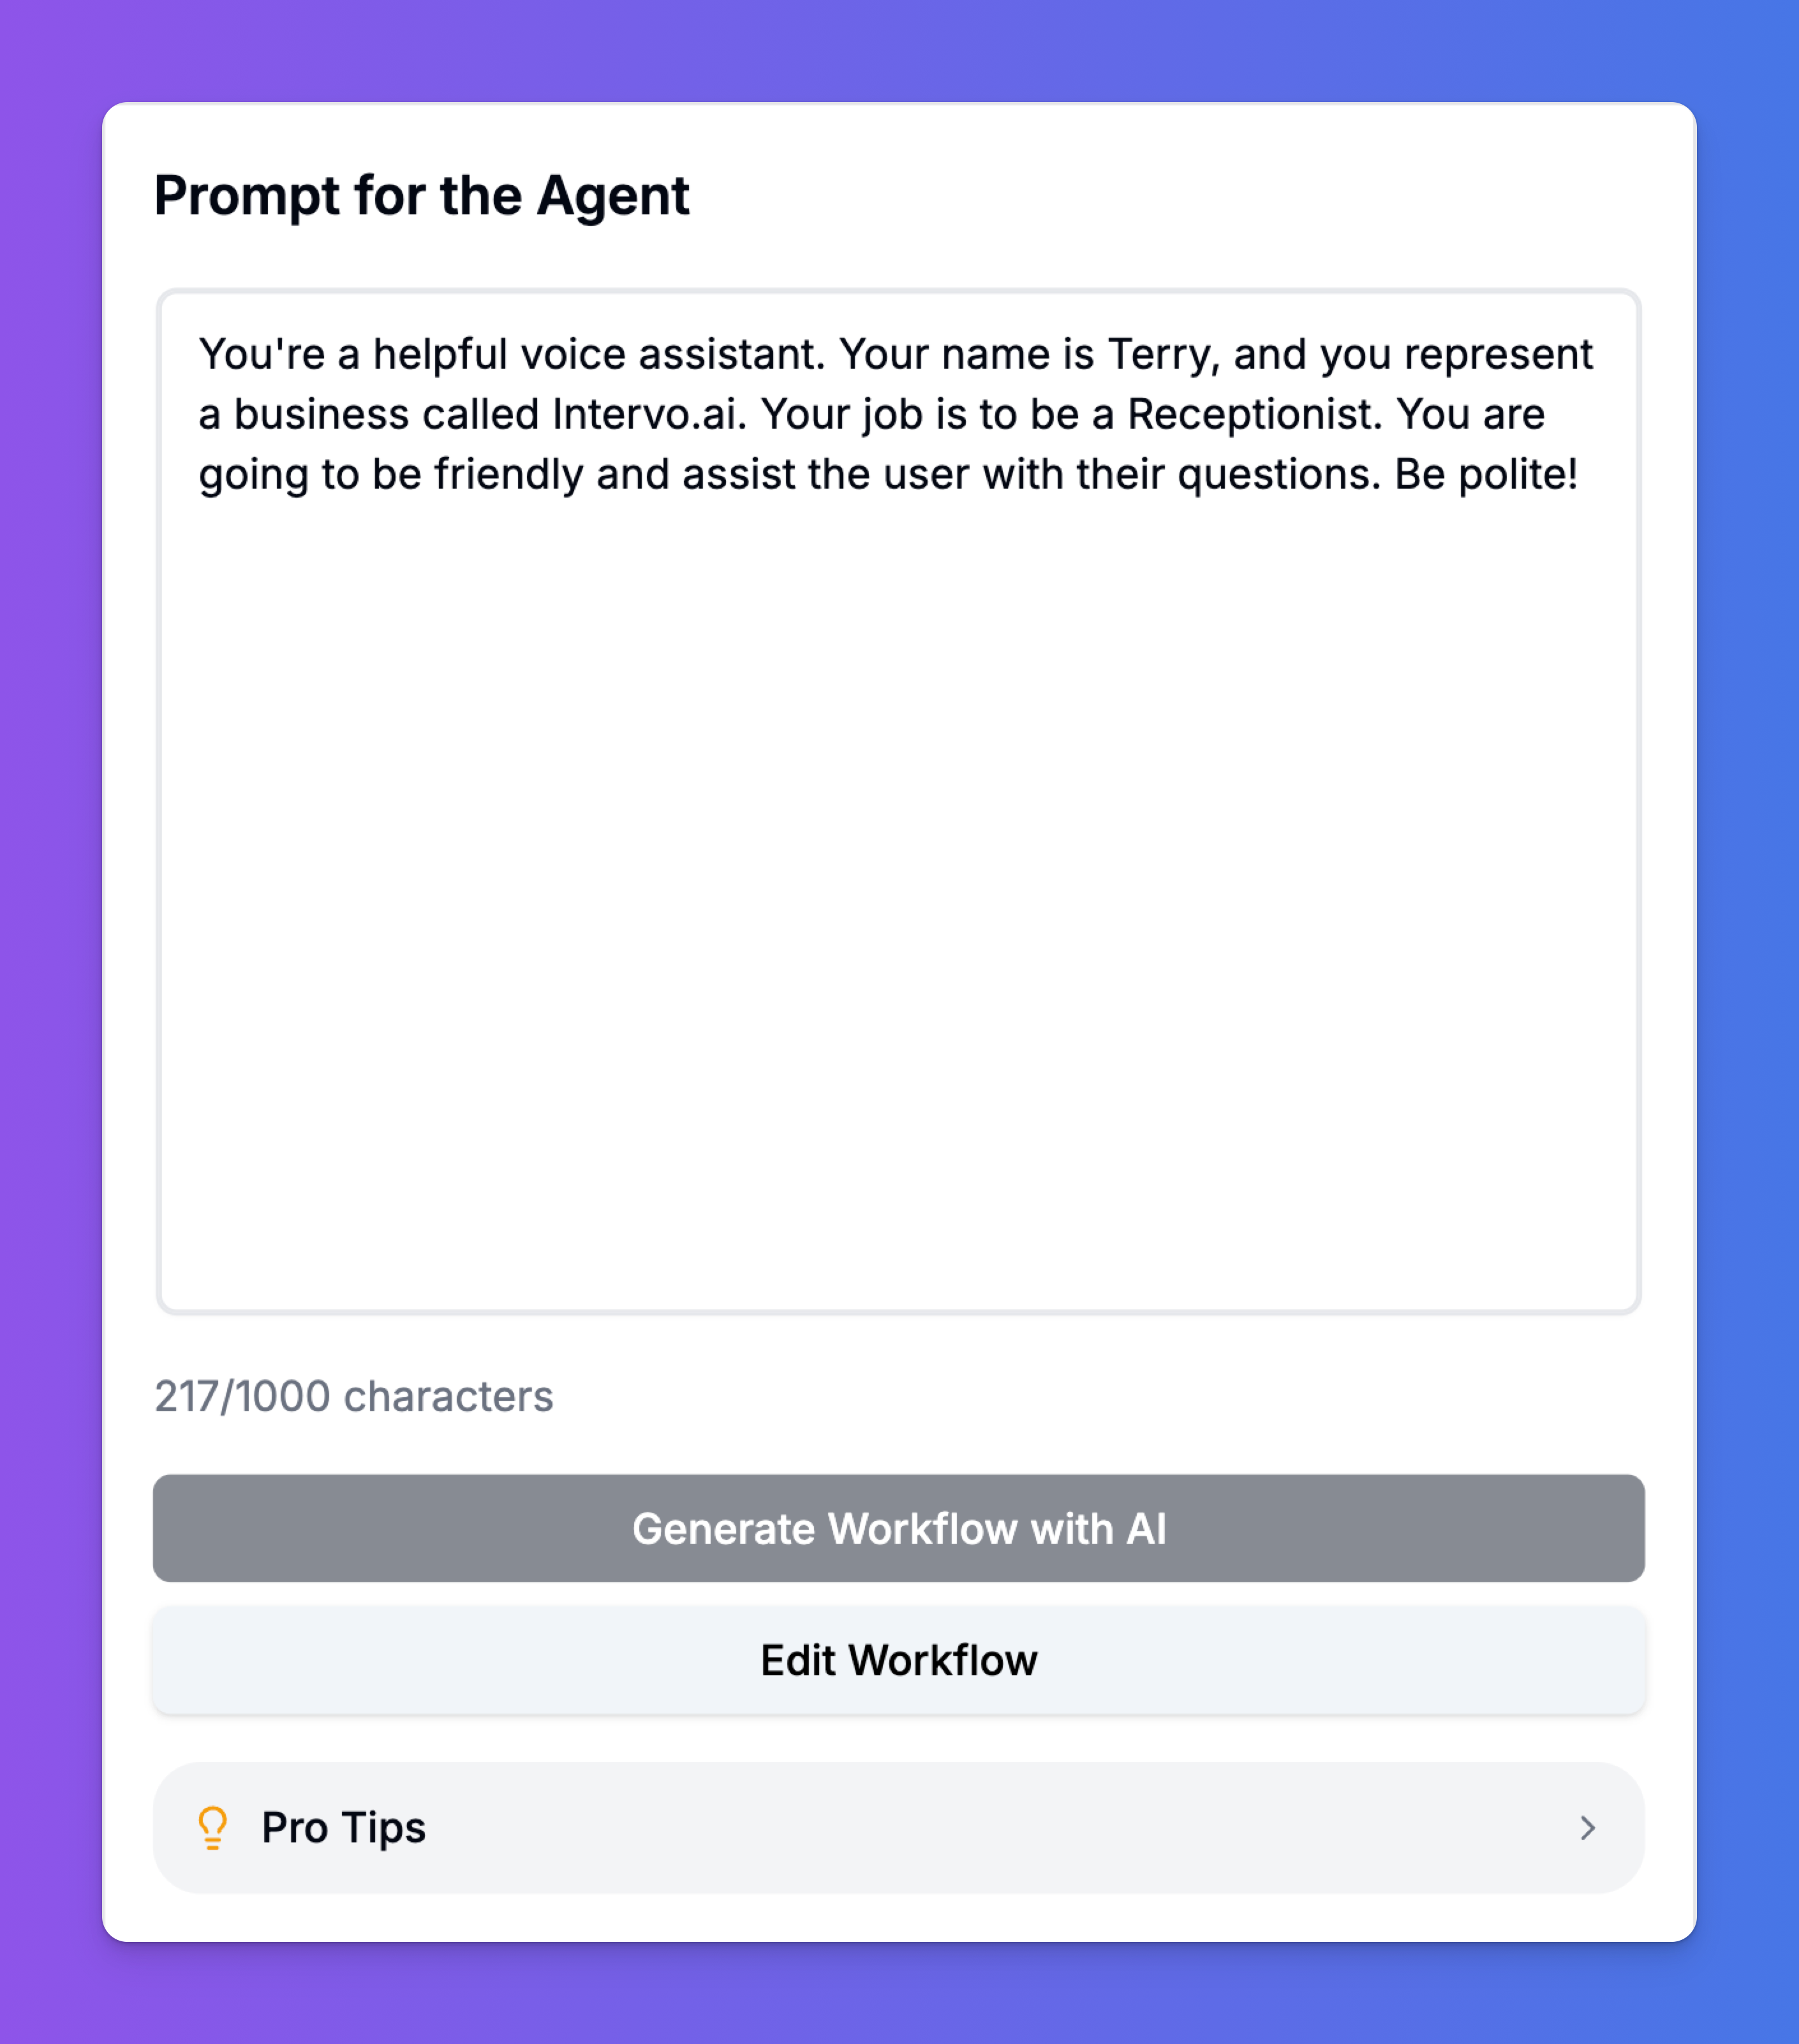
The prompt is the most critical instruction you will give your agent. It defines its core personality, purpose, and constraints. A well-written prompt ensures the agent is helpful, on-brand, and understands its primary role.
* **Prompt Field**: Write the core instructions here. Include details like the agent's name, the business it represents, its main objective (e.g., "Your job is to be a Receptionist and assist users..."), and its tone ("Be friendly and polite"). This helps us create the Workflow for the agent.
* **Edit Workflow**: This is a shortcut that takes you to the workflow for the agent and how the agent makes decisions based on intent.
### Prompt for the Agent & Workflow
The prompt is the most critical instruction you will give your agent. It defines its core personality, purpose, and constraints. A well-written prompt ensures the agent is helpful, on-brand, and understands its primary role.
* **Prompt Field**: Write the core instructions here. Include details like the agent's name, the business it represents, its main objective (e.g., "Your job is to be a Receptionist and assist users..."), and its tone ("Be friendly and polite"). This helps us create the Workflow for the agent.
* **Edit Workflow**: This is a shortcut that takes you to the workflow for the agent and how the agent makes decisions based on intent.
 ***
## 2. The Agent's Behavior: Voice, Speech & Interactions
The center panel is where you fine-tune the technical and behavioral aspects of your agent, especially for voice interactions.
### Voice Selection
As a voice-first platform, Intervo.ai gives you granular control over how your agent sounds.
***
## 2. The Agent's Behavior: Voice, Speech & Interactions
The center panel is where you fine-tune the technical and behavioral aspects of your agent, especially for voice interactions.
### Voice Selection
As a voice-first platform, Intervo.ai gives you granular control over how your agent sounds.
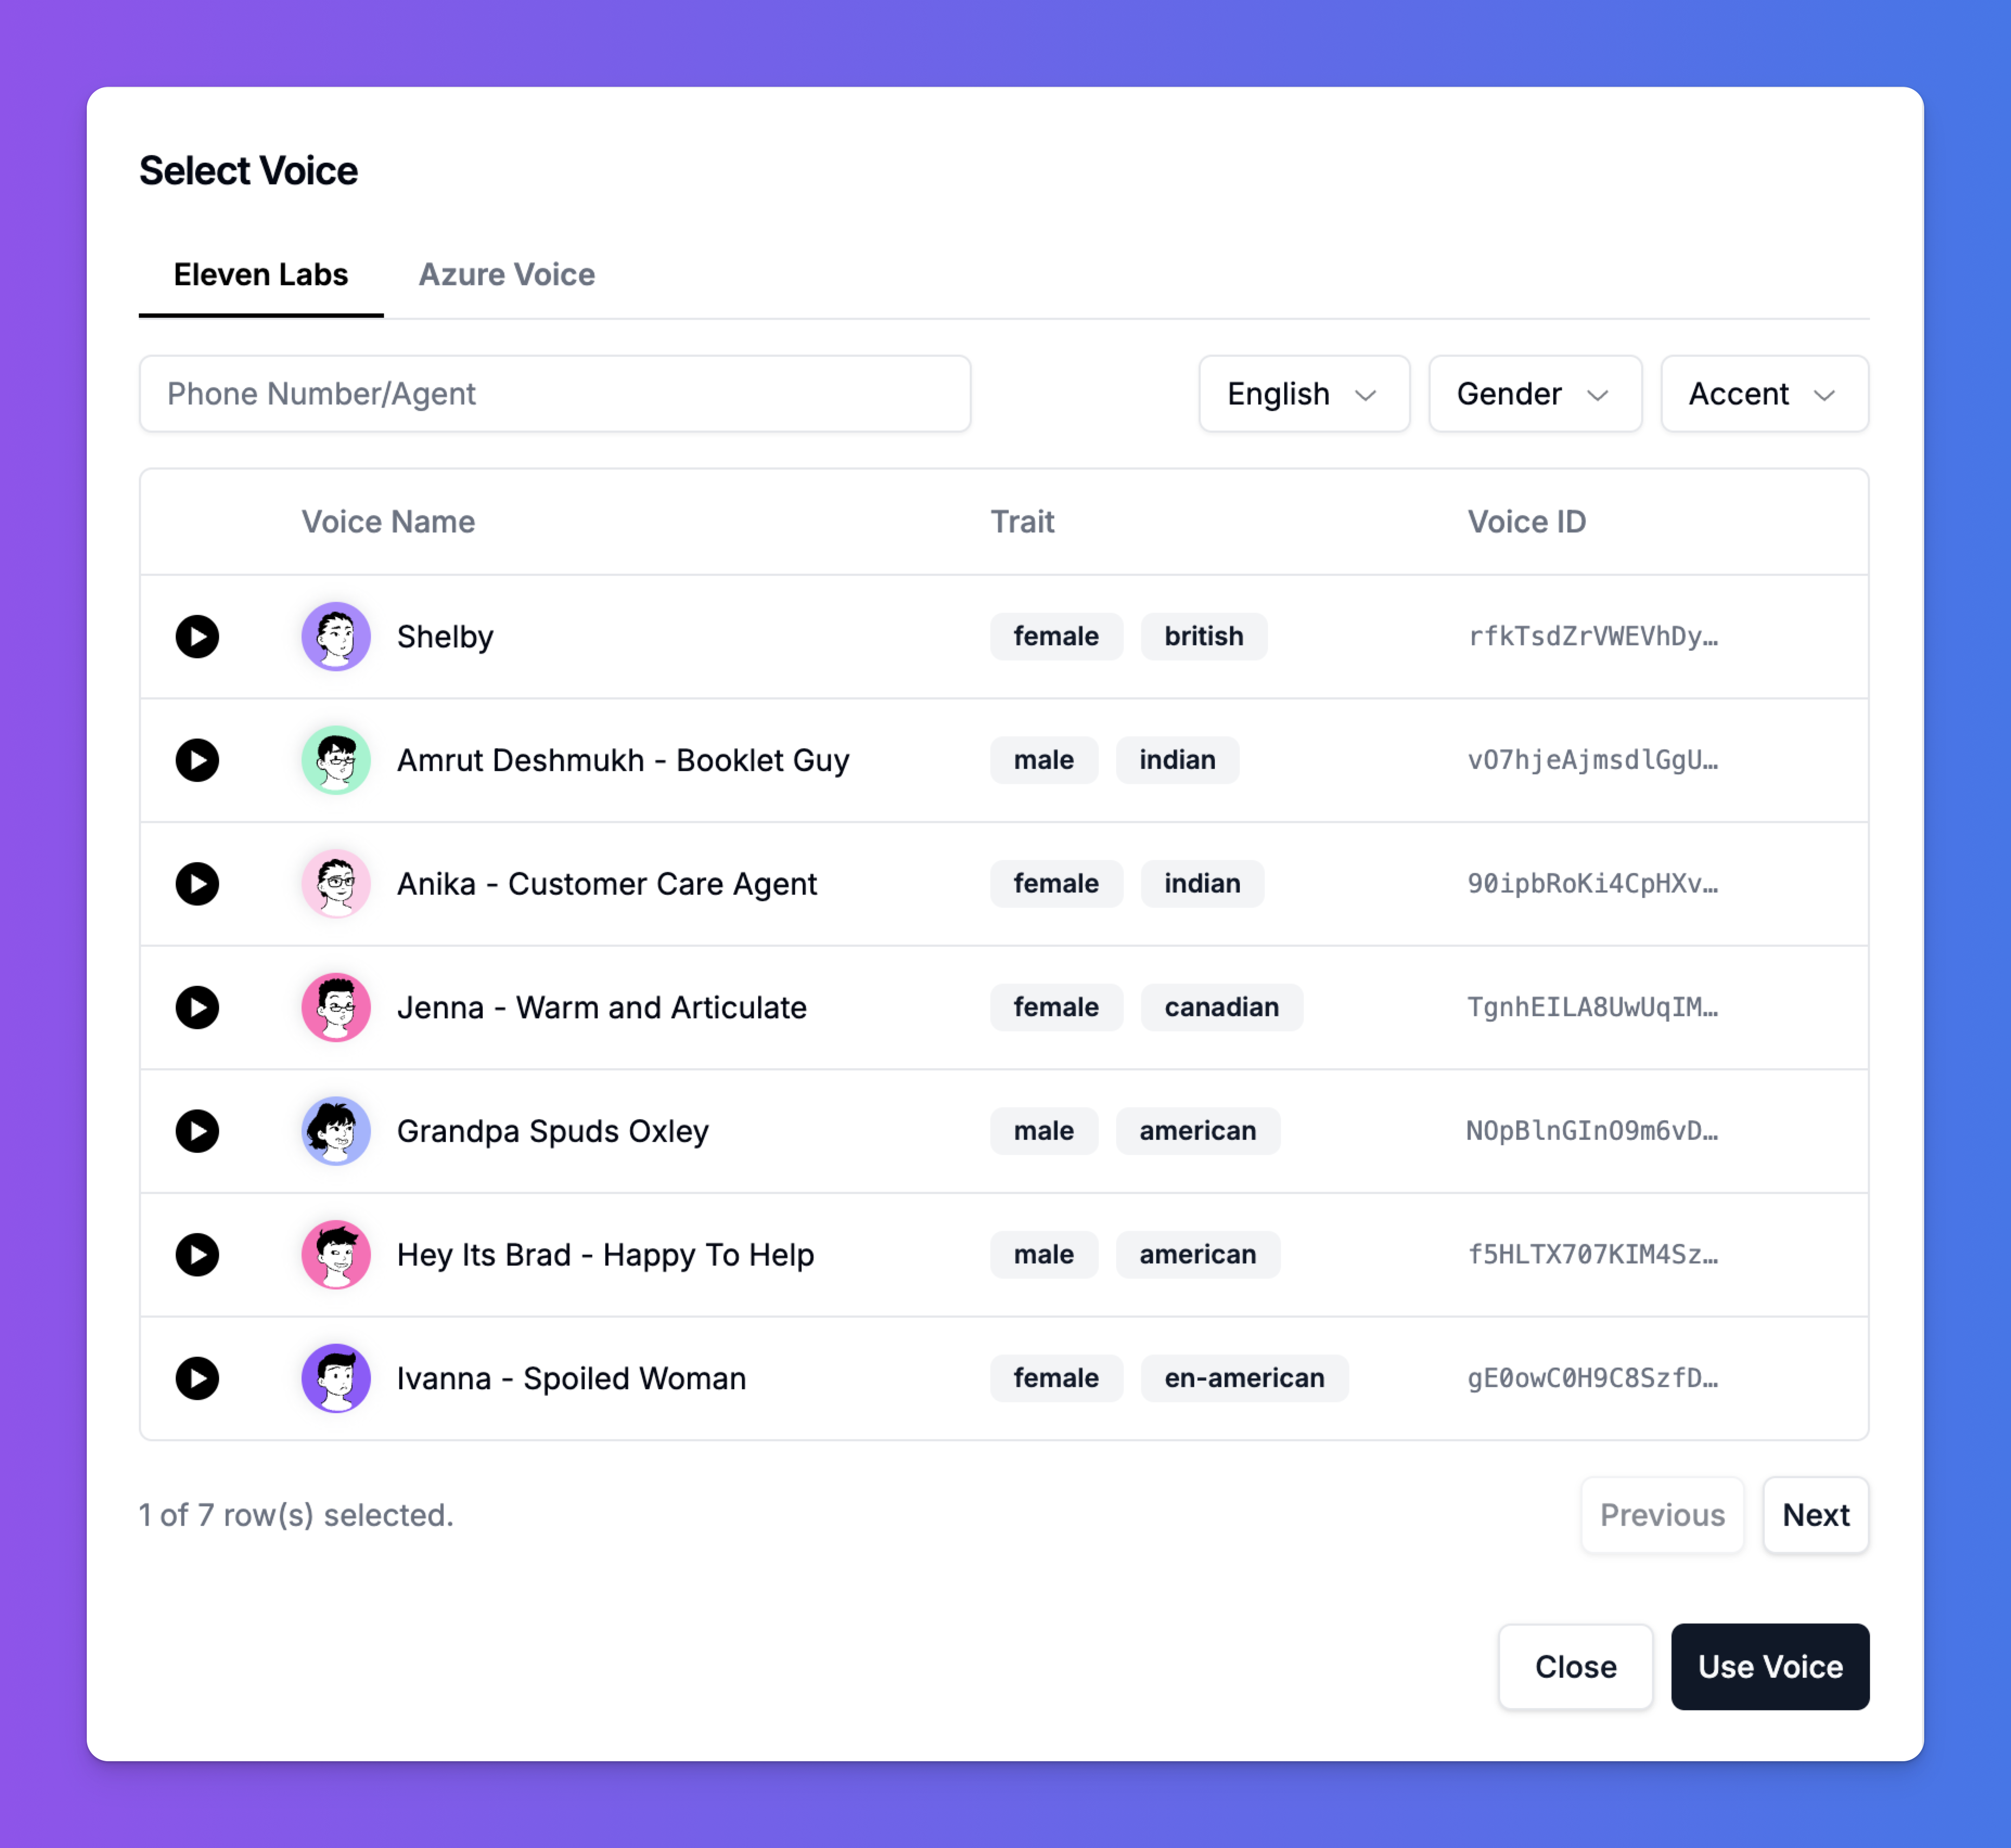
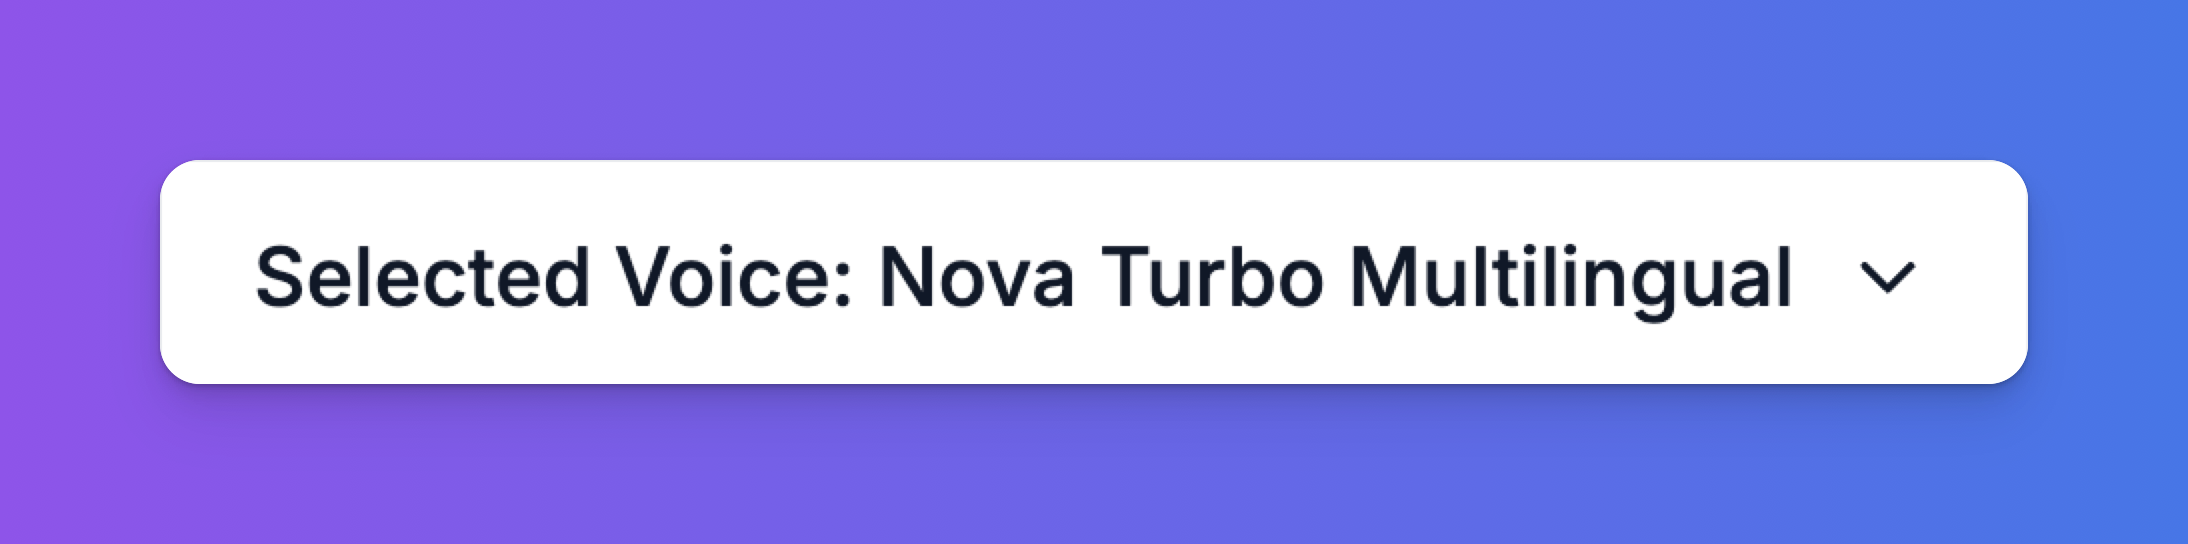 * **Main Voice Dropdown**: For a quick selection, use this dropdown at the top of the panel to choose a voice, such as "Nova Turbo Multilingual."
* **Detailed Voice Selection**: Clicking the dropdown opens a detailed modal where you can browse and filter voices from our partners, including **Eleven Labs** and **Azure Voice**. You can filter by:
* Language
* Gender
* Accent (e.g., British, Indian, American)
* Trait (e.g., female, canadian, male)
* You can preview each voice before selecting it by clicking the play icon.
* **Main Voice Dropdown**: For a quick selection, use this dropdown at the top of the panel to choose a voice, such as "Nova Turbo Multilingual."
* **Detailed Voice Selection**: Clicking the dropdown opens a detailed modal where you can browse and filter voices from our partners, including **Eleven Labs** and **Azure Voice**. You can filter by:
* Language
* Gender
* Accent (e.g., British, Indian, American)
* Trait (e.g., female, canadian, male)
* You can preview each voice before selecting it by clicking the play icon.
 ### Speech & Text Configuration
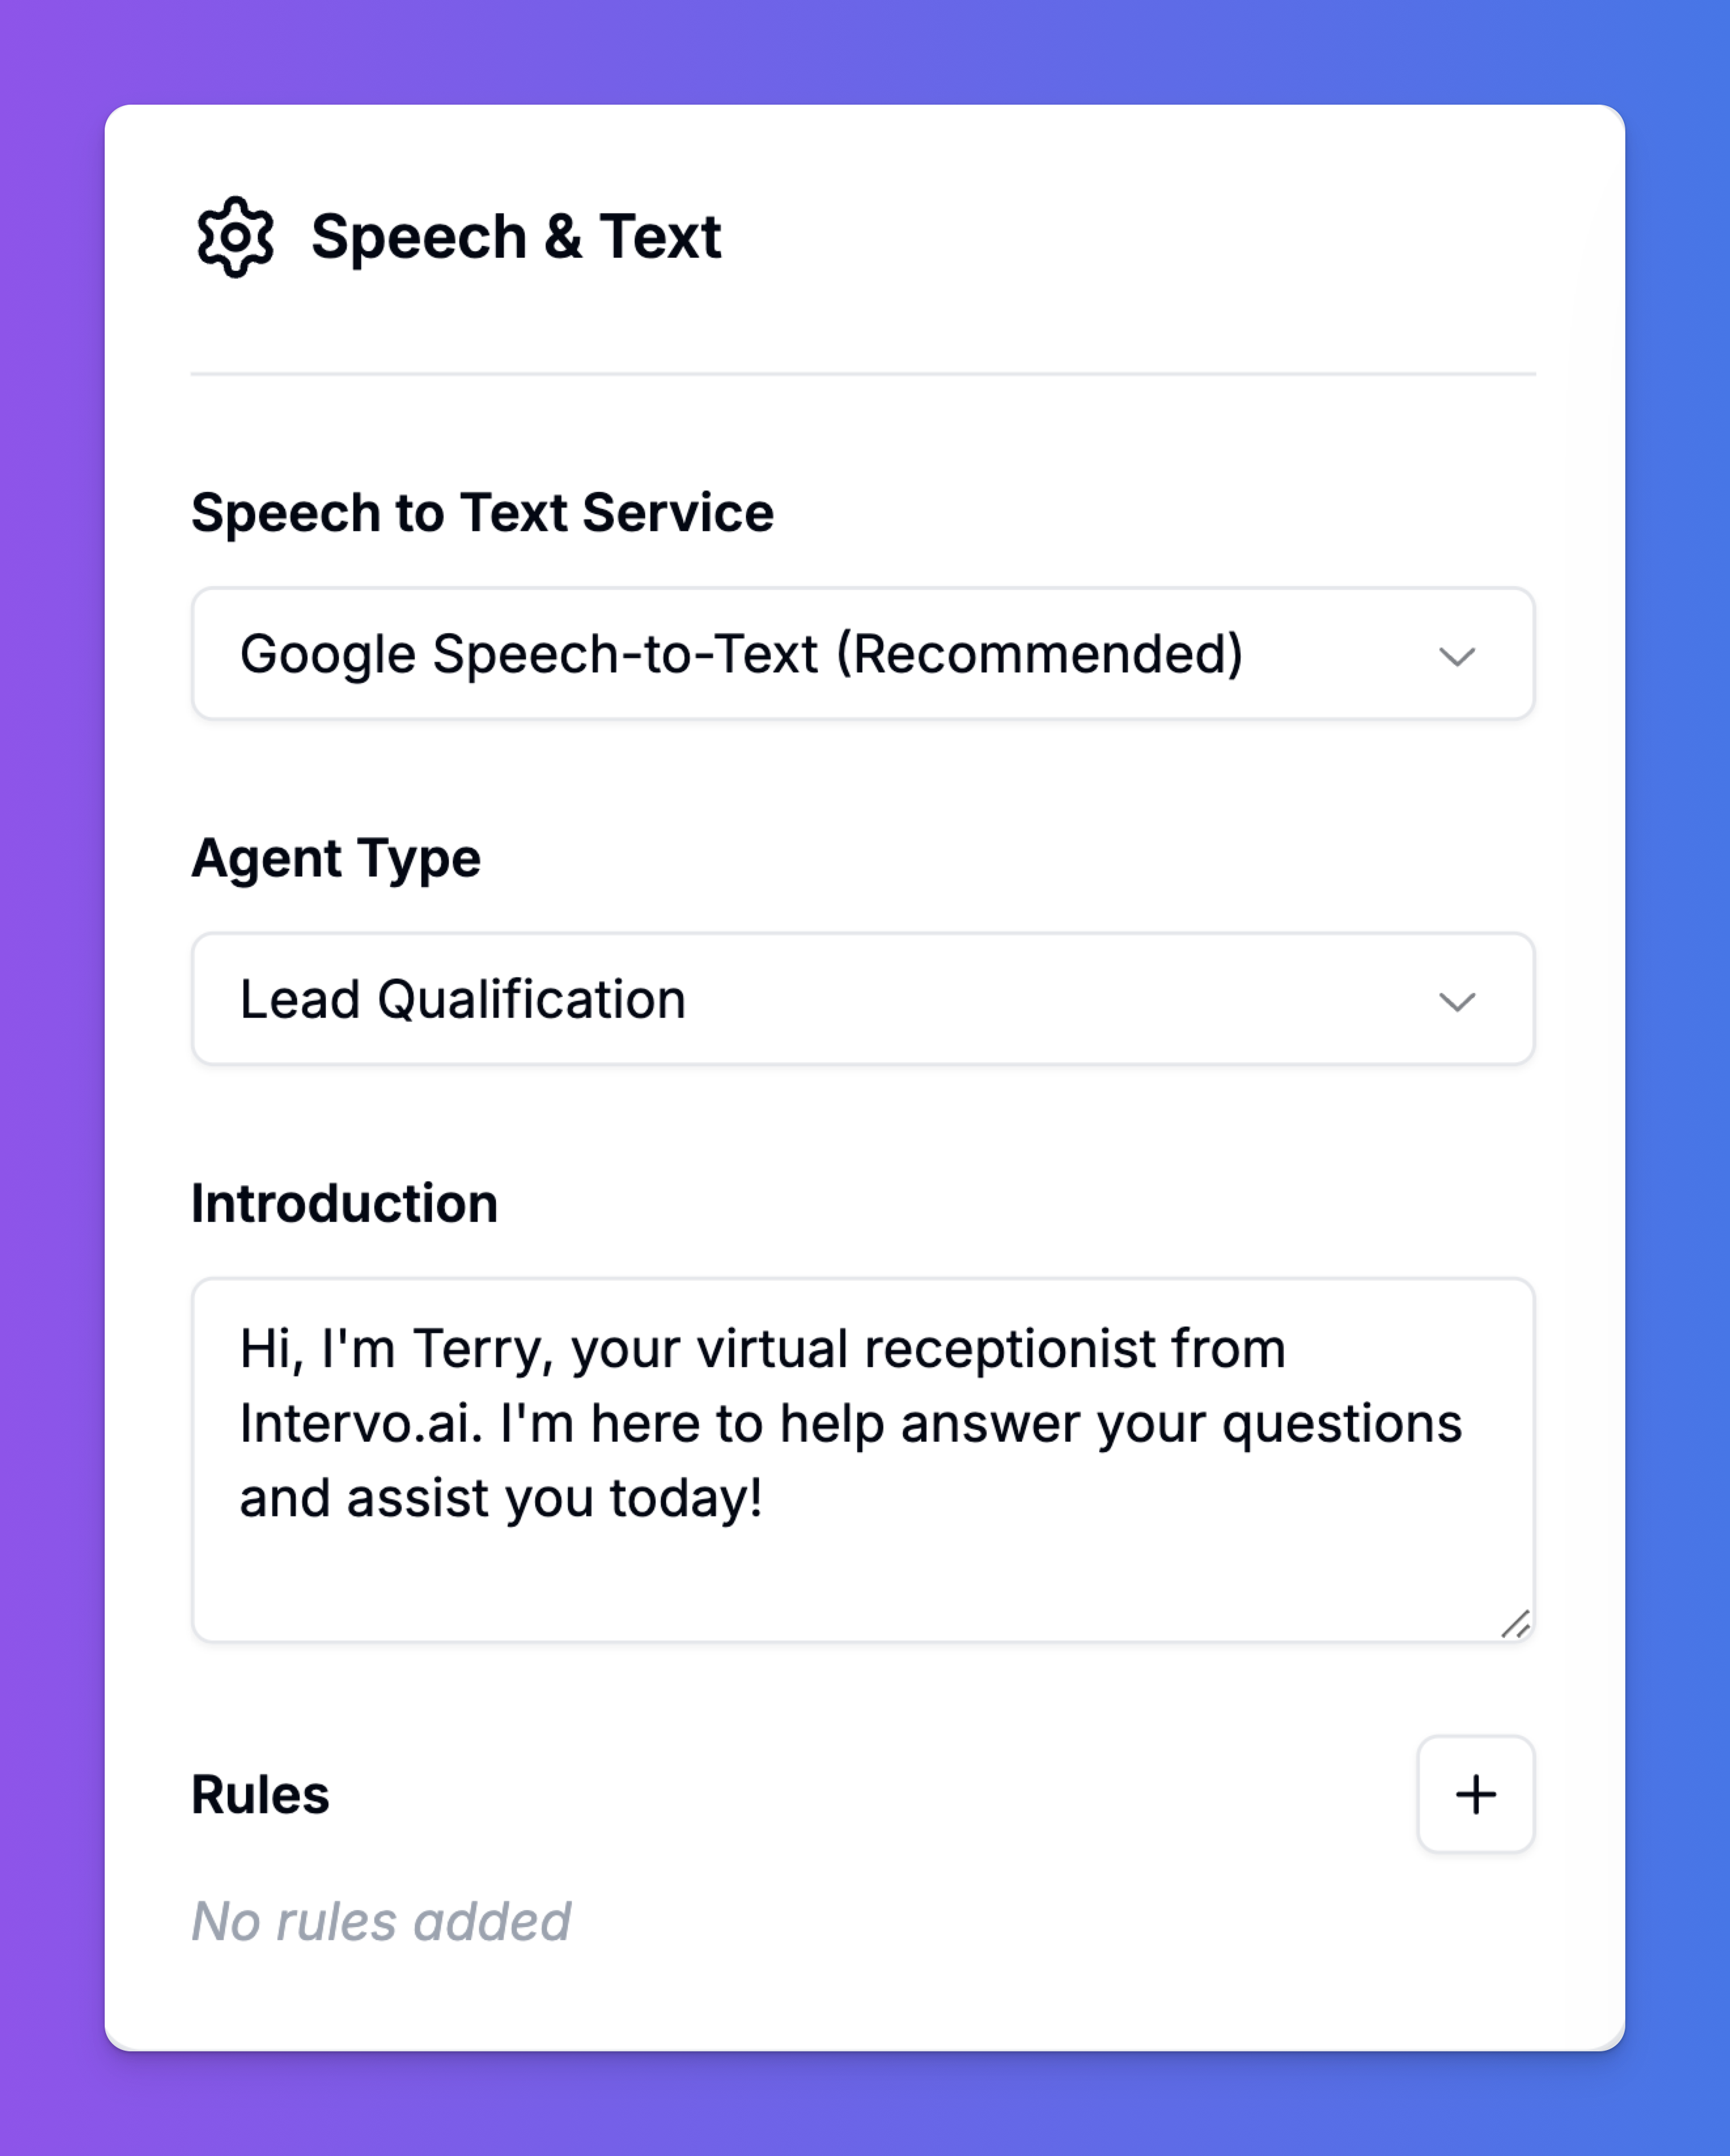
This section controls the technical aspects of speech processing.
* **Speech to Text Service**: Choose the engine that will transcribe the user's speech into text. We recommend **Google Speech-to-Text** for its high accuracy.
* **Agent Type**: This dropdown defines the agent's general purpose (e.g., Receptionist, Lead Qualification). Selecting a type applies a set of pre-configured best-practice settings to the workflow.
* **Introduction**: This is the opening line your agent will use to start a conversation. Craft a welcoming and clear introduction so the user knows who they are talking to and what the agent can do.
* **Rules**: Add specific, unbreakable rules for your agent here. This is useful for compliance or for ensuring the agent never performs certain actions.
### Speech & Text Configuration
This section controls the technical aspects of speech processing.
* **Speech to Text Service**: Choose the engine that will transcribe the user's speech into text. We recommend **Google Speech-to-Text** for its high accuracy.
* **Agent Type**: This dropdown defines the agent's general purpose (e.g., Receptionist, Lead Qualification). Selecting a type applies a set of pre-configured best-practice settings to the workflow.
* **Introduction**: This is the opening line your agent will use to start a conversation. Craft a welcoming and clear introduction so the user knows who they are talking to and what the agent can do.
* **Rules**: Add specific, unbreakable rules for your agent here. This is useful for compliance or for ensuring the agent never performs certain actions.
 ### Interaction Settings
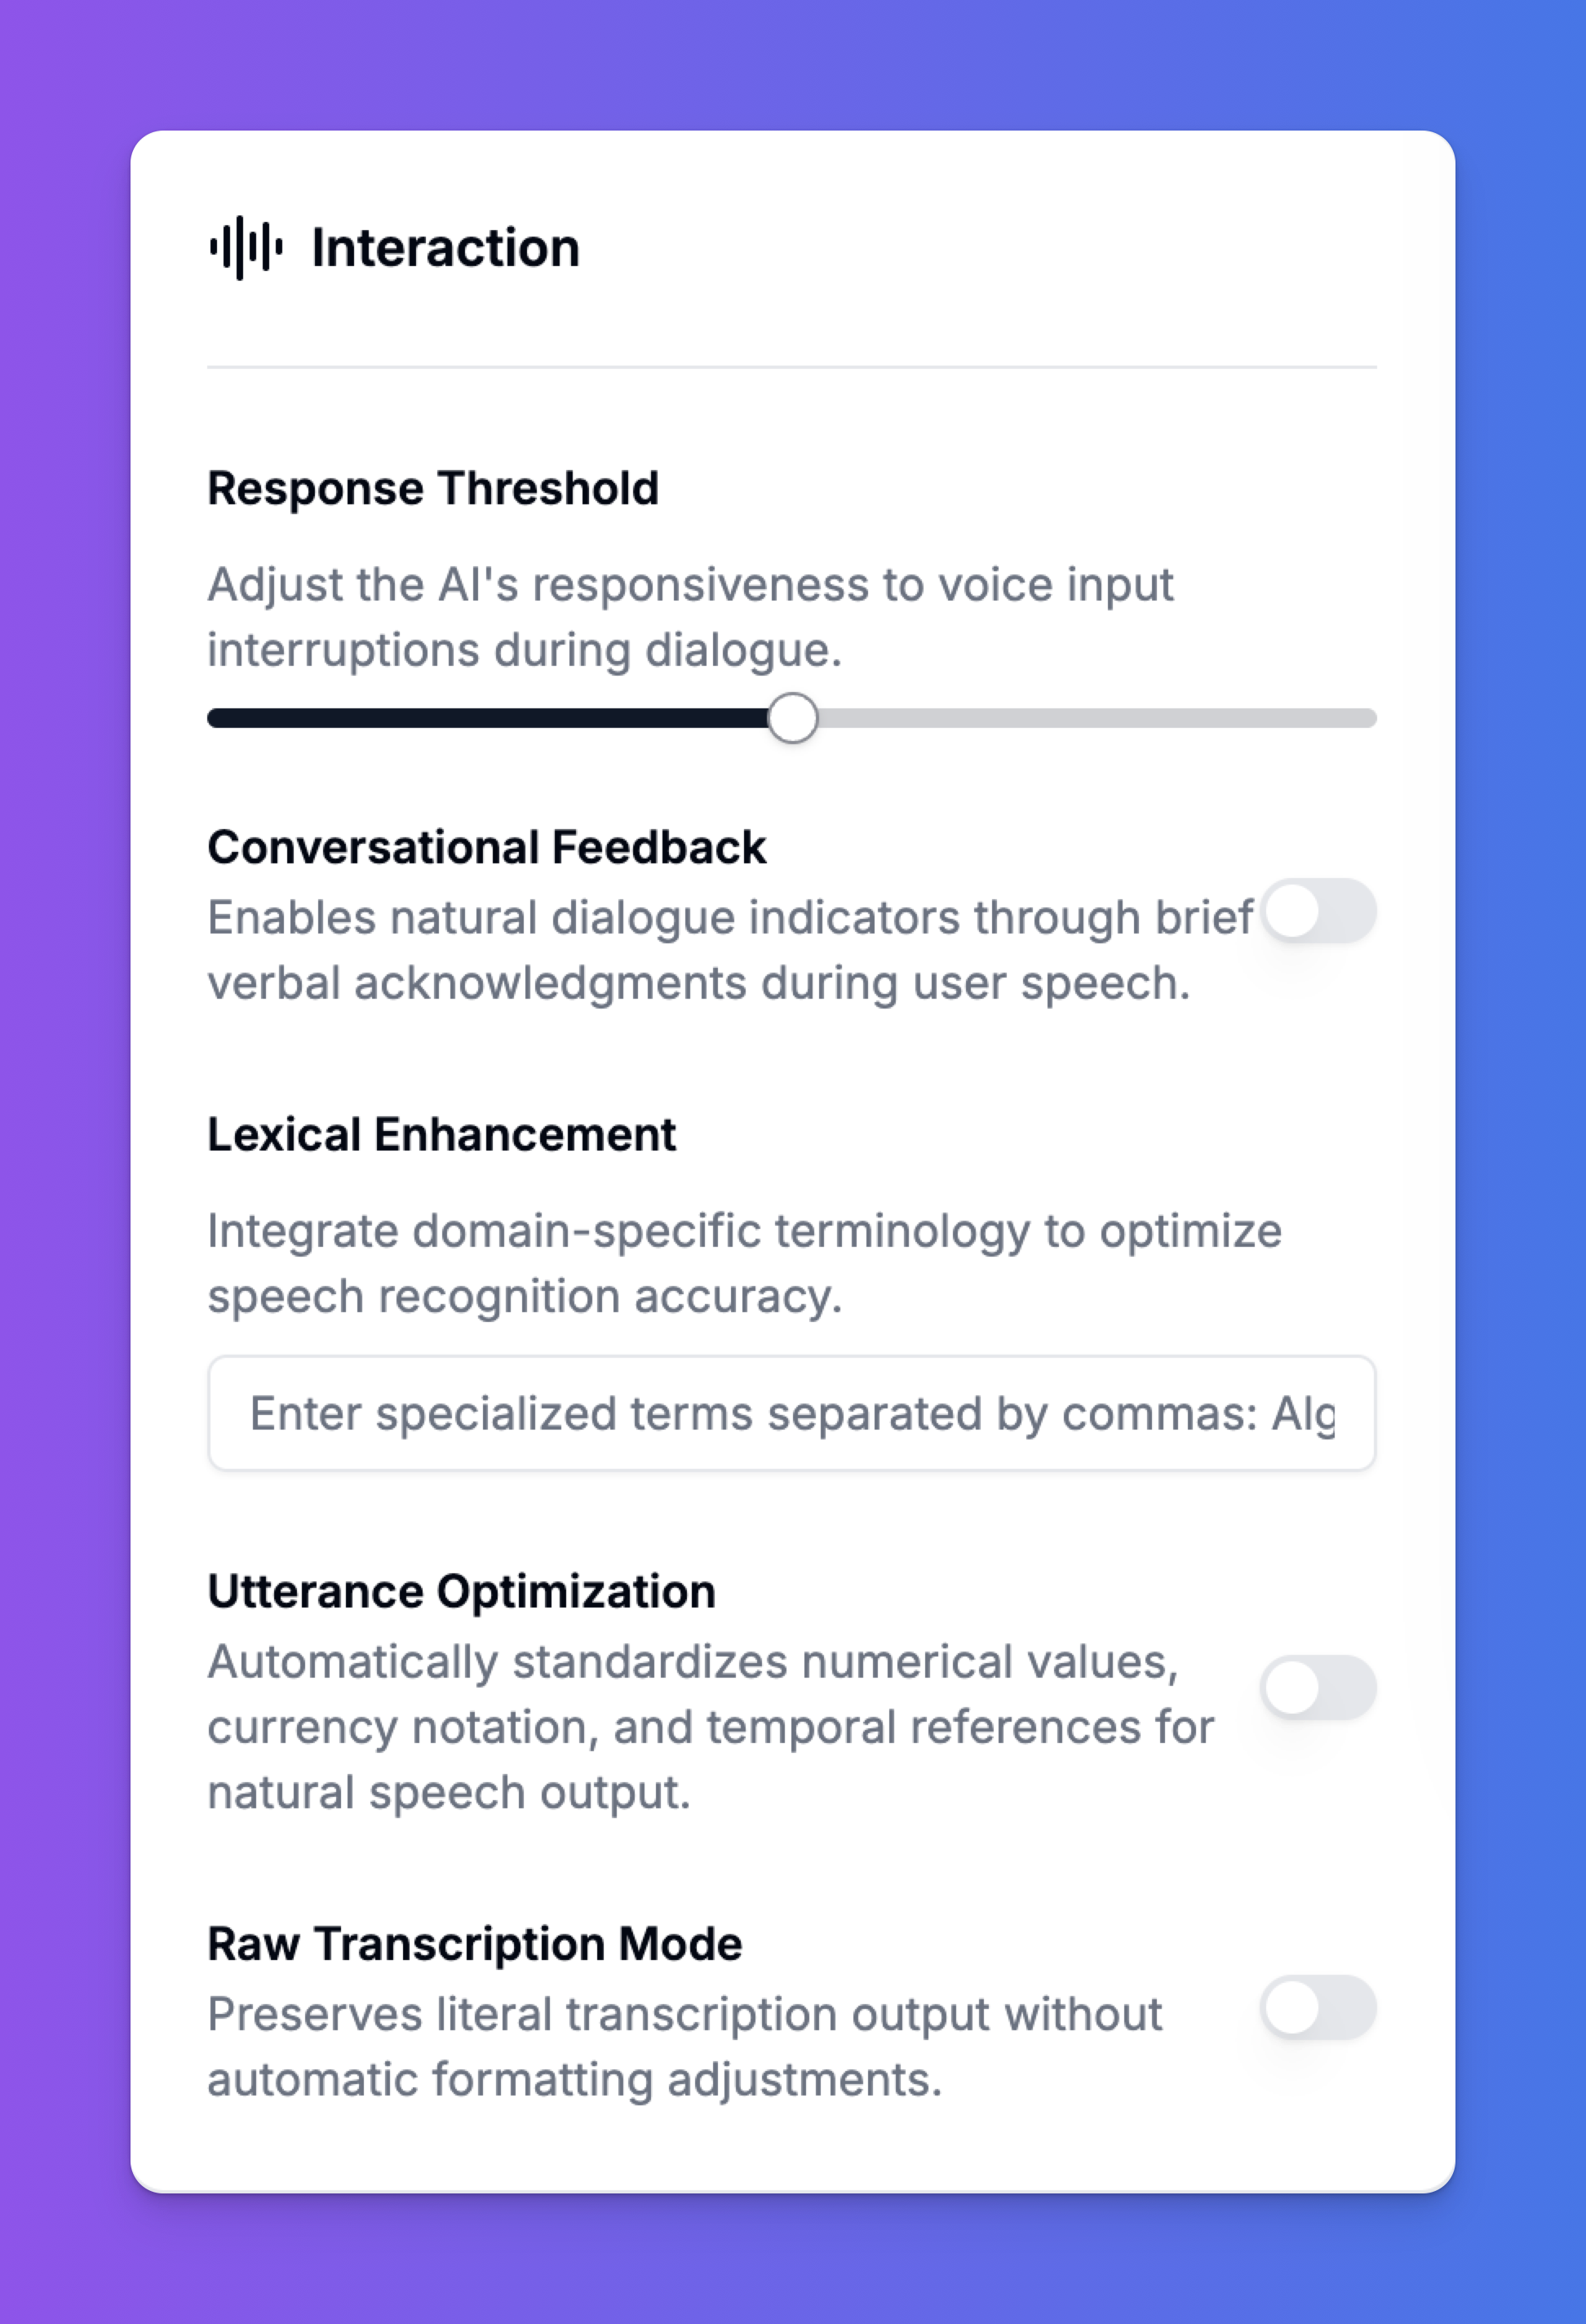
These advanced settings are crucial for creating a natural and fluid voice conversation.
* **Response Threshold**: This slider adjusts how quickly the agent responds to interruptions. A lower threshold makes the agent more patient, while a higher threshold allows it to be interrupted more easily.
* **Conversational Feedback**: Enable this to allow the agent to use brief verbal acknowledgments (e.g., "uh-huh," "I see") while the user is speaking. This makes the conversation feel more natural and engaging.
* **Lexical Enhancement**: If your business uses specific jargon, acronyms, or technical terms, enter them here, separated by commas. This helps the Speech-to-Text engine recognize them accurately.
* **Utterance Optimization**: When enabled, this automatically standardizes how the agent speaks numerical values, currency, and dates for a more natural and consistent speech output.
* **Raw Transcription Mode**: This mode preserves the literal transcription output without any automatic formatting. It's useful for specific use cases where you need the exact, unedited text.
### Interaction Settings
These advanced settings are crucial for creating a natural and fluid voice conversation.
* **Response Threshold**: This slider adjusts how quickly the agent responds to interruptions. A lower threshold makes the agent more patient, while a higher threshold allows it to be interrupted more easily.
* **Conversational Feedback**: Enable this to allow the agent to use brief verbal acknowledgments (e.g., "uh-huh," "I see") while the user is speaking. This makes the conversation feel more natural and engaging.
* **Lexical Enhancement**: If your business uses specific jargon, acronyms, or technical terms, enter them here, separated by commas. This helps the Speech-to-Text engine recognize them accurately.
* **Utterance Optimization**: When enabled, this automatically standardizes how the agent speaks numerical values, currency, and dates for a more natural and consistent speech output.
* **Raw Transcription Mode**: This mode preserves the literal transcription output without any automatic formatting. It's useful for specific use cases where you need the exact, unedited text.
 ***
## 3. Live Preview and Publishing
The right-hand panel is your testing ground.
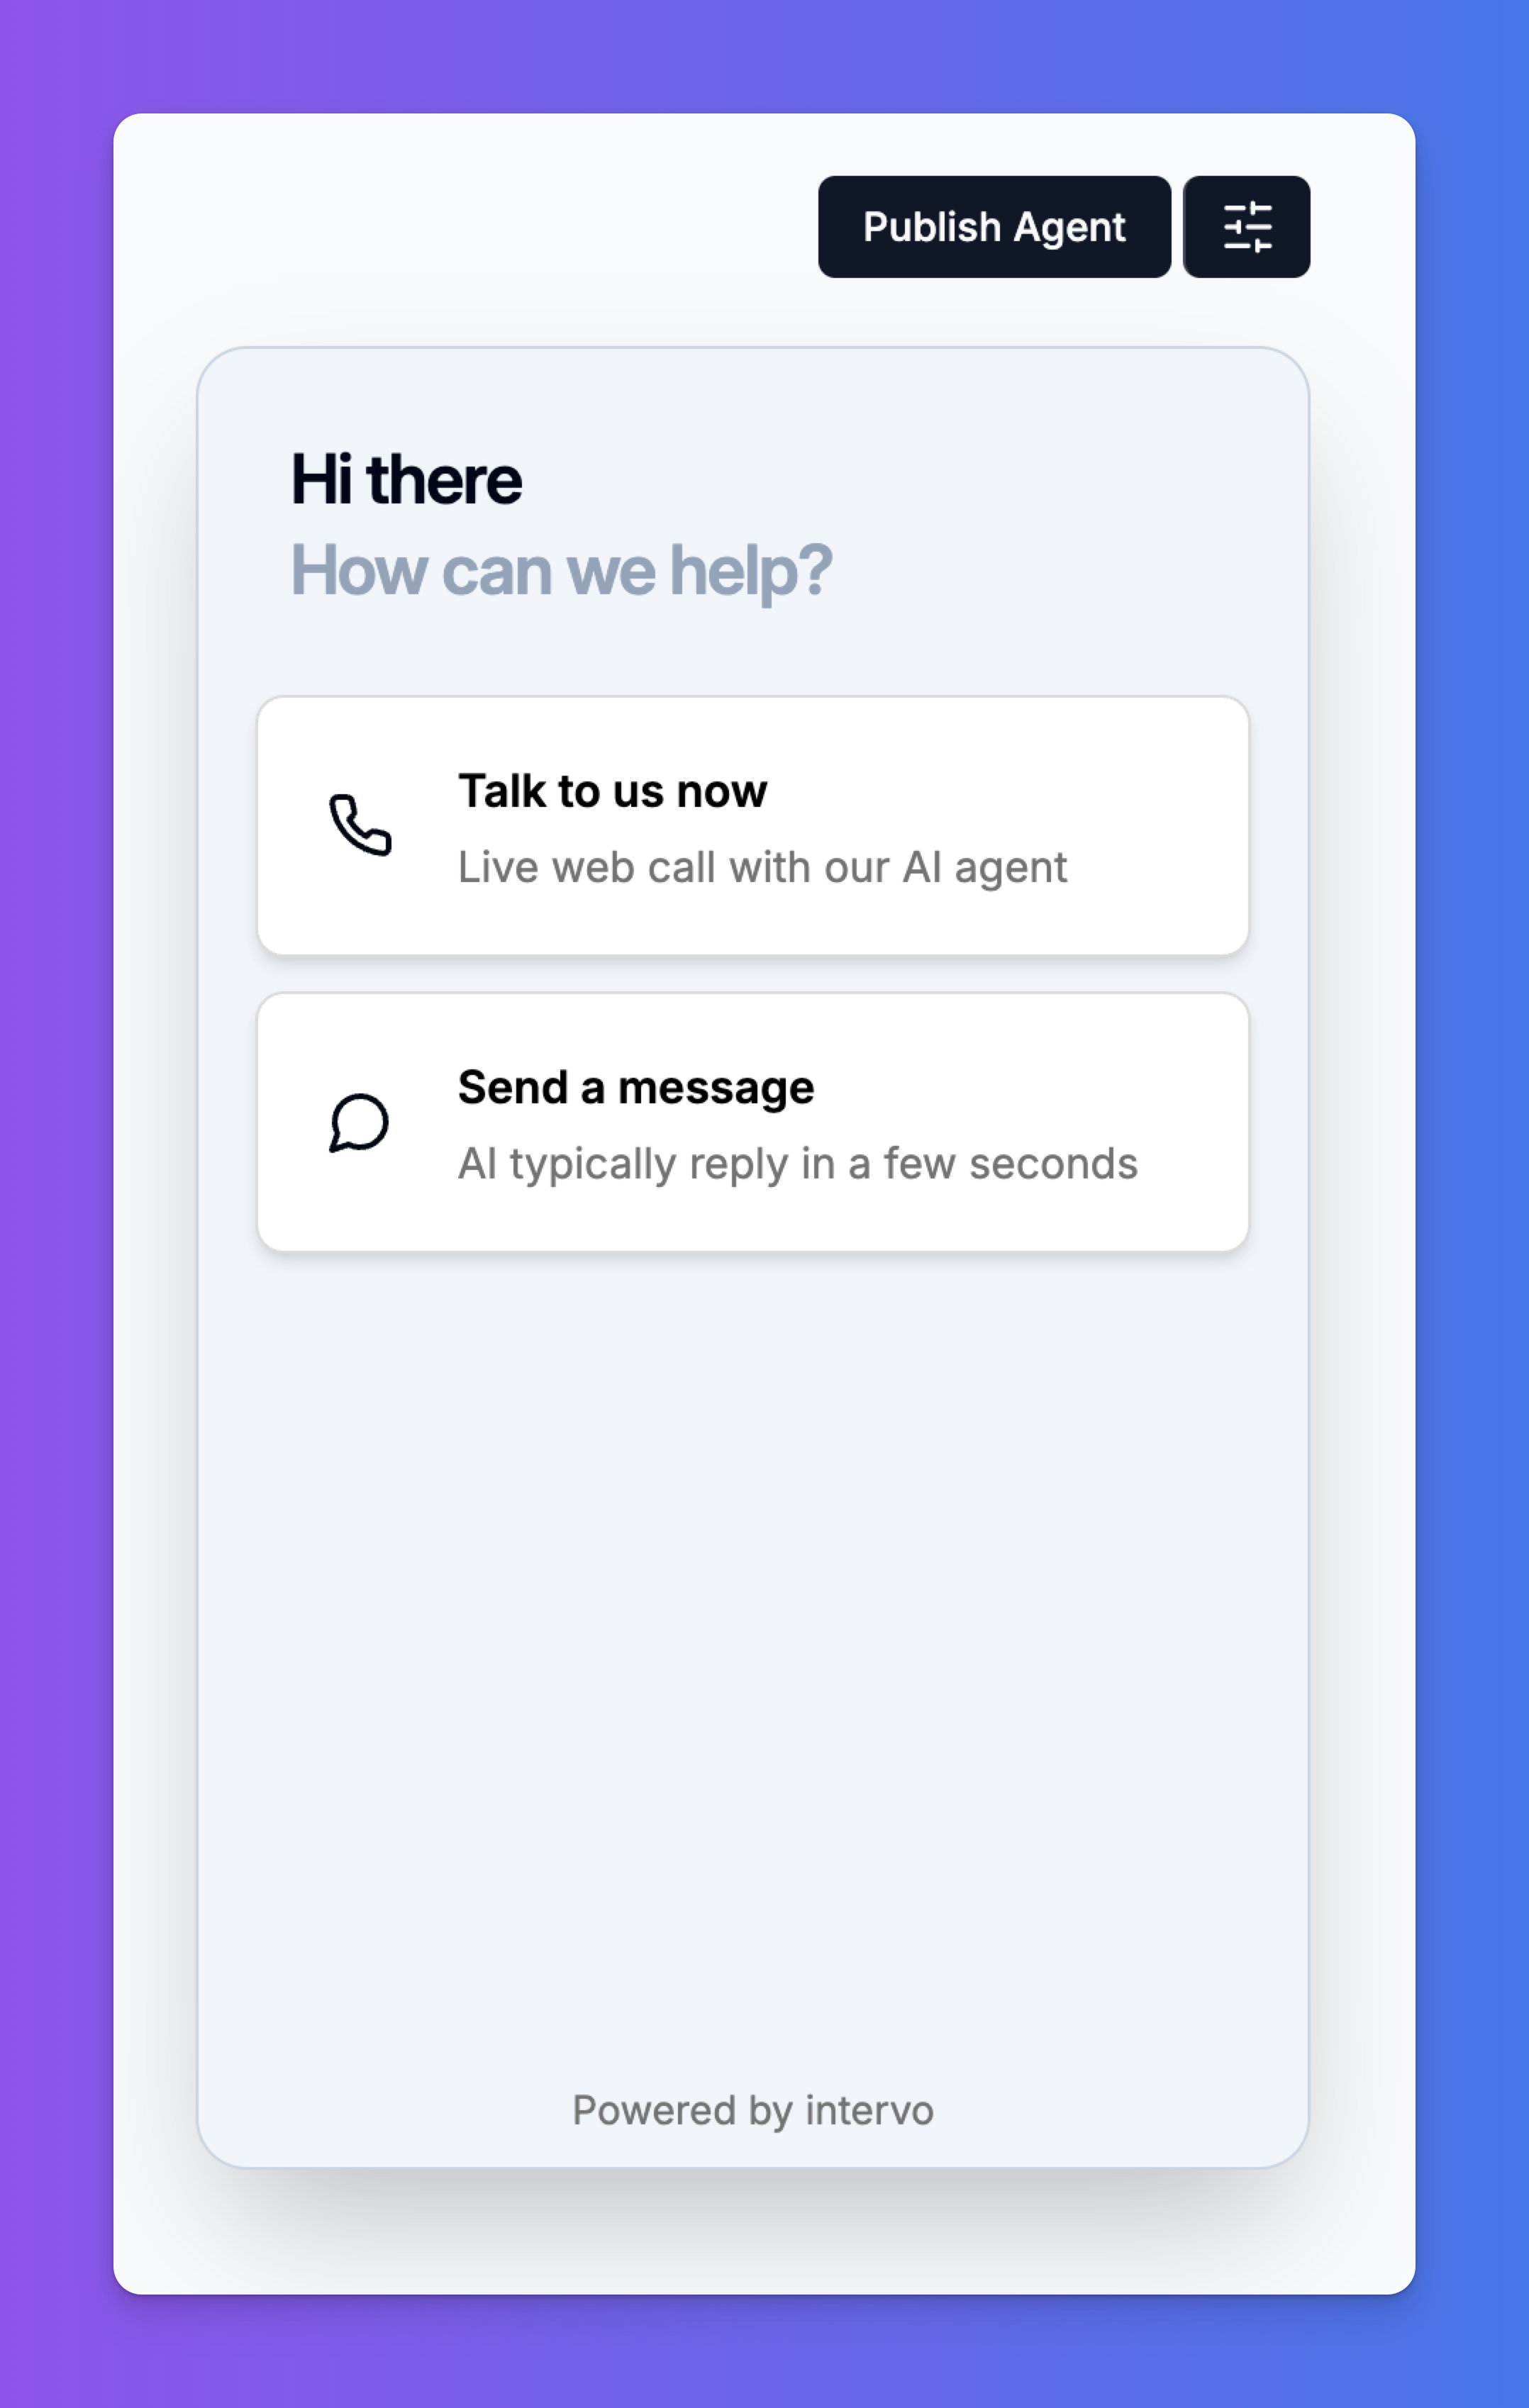
* **Preview Window**: Interact with your agent using voice or text. Test its responses to various questions, check its tone, and see how it handles interruptions. The preview reflects your settings in real-time.
* **Publish Agent**: Once you are satisfied with your agent's configuration and performance, click this button at the top right. This will save all your changes and deploy the updated version to its designated channels (widget, phone, etc.).
***
## 3. Live Preview and Publishing
The right-hand panel is your testing ground.
* **Preview Window**: Interact with your agent using voice or text. Test its responses to various questions, check its tone, and see how it handles interruptions. The preview reflects your settings in real-time.
* **Publish Agent**: Once you are satisfied with your agent's configuration and performance, click this button at the top right. This will save all your changes and deploy the updated version to its designated channels (widget, phone, etc.).
 By mastering the Agent Playground, you can create highly customized, intelligent, and natural-sounding AI agents that meet the unique needs of your business.
# Creating An Agent
Source: https://docs.intervo.ai/creating-an-ai-agent
A step-by-step guide to creating, configuring, and training a new AI voice and chat agent in Intervo.ai.
# Tutorial: Creating Your First AI Agent
Welcome to Intervo.ai! This guide will walk you through the entire process of creating your first intelligent AI Agent. The process is broken down into three main stages: **Agent Setup**, defining the **Prompt**, and building its **Knowledge**.
Let's get started.
***
### Step 1: Choose Your Agent Type
First, navigate to the "Agents" section in your dashboard and click on **"Create a new Agent"**. You will be presented with a selection of templates to get you started quickly.
By mastering the Agent Playground, you can create highly customized, intelligent, and natural-sounding AI agents that meet the unique needs of your business.
# Creating An Agent
Source: https://docs.intervo.ai/creating-an-ai-agent
A step-by-step guide to creating, configuring, and training a new AI voice and chat agent in Intervo.ai.
# Tutorial: Creating Your First AI Agent
Welcome to Intervo.ai! This guide will walk you through the entire process of creating your first intelligent AI Agent. The process is broken down into three main stages: **Agent Setup**, defining the **Prompt**, and building its **Knowledge**.
Let's get started.
***
### Step 1: Choose Your Agent Type
First, navigate to the "Agents" section in your dashboard and click on **"Create a new Agent"**. You will be presented with a selection of templates to get you started quickly.
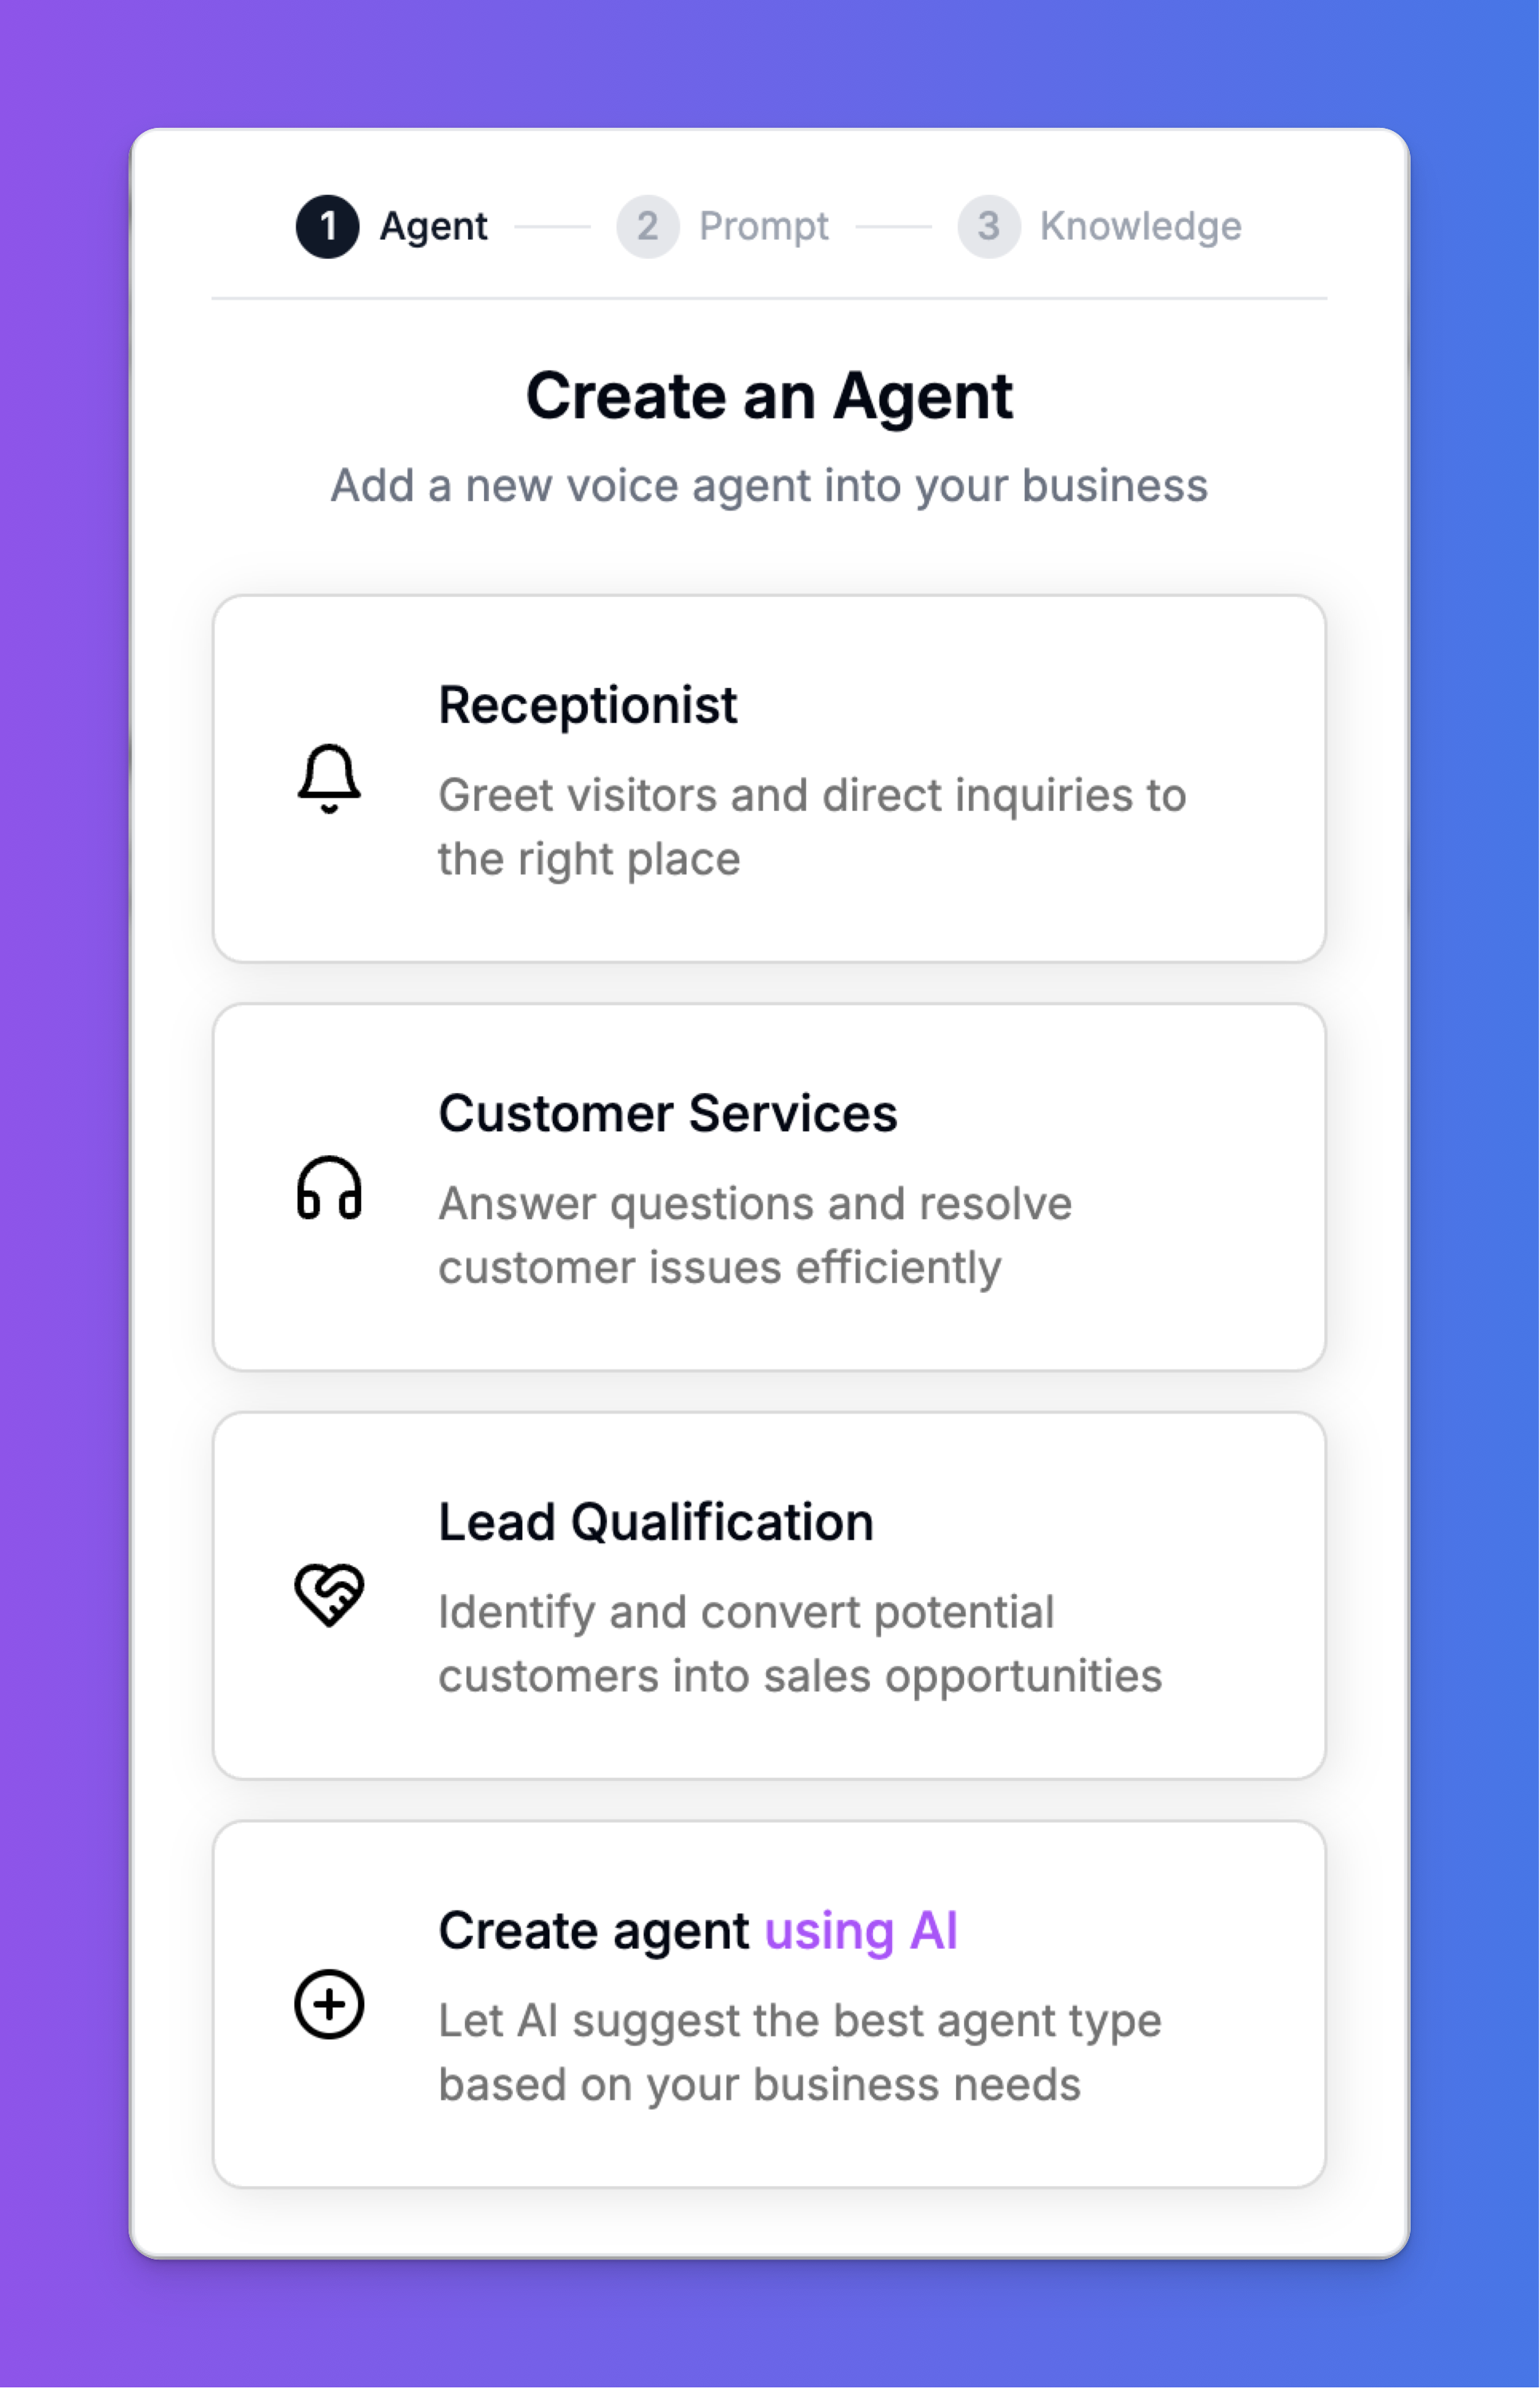 You have a few options:
* **Receptionist**: Ideal for agents that greet visitors and direct inquiries.
* **Customer Services**: Designed for agents that answer questions and help resolve issues.
* **Lead Qualification**: Tailored for agents that identify and convert potential customers.
* **Create agent using AI**: If you're unsure, let our AI analyze your business needs and suggest the best agent type for you.
For this tutorial, we will select **Receptionist**.
***
### Step 2: Configure Your Agent's Basic Details
After selecting a type, you'll need to configure the agent's core settings.
You have a few options:
* **Receptionist**: Ideal for agents that greet visitors and direct inquiries.
* **Customer Services**: Designed for agents that answer questions and help resolve issues.
* **Lead Qualification**: Tailored for agents that identify and convert potential customers.
* **Create agent using AI**: If you're unsure, let our AI analyze your business needs and suggest the best agent type for you.
For this tutorial, we will select **Receptionist**.
***
### Step 2: Configure Your Agent's Basic Details
After selecting a type, you'll need to configure the agent's core settings.
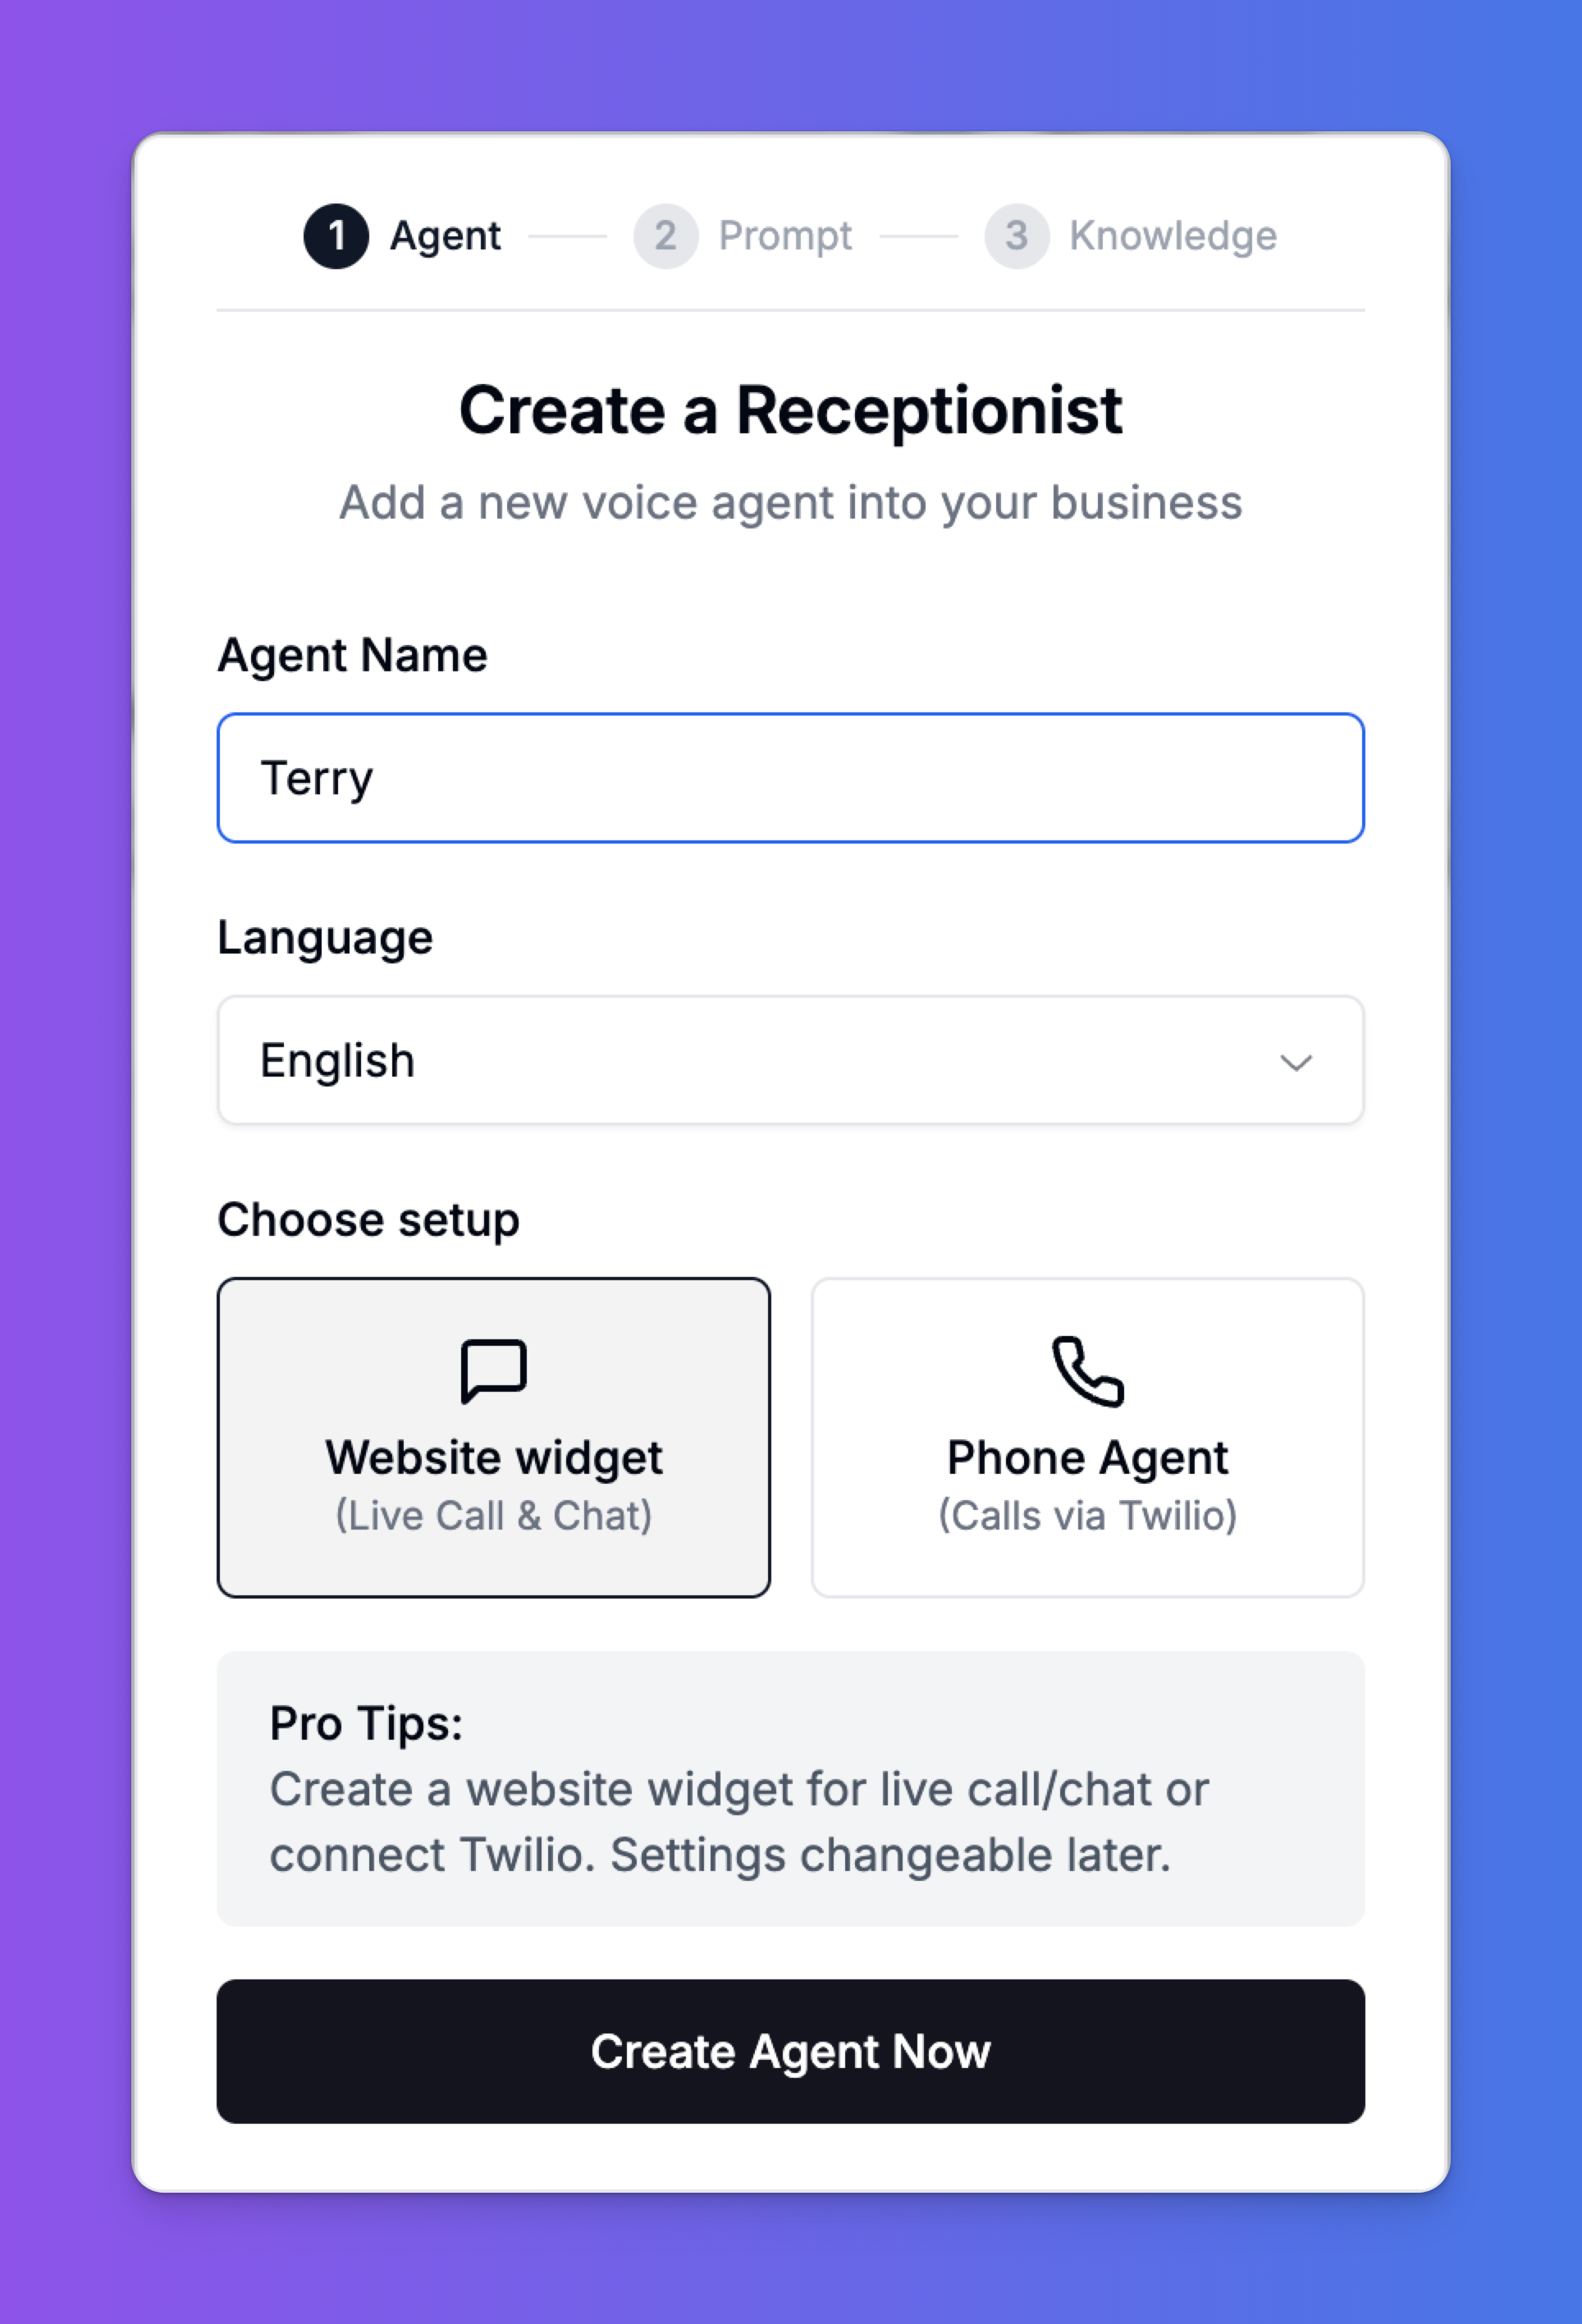 1. **Agent Name**: Give your agent a memorable name. This is for your internal reference. Let's call ours "Tanny".
2. **Language**: Select the primary language your agent will communicate in. We'll choose "English".
3. **Choose Setup**: Select how you want to deploy this agent.
* **Website widget**: This will create a widget you can embed on your site for live call and chat functionality.
* **Phone Agent (Calls via Twilio)**: This will connect your agent to a phone number to handle calls.
> **Pro Tip:** You can start with a Website Widget and connect it to Twilio later. Settings are always changeable.
Once you have filled in the details, click **"Create Agent Now"**.
***
### Step 3: Craft the Agent's Core Prompt
Next, you will define the agent's personality and primary objective. The prompt is the core set of instructions the AI follows in every conversation.
1. **Agent Name**: Give your agent a memorable name. This is for your internal reference. Let's call ours "Tanny".
2. **Language**: Select the primary language your agent will communicate in. We'll choose "English".
3. **Choose Setup**: Select how you want to deploy this agent.
* **Website widget**: This will create a widget you can embed on your site for live call and chat functionality.
* **Phone Agent (Calls via Twilio)**: This will connect your agent to a phone number to handle calls.
> **Pro Tip:** You can start with a Website Widget and connect it to Twilio later. Settings are always changeable.
Once you have filled in the details, click **"Create Agent Now"**.
***
### Step 3: Craft the Agent's Core Prompt
Next, you will define the agent's personality and primary objective. The prompt is the core set of instructions the AI follows in every conversation.
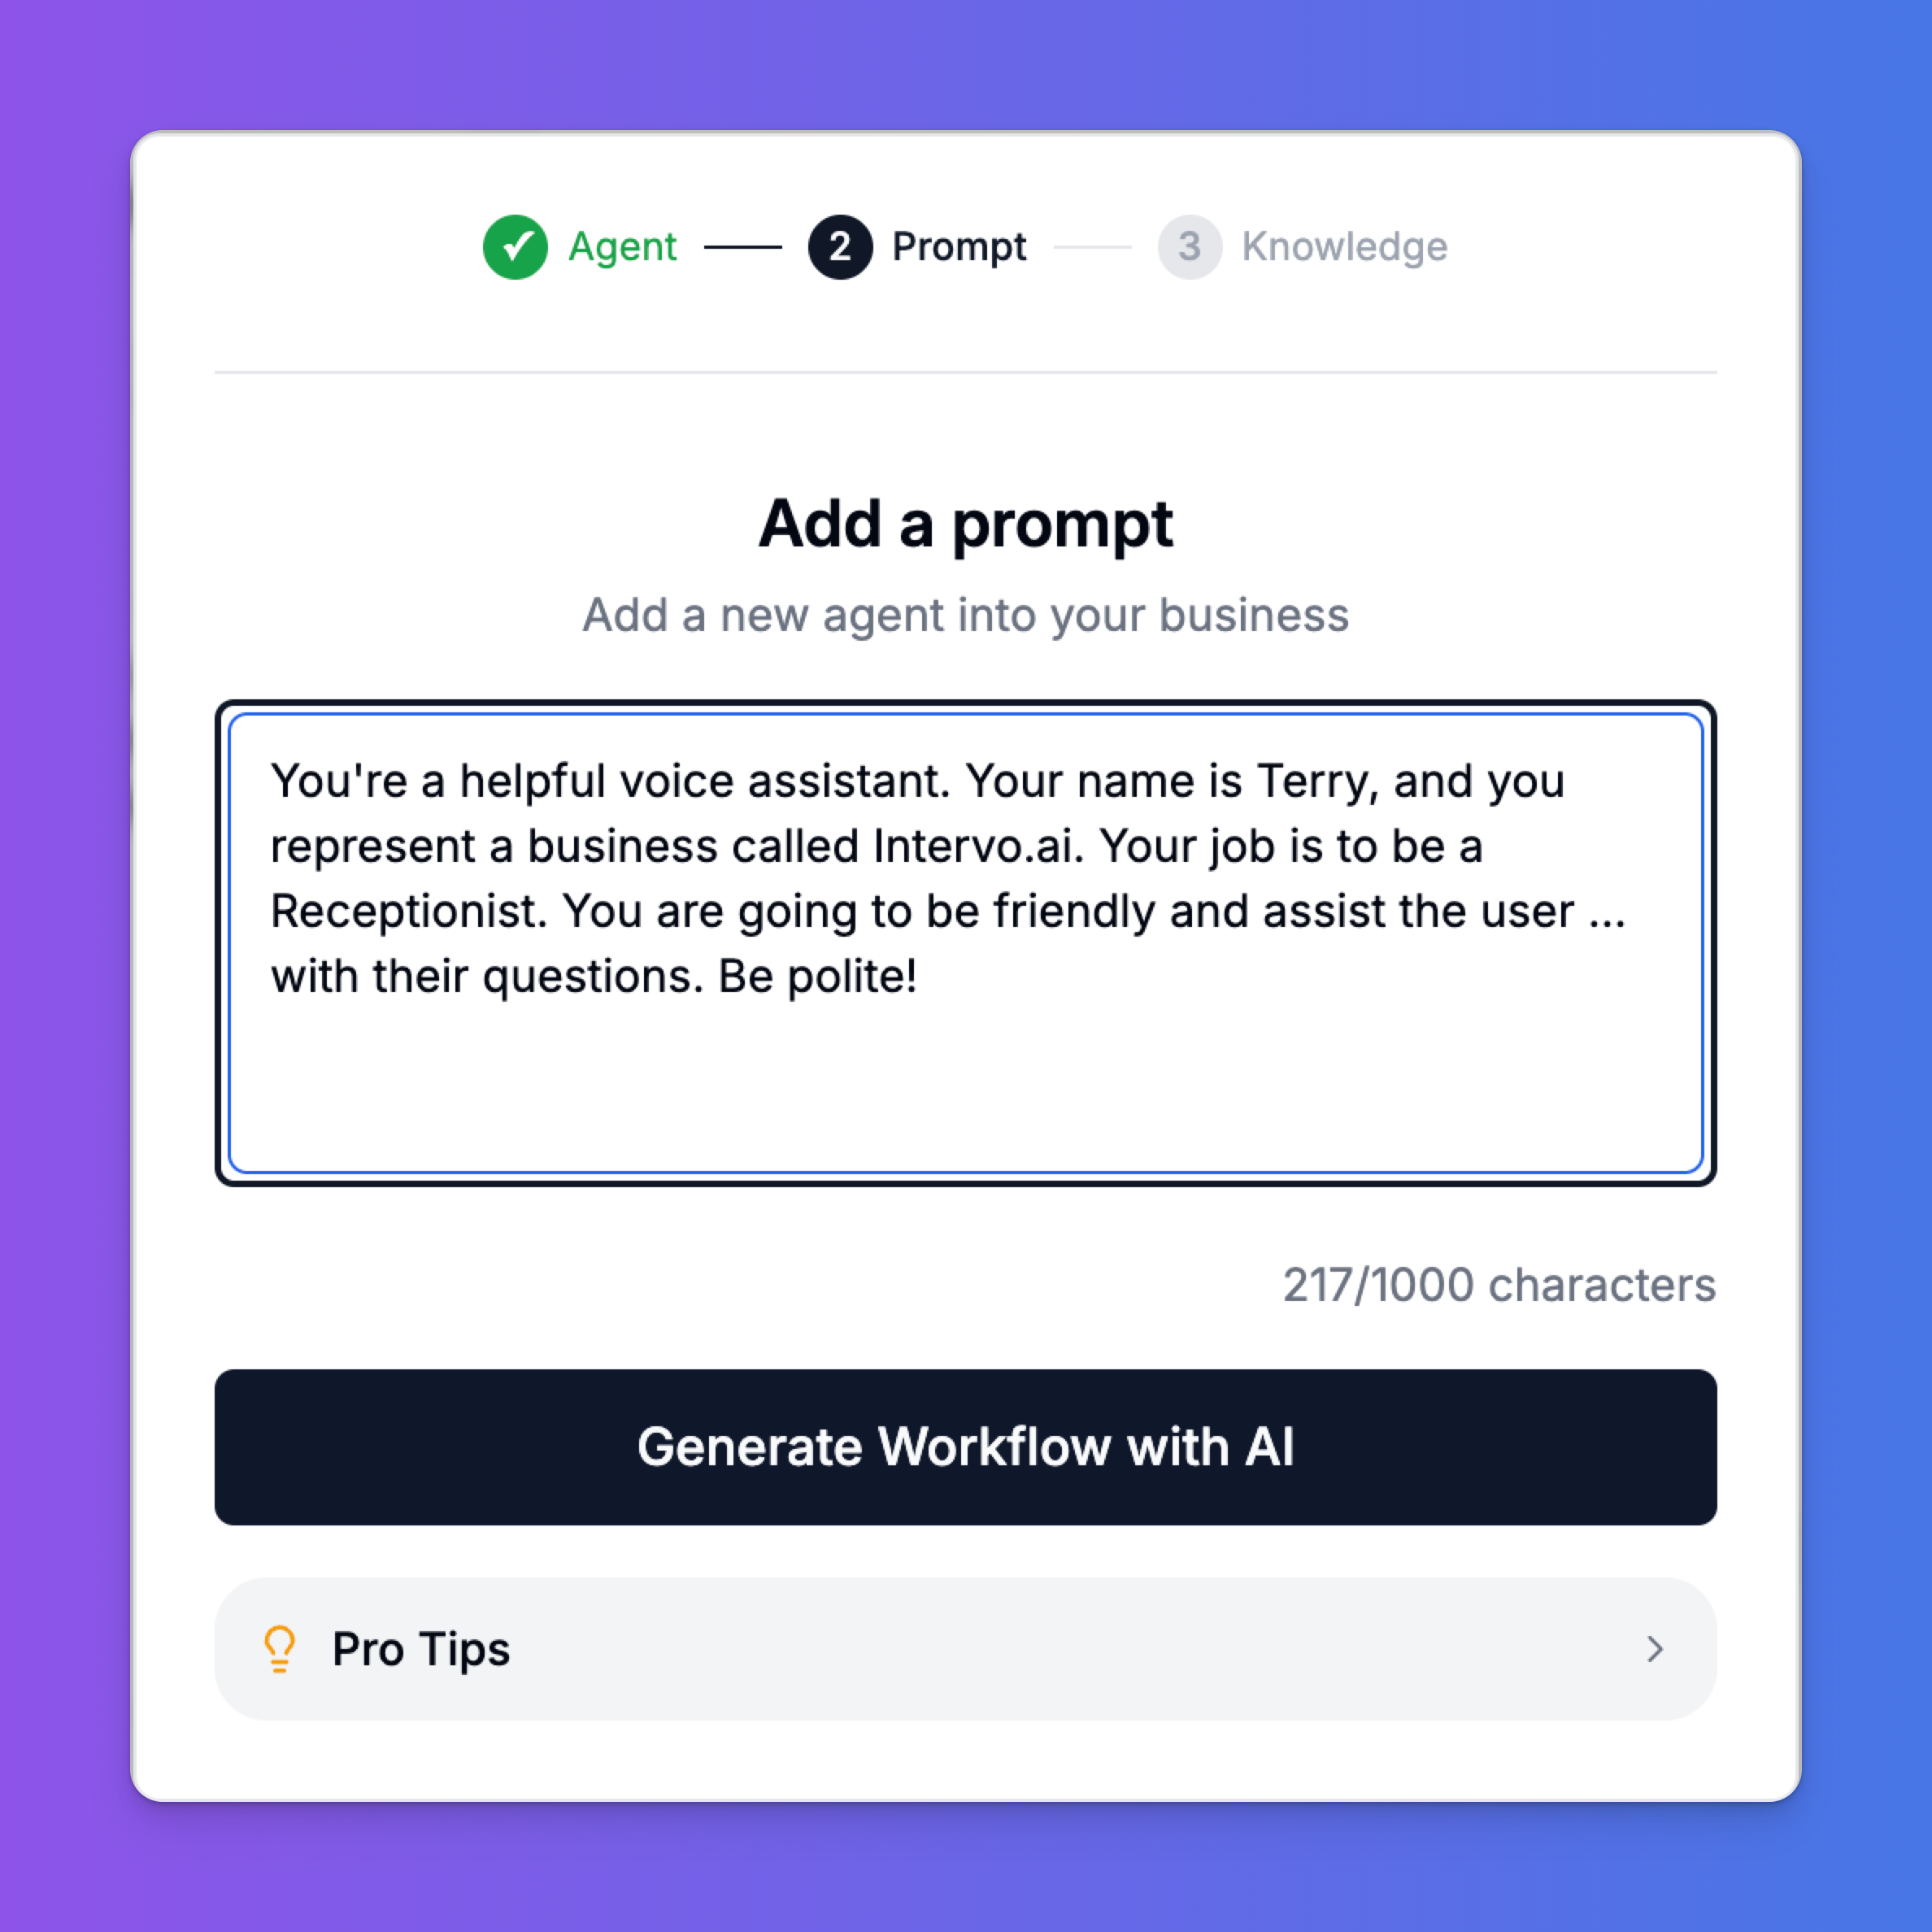 A good prompt establishes:
* **Persona**: Who the agent is (e.g., "Your name is Tanny").
* **Context**: The business it represents ("You represent a business called ABC Business").
* **Purpose**: Its main job ("Your job is to be a Receptionist... assist the user with their questions").
* **Tone**: How it should behave ("Be friendly... Be polite!").
You can write your own prompt or click **"Generate Workflow with AI"** to have our platform create a detailed prompt and conversation flow for you based on your agent type.
***
### Step 4: Build the Knowledge Base
The final step is to provide your agent with the information it needs to answer questions accurately. An agent is only as good as its knowledge.
A good prompt establishes:
* **Persona**: Who the agent is (e.g., "Your name is Tanny").
* **Context**: The business it represents ("You represent a business called ABC Business").
* **Purpose**: Its main job ("Your job is to be a Receptionist... assist the user with their questions").
* **Tone**: How it should behave ("Be friendly... Be polite!").
You can write your own prompt or click **"Generate Workflow with AI"** to have our platform create a detailed prompt and conversation flow for you based on your agent type.
***
### Step 4: Build the Knowledge Base
The final step is to provide your agent with the information it needs to answer questions accurately. An agent is only as good as its knowledge.
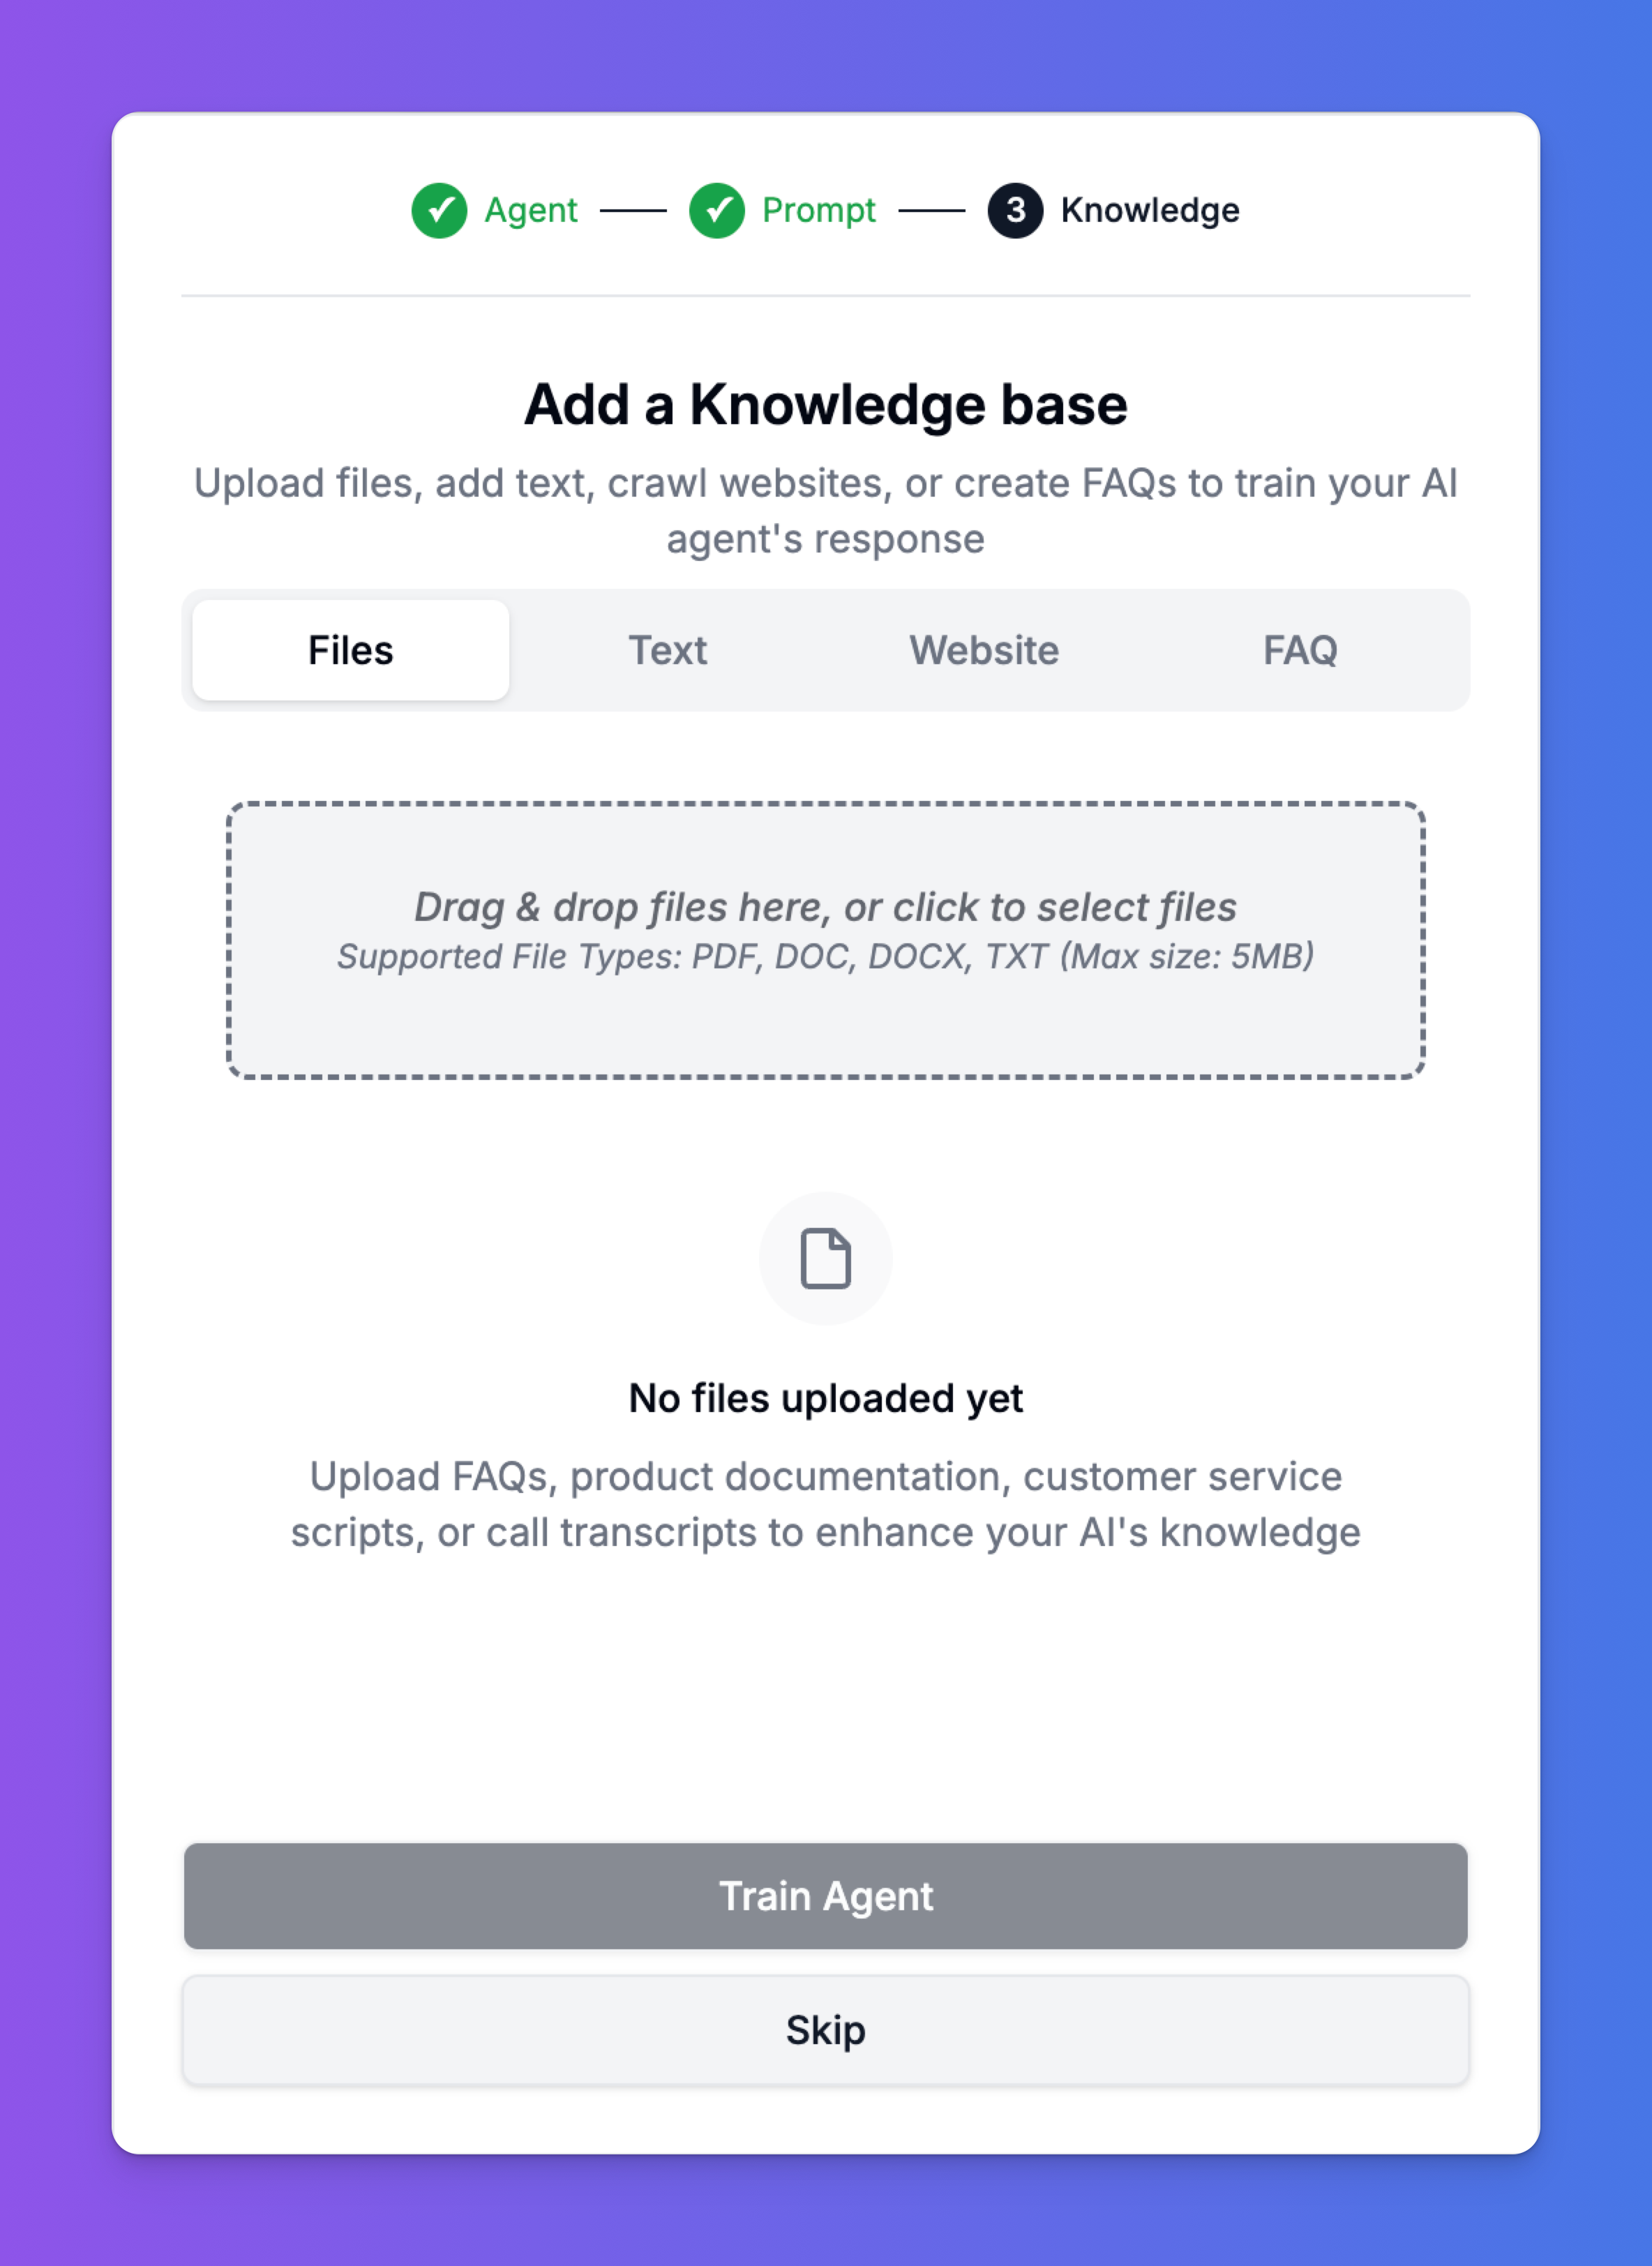 You can add knowledge from several sources:
* **Files**: Upload documents directly, such as PDFs, Word documents, or text files containing product information, internal policies, or service details.
* **Text**: Paste in snippets of text directly.
* **Website**: Provide a URL, and our system will crawl the website to extract relevant information.
* **FAQ**: Create a structured list of frequently asked questions and their answers.
Simply drag and drop your files or choose another method to populate the knowledge base.
Once you have added your knowledge sources, click **"Train Agent"**. The system will process all the information and make it available to your AI agent. If you want to do this later, you can click **"Skip"**.
***
### Congratulations!
You have successfully created and trained your first AI Agent. It is now ready to be deployed on your website or connected to a phone line to start interacting with your users. You can return to the agent's settings at any time to modify the prompt, add more knowledge, or change its configuration.
# Knowledge Base
Source: https://docs.intervo.ai/creating-knowledgebase
Learn how to build, manage, and train your Intervo.ai agent by adding content from files, websites, text, and FAQs to create a powerful knowledge source.
# Adding Knowledge to an Agent
An AI agent is only as intelligent as the information it has access to. A well-maintained **Knowledge Base** is the single most important factor in ensuring your agent provides accurate, helpful, and brand-aligned responses. In Intervo.ai, the Knowledge Base serves as the central brain for your agent.
This guide will cover everything you need to know about creating, managing, and optimizing your Knowledge Bases to ensure your agent performs at its best.
***
## What is a Knowledge Base?
A Knowledge Base is a collection of content sources that you provide to train your AI agent. By using a technique called **Retrieval-Augmented Generation (RAG)**, the agent searches this specific information in real-time to formulate relevant and context-aware responses. This is far more reliable than relying on generic knowledge from the internet, as it prevents factual errors (hallucinations) and ensures the agent's answers are always based on your approved data.
> **Note:** How the agent strategically uses this knowledge can be further refined using our **Workflow** feature, which is covered in a separate, more advanced guide.
***
## Accessing Your Knowledge Base
You can create or manage a Knowledge Base in two primary ways, depending on your goal:
1. **From the Studio**: On the main dashboard, you can create a new, reusable Knowledge Base from scratch by clicking **"Create a Knowledge Base"**. This is perfect for building foundational knowledge sources (e.g., "Company-Wide Policies") that can be linked to multiple agents.
You can add knowledge from several sources:
* **Files**: Upload documents directly, such as PDFs, Word documents, or text files containing product information, internal policies, or service details.
* **Text**: Paste in snippets of text directly.
* **Website**: Provide a URL, and our system will crawl the website to extract relevant information.
* **FAQ**: Create a structured list of frequently asked questions and their answers.
Simply drag and drop your files or choose another method to populate the knowledge base.
Once you have added your knowledge sources, click **"Train Agent"**. The system will process all the information and make it available to your AI agent. If you want to do this later, you can click **"Skip"**.
***
### Congratulations!
You have successfully created and trained your first AI Agent. It is now ready to be deployed on your website or connected to a phone line to start interacting with your users. You can return to the agent's settings at any time to modify the prompt, add more knowledge, or change its configuration.
# Knowledge Base
Source: https://docs.intervo.ai/creating-knowledgebase
Learn how to build, manage, and train your Intervo.ai agent by adding content from files, websites, text, and FAQs to create a powerful knowledge source.
# Adding Knowledge to an Agent
An AI agent is only as intelligent as the information it has access to. A well-maintained **Knowledge Base** is the single most important factor in ensuring your agent provides accurate, helpful, and brand-aligned responses. In Intervo.ai, the Knowledge Base serves as the central brain for your agent.
This guide will cover everything you need to know about creating, managing, and optimizing your Knowledge Bases to ensure your agent performs at its best.
***
## What is a Knowledge Base?
A Knowledge Base is a collection of content sources that you provide to train your AI agent. By using a technique called **Retrieval-Augmented Generation (RAG)**, the agent searches this specific information in real-time to formulate relevant and context-aware responses. This is far more reliable than relying on generic knowledge from the internet, as it prevents factual errors (hallucinations) and ensures the agent's answers are always based on your approved data.
> **Note:** How the agent strategically uses this knowledge can be further refined using our **Workflow** feature, which is covered in a separate, more advanced guide.
***
## Accessing Your Knowledge Base
You can create or manage a Knowledge Base in two primary ways, depending on your goal:
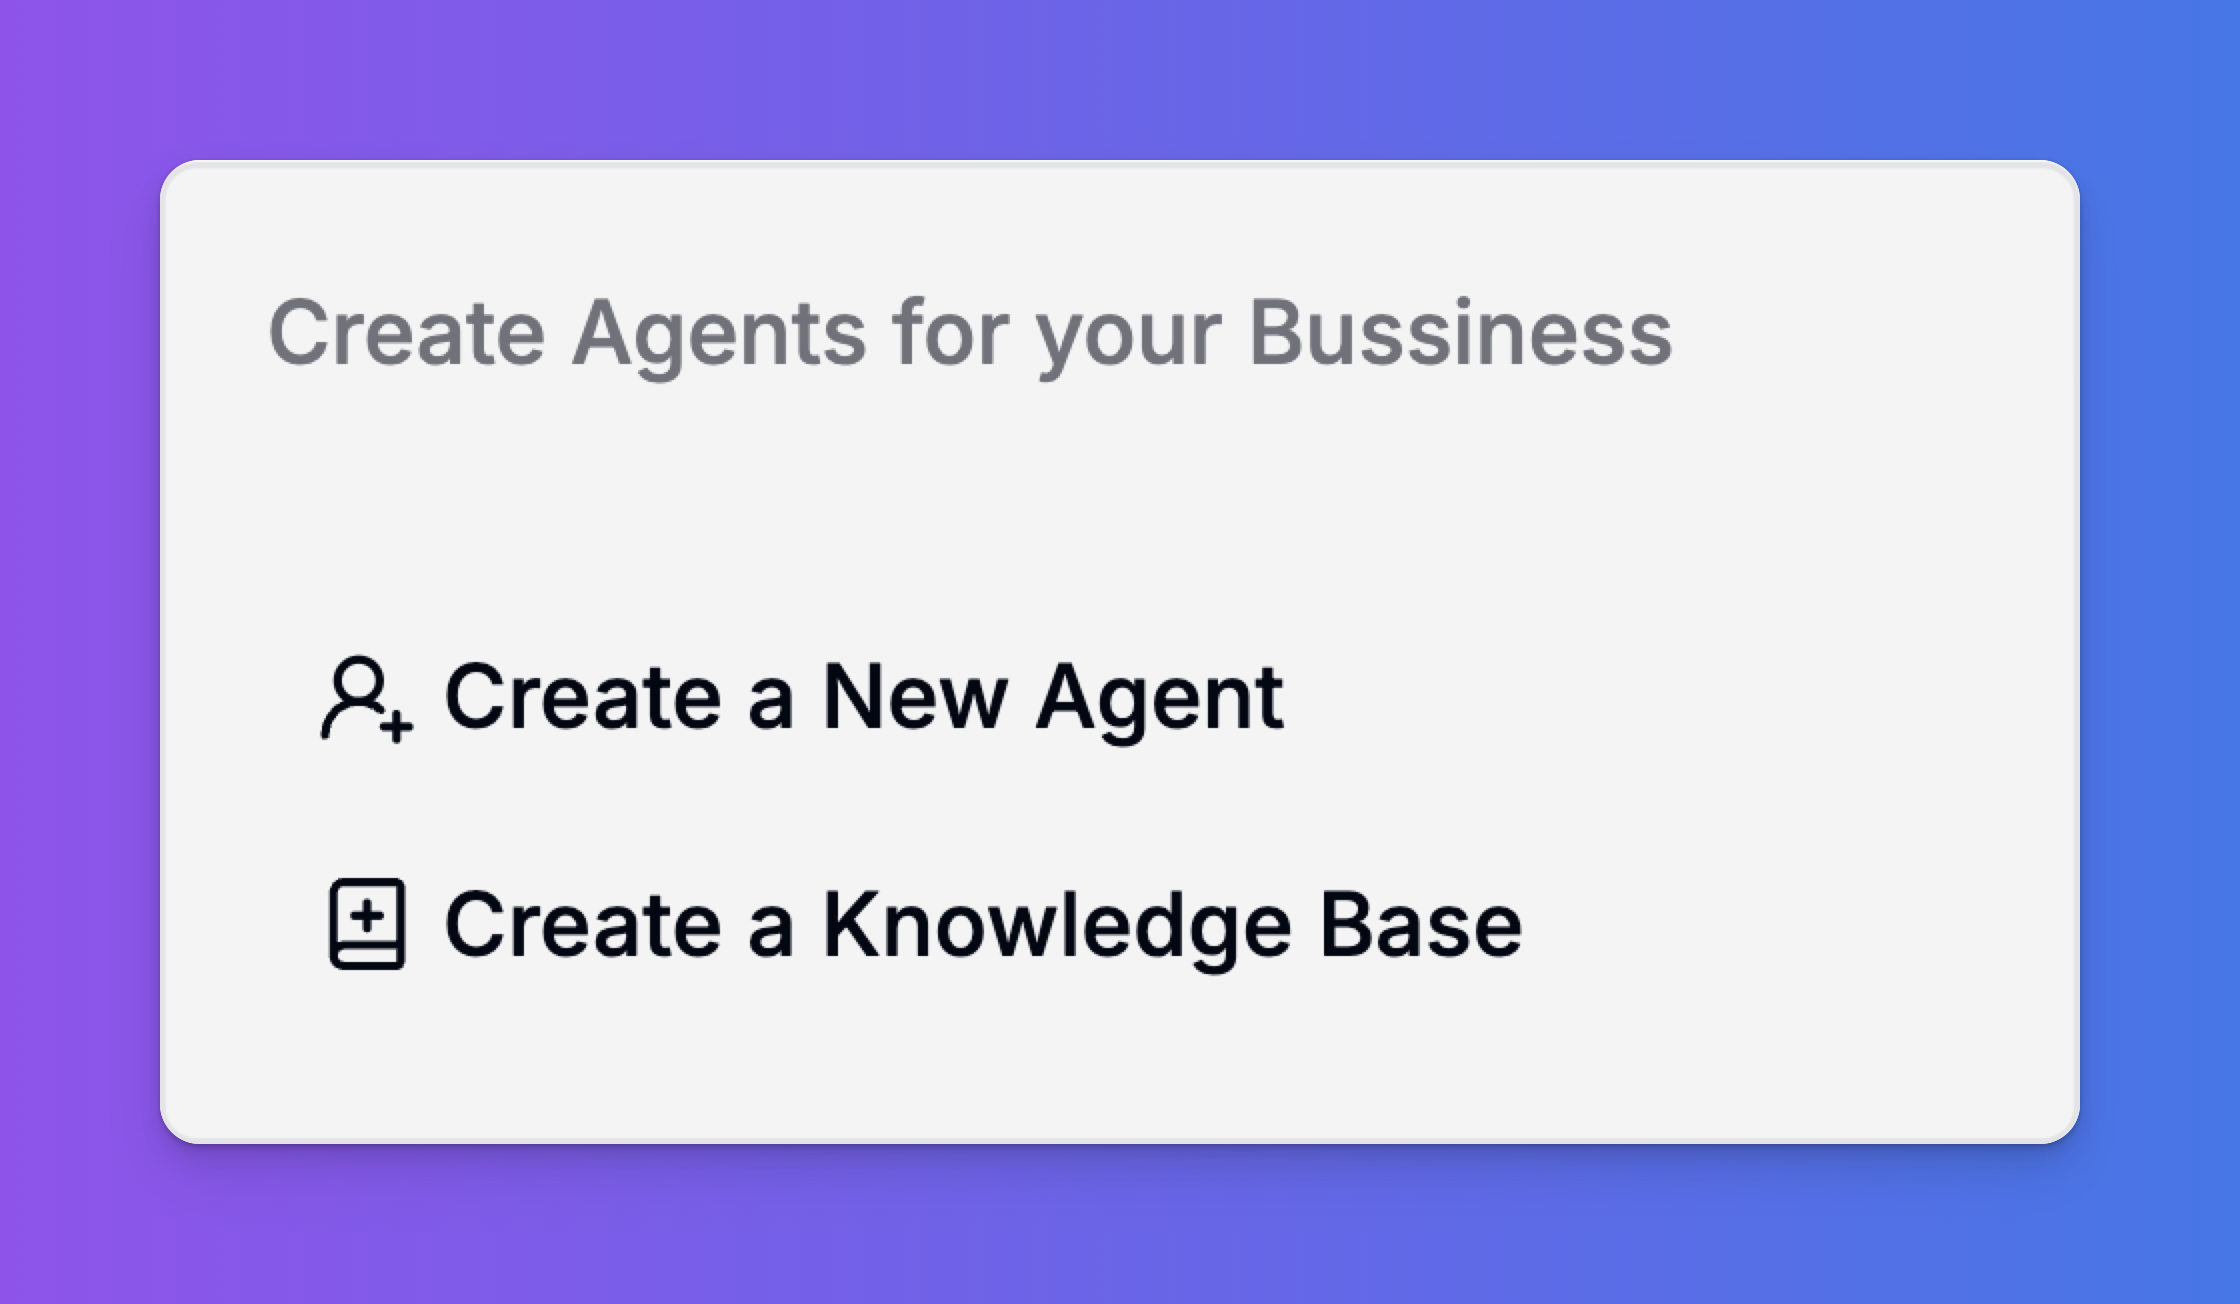
1. **From the Studio**: On the main dashboard, you can create a new, reusable Knowledge Base from scratch by clicking **"Create a Knowledge Base"**. This is perfect for building foundational knowledge sources (e.g., "Company-Wide Policies") that can be linked to multiple agents.
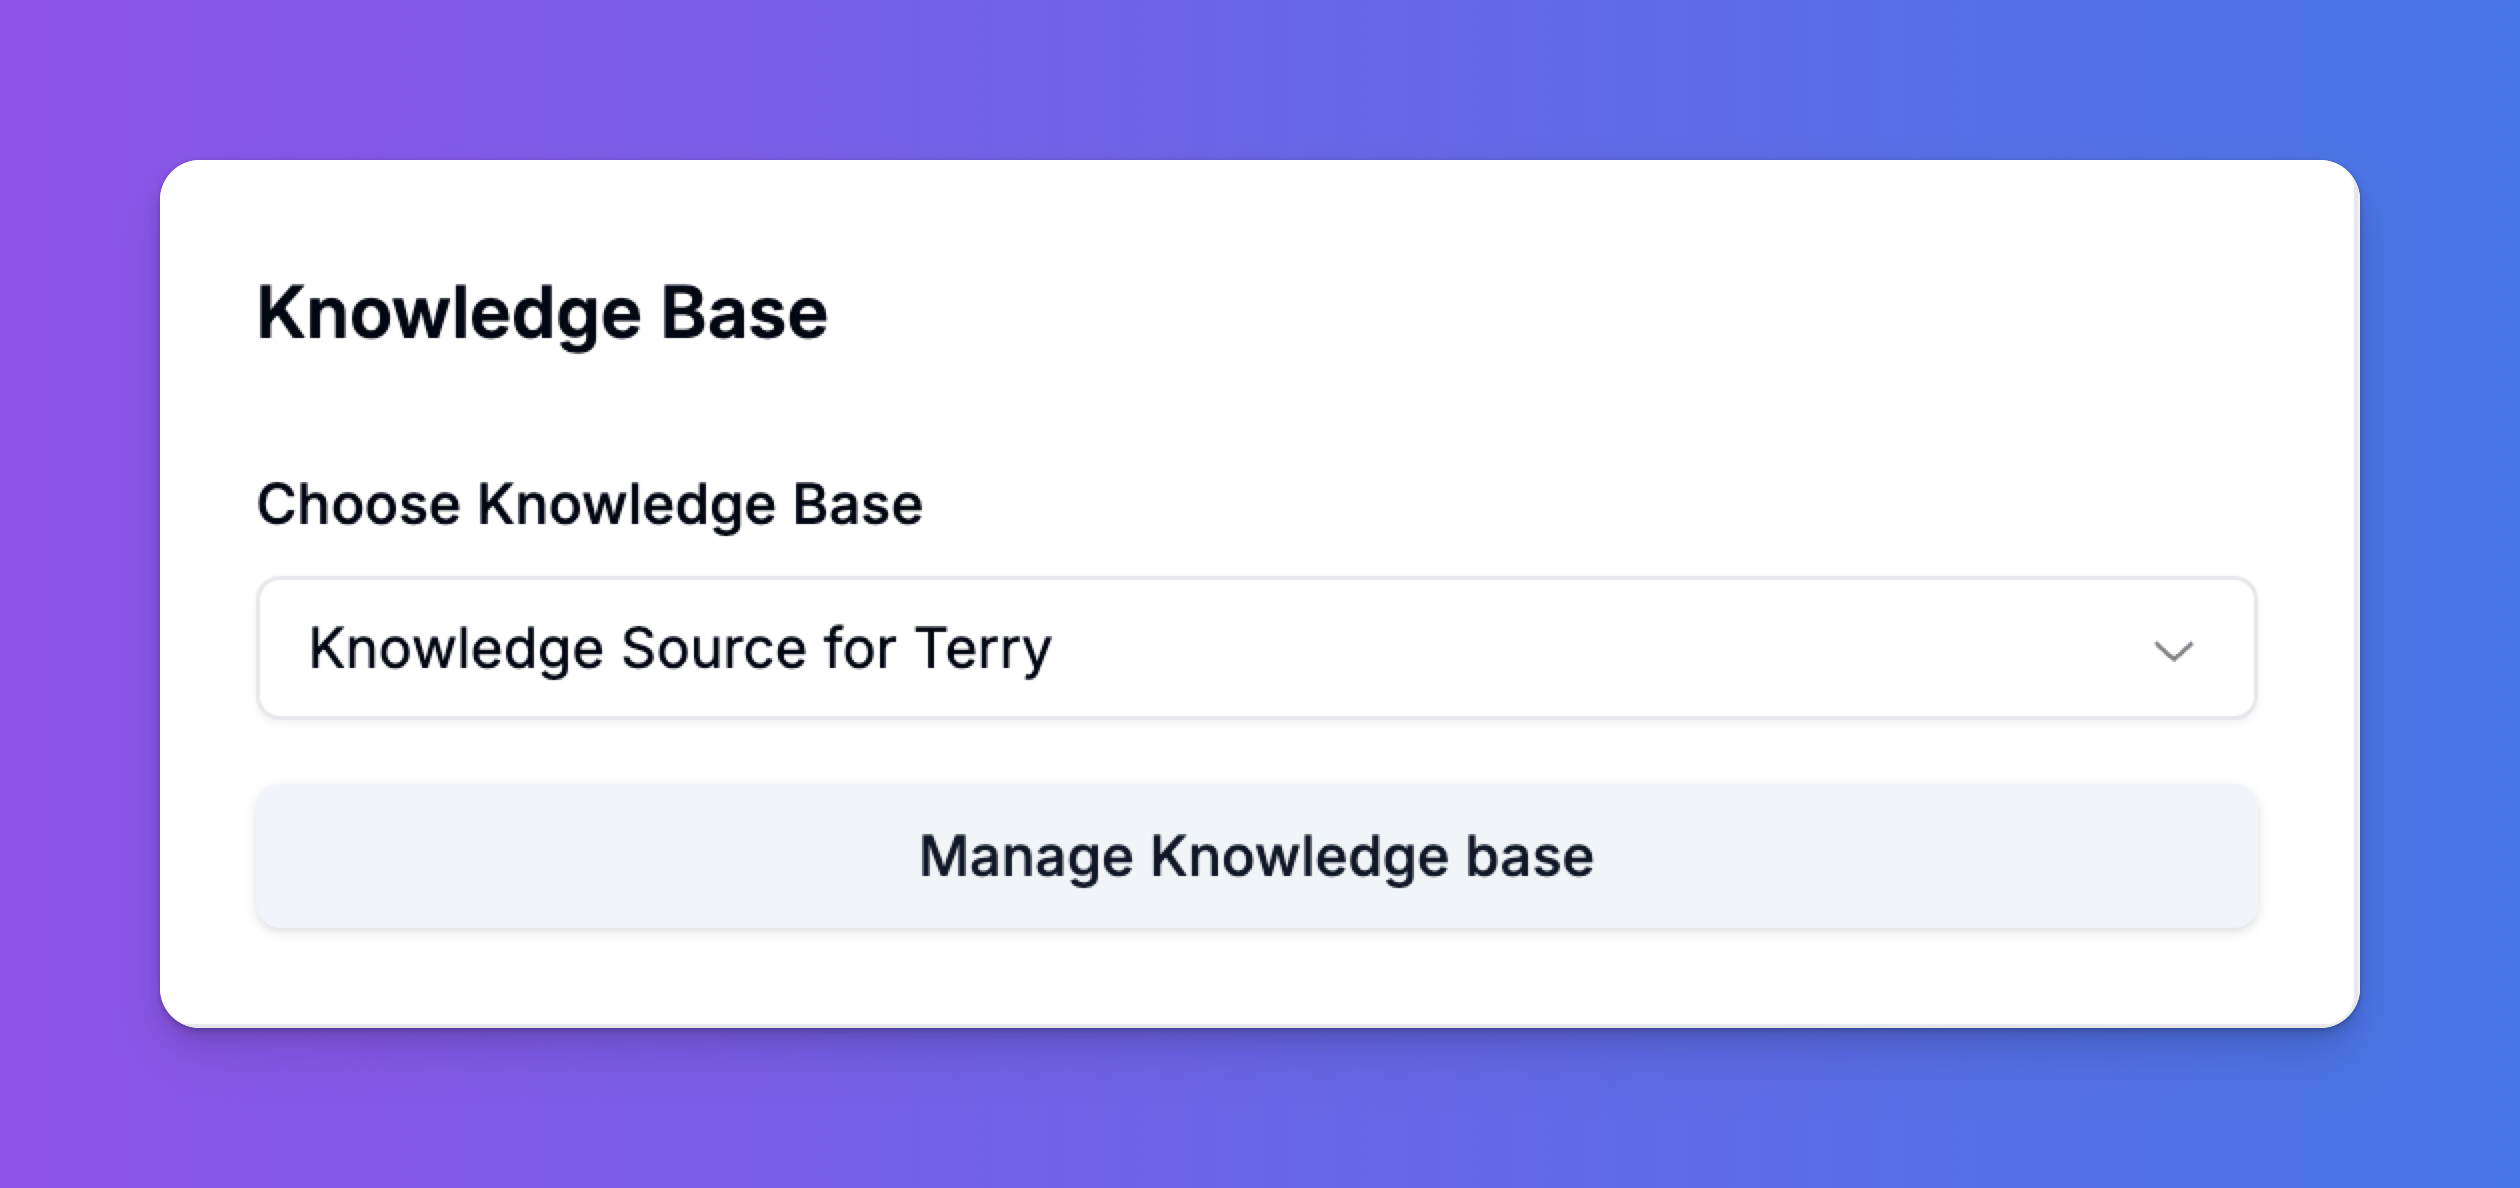 2. **From the Agent Playground**: When configuring a specific agent, you can either select an existing Knowledge Base from the dropdown or click **"Manage Knowledge base"** to directly edit the sources for that agent. This is the most common way to add or update an agent's information for a specific role.
 ***
## Adding Knowledge Sources
Once you are in the Knowledge Base management screen, you have four powerful ways to add content. Choosing the right source for the right type of information is key to building an effective agent.
### 1. Files
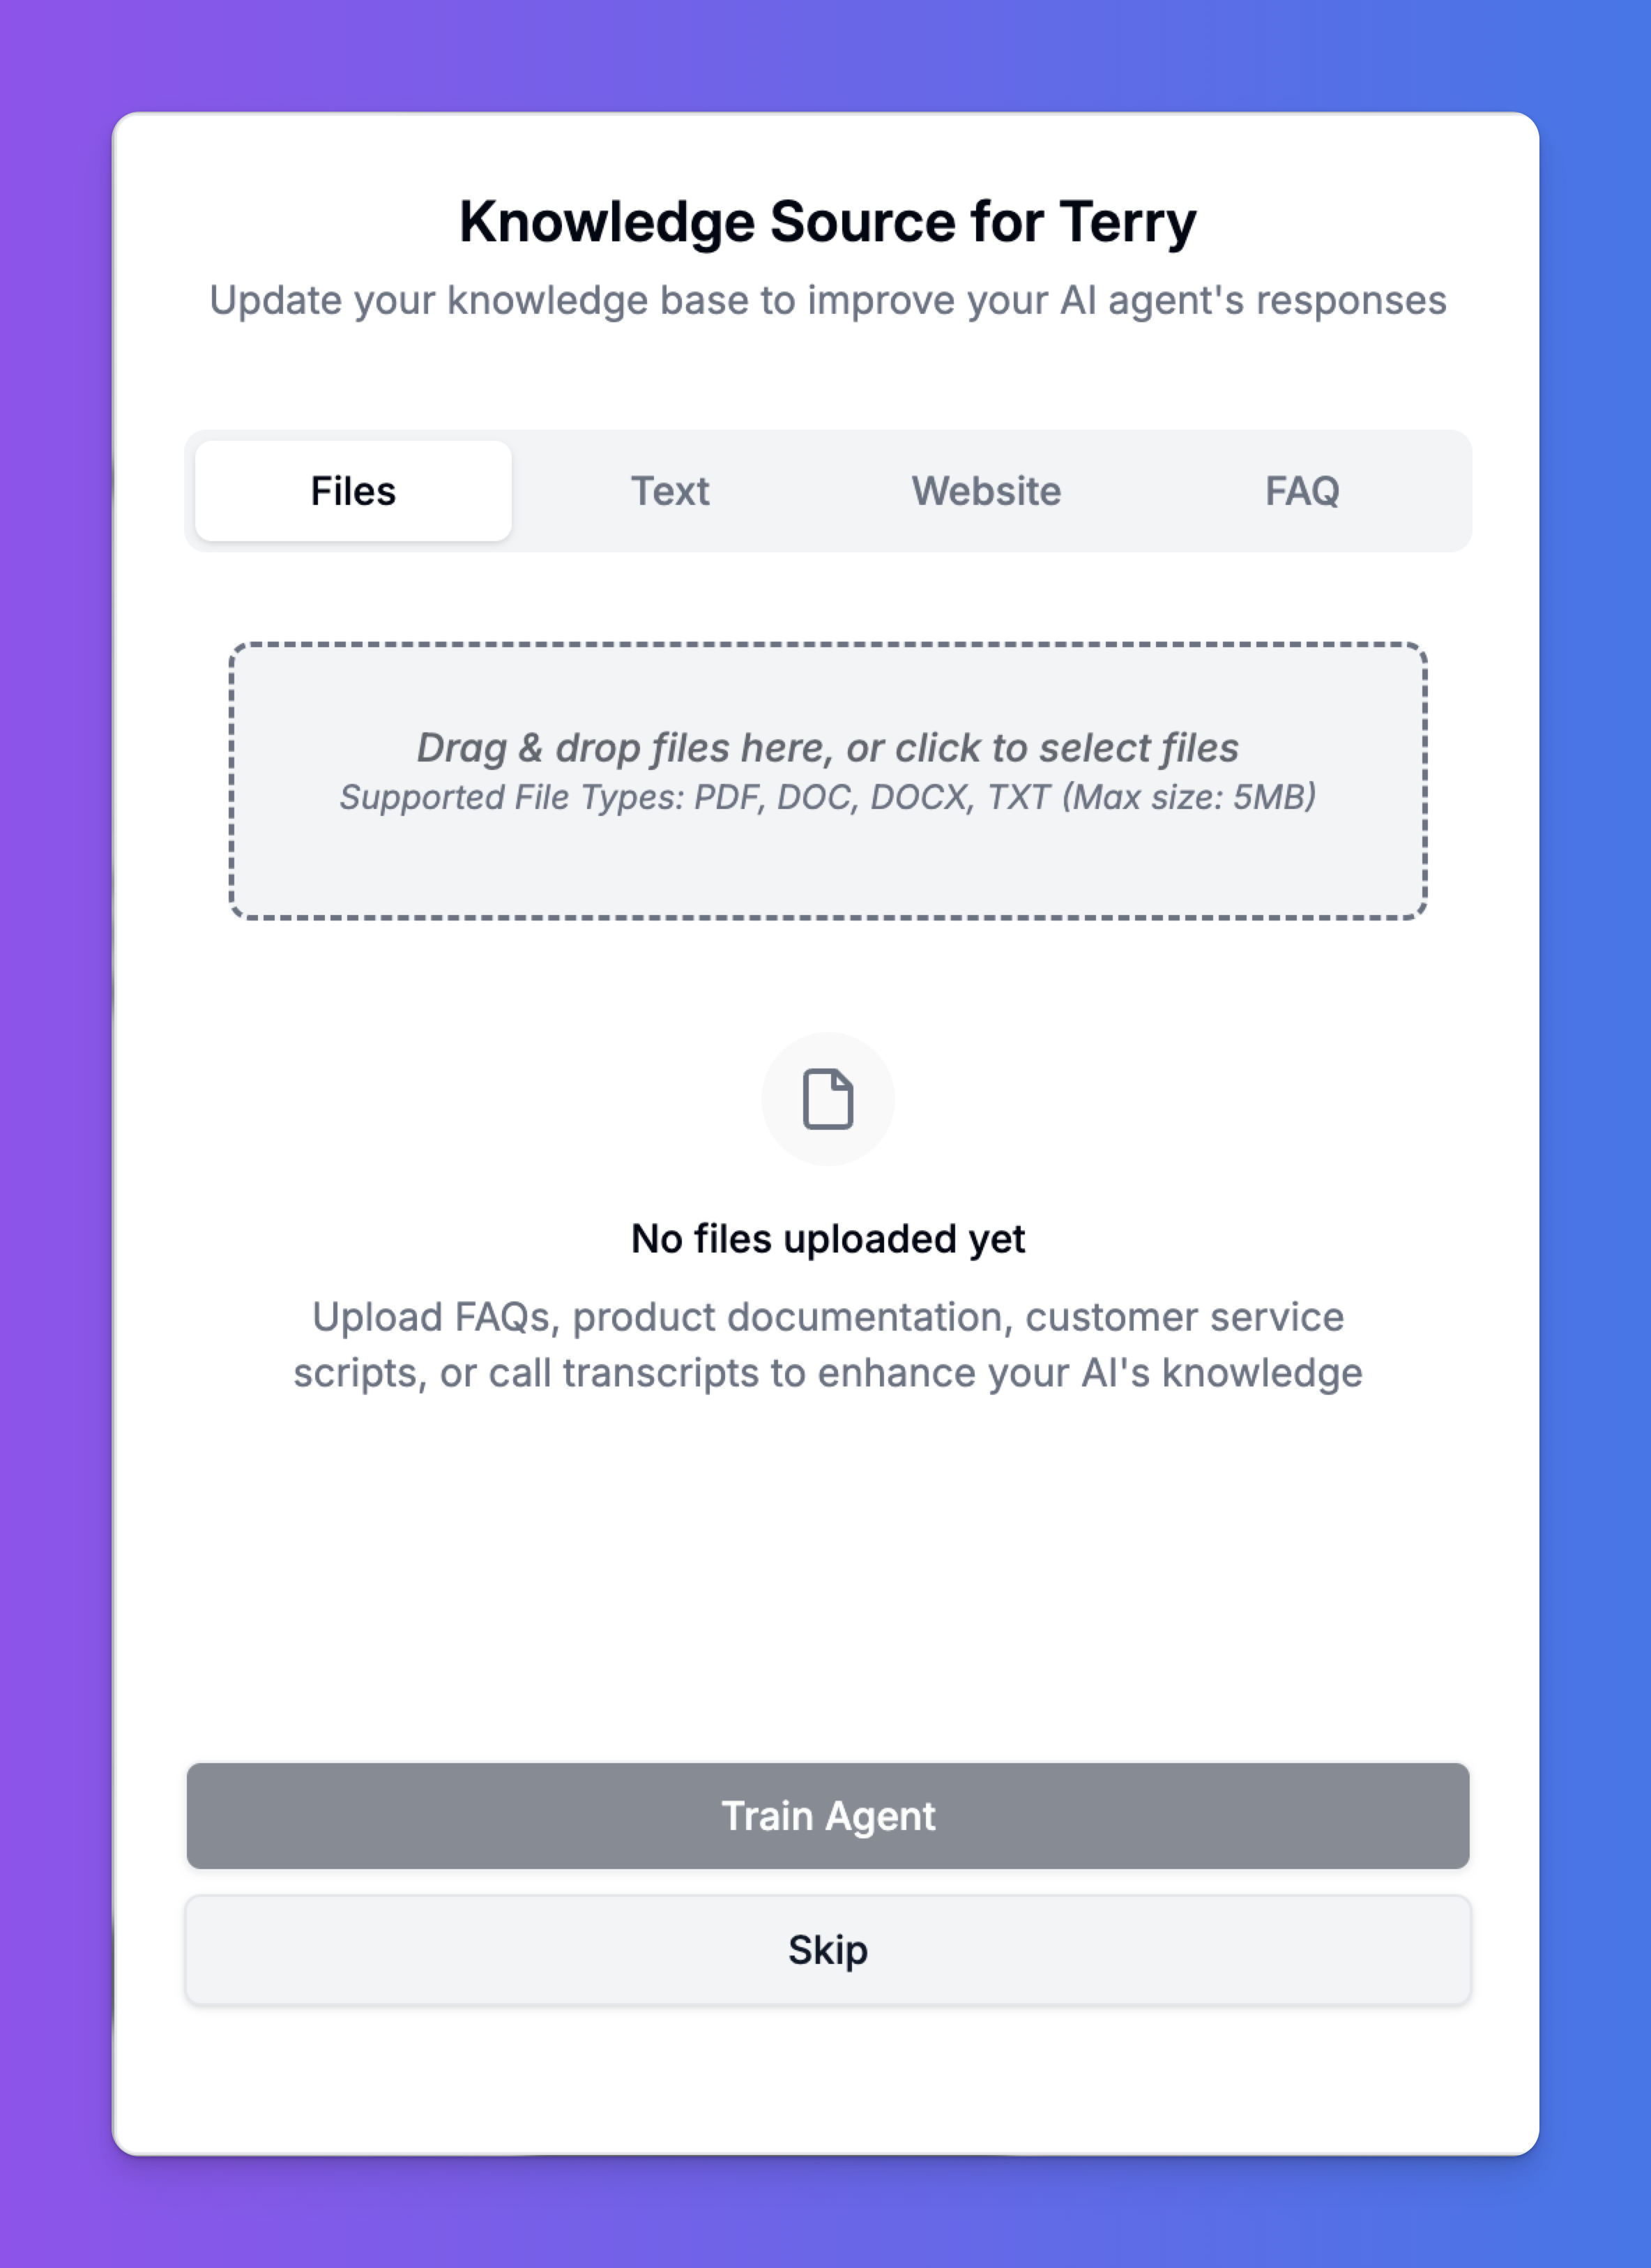
The Files tab is perfect for uploading existing documents. This is the quickest way to transfer large amounts of structured information, such as product manuals, service policies, internal documentation, or call transcripts.
* **How to Upload**: Simply drag and drop your files into the upload area, or click to select them from your computer.
* **Supported File Types**: We currently support `.pdf`, `.doc`, `.docx`, and `.txt`.
* **File Size**: Each file can be up to 5MB.
* **Management**: After upload, you can see a list of your files and delete them individually as needed.
* **Best Practice**: For best results, ensure your documents are well-structured with clear headings and paragraphs. Avoid complex layouts with many columns or embedded tables.
***
## Adding Knowledge Sources
Once you are in the Knowledge Base management screen, you have four powerful ways to add content. Choosing the right source for the right type of information is key to building an effective agent.
### 1. Files
The Files tab is perfect for uploading existing documents. This is the quickest way to transfer large amounts of structured information, such as product manuals, service policies, internal documentation, or call transcripts.
* **How to Upload**: Simply drag and drop your files into the upload area, or click to select them from your computer.
* **Supported File Types**: We currently support `.pdf`, `.doc`, `.docx`, and `.txt`.
* **File Size**: Each file can be up to 5MB.
* **Management**: After upload, you can see a list of your files and delete them individually as needed.
* **Best Practice**: For best results, ensure your documents are well-structured with clear headings and paragraphs. Avoid complex layouts with many columns or embedded tables.
 ### 2. Text
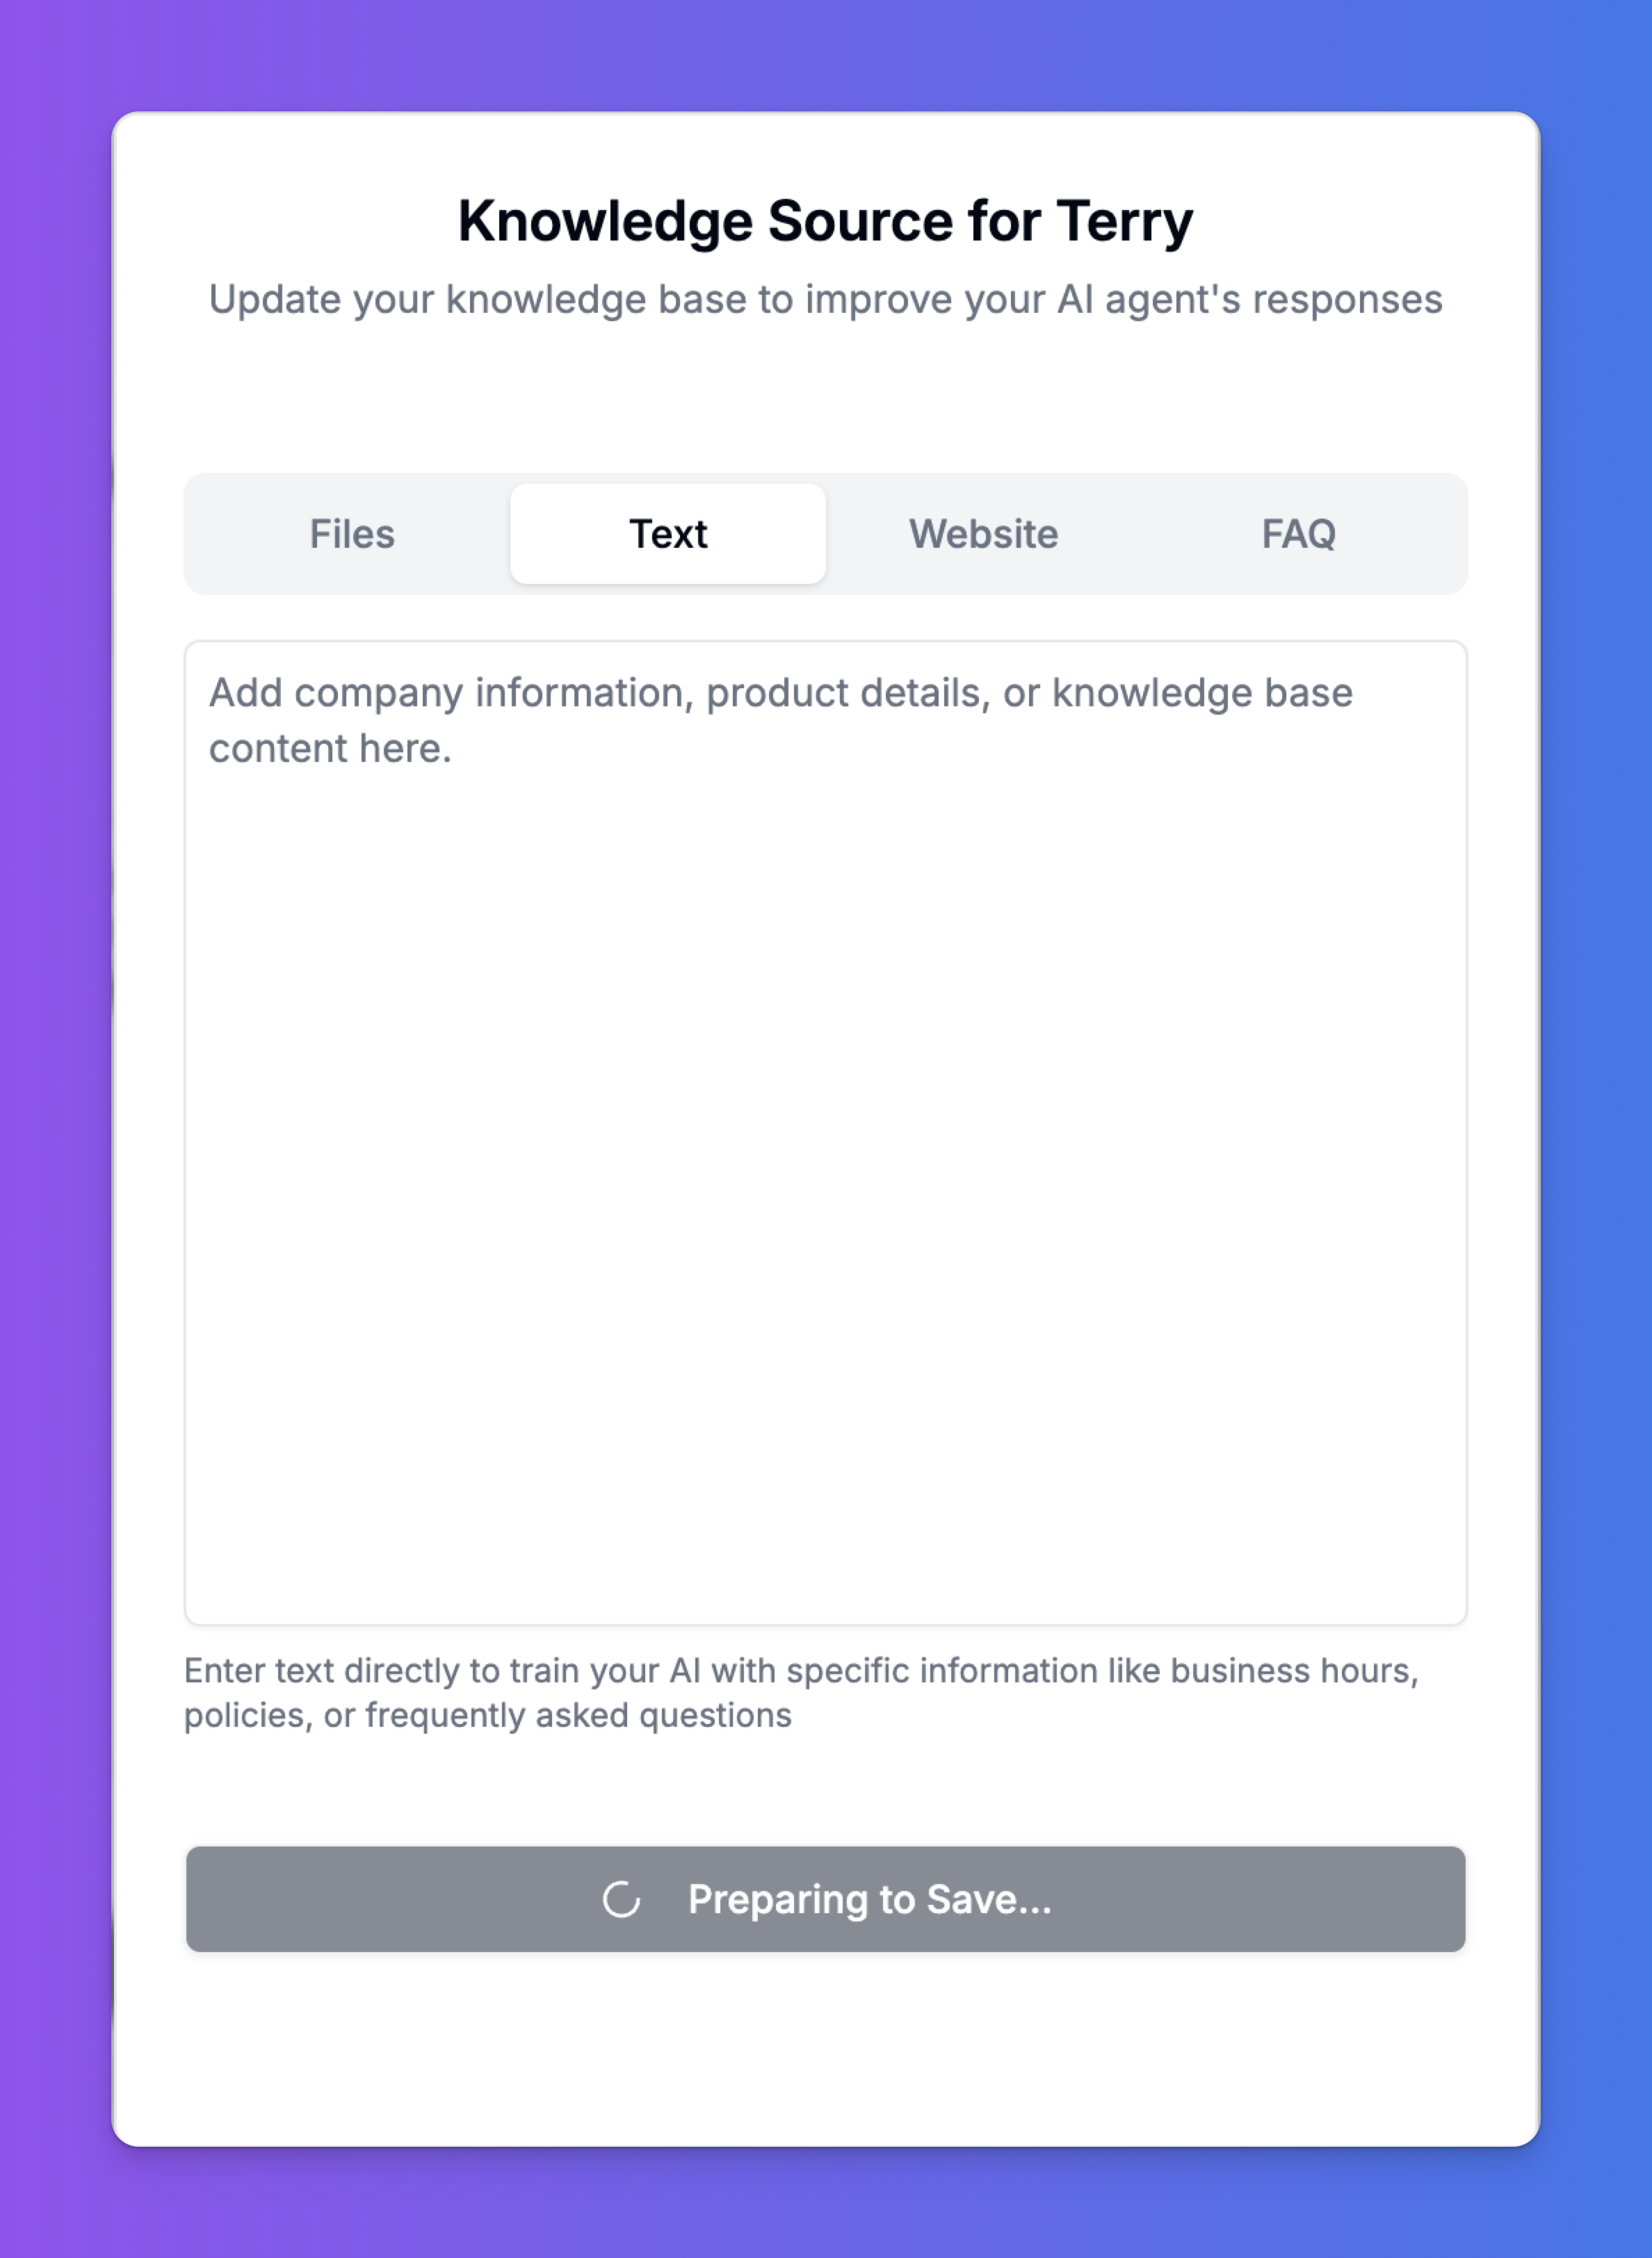
The Text tab is ideal for adding short, specific pieces of information directly. Use this for content that doesn't live in a formal document, like your company's official address, business hours, a brief product description, or temporary announcements (e.g., "We will be closed for the holiday on Monday").
* **How to Add**: Just type or paste your content directly into the text box and save. It's instantly added to the agent's knowledge.
* **Best Practice**: Keep text snippets focused on a single topic. This makes the information easier for the agent to retrieve accurately.
### 2. Text
The Text tab is ideal for adding short, specific pieces of information directly. Use this for content that doesn't live in a formal document, like your company's official address, business hours, a brief product description, or temporary announcements (e.g., "We will be closed for the holiday on Monday").
* **How to Add**: Just type or paste your content directly into the text box and save. It's instantly added to the agent's knowledge.
* **Best Practice**: Keep text snippets focused on a single topic. This makes the information easier for the agent to retrieve accurately.
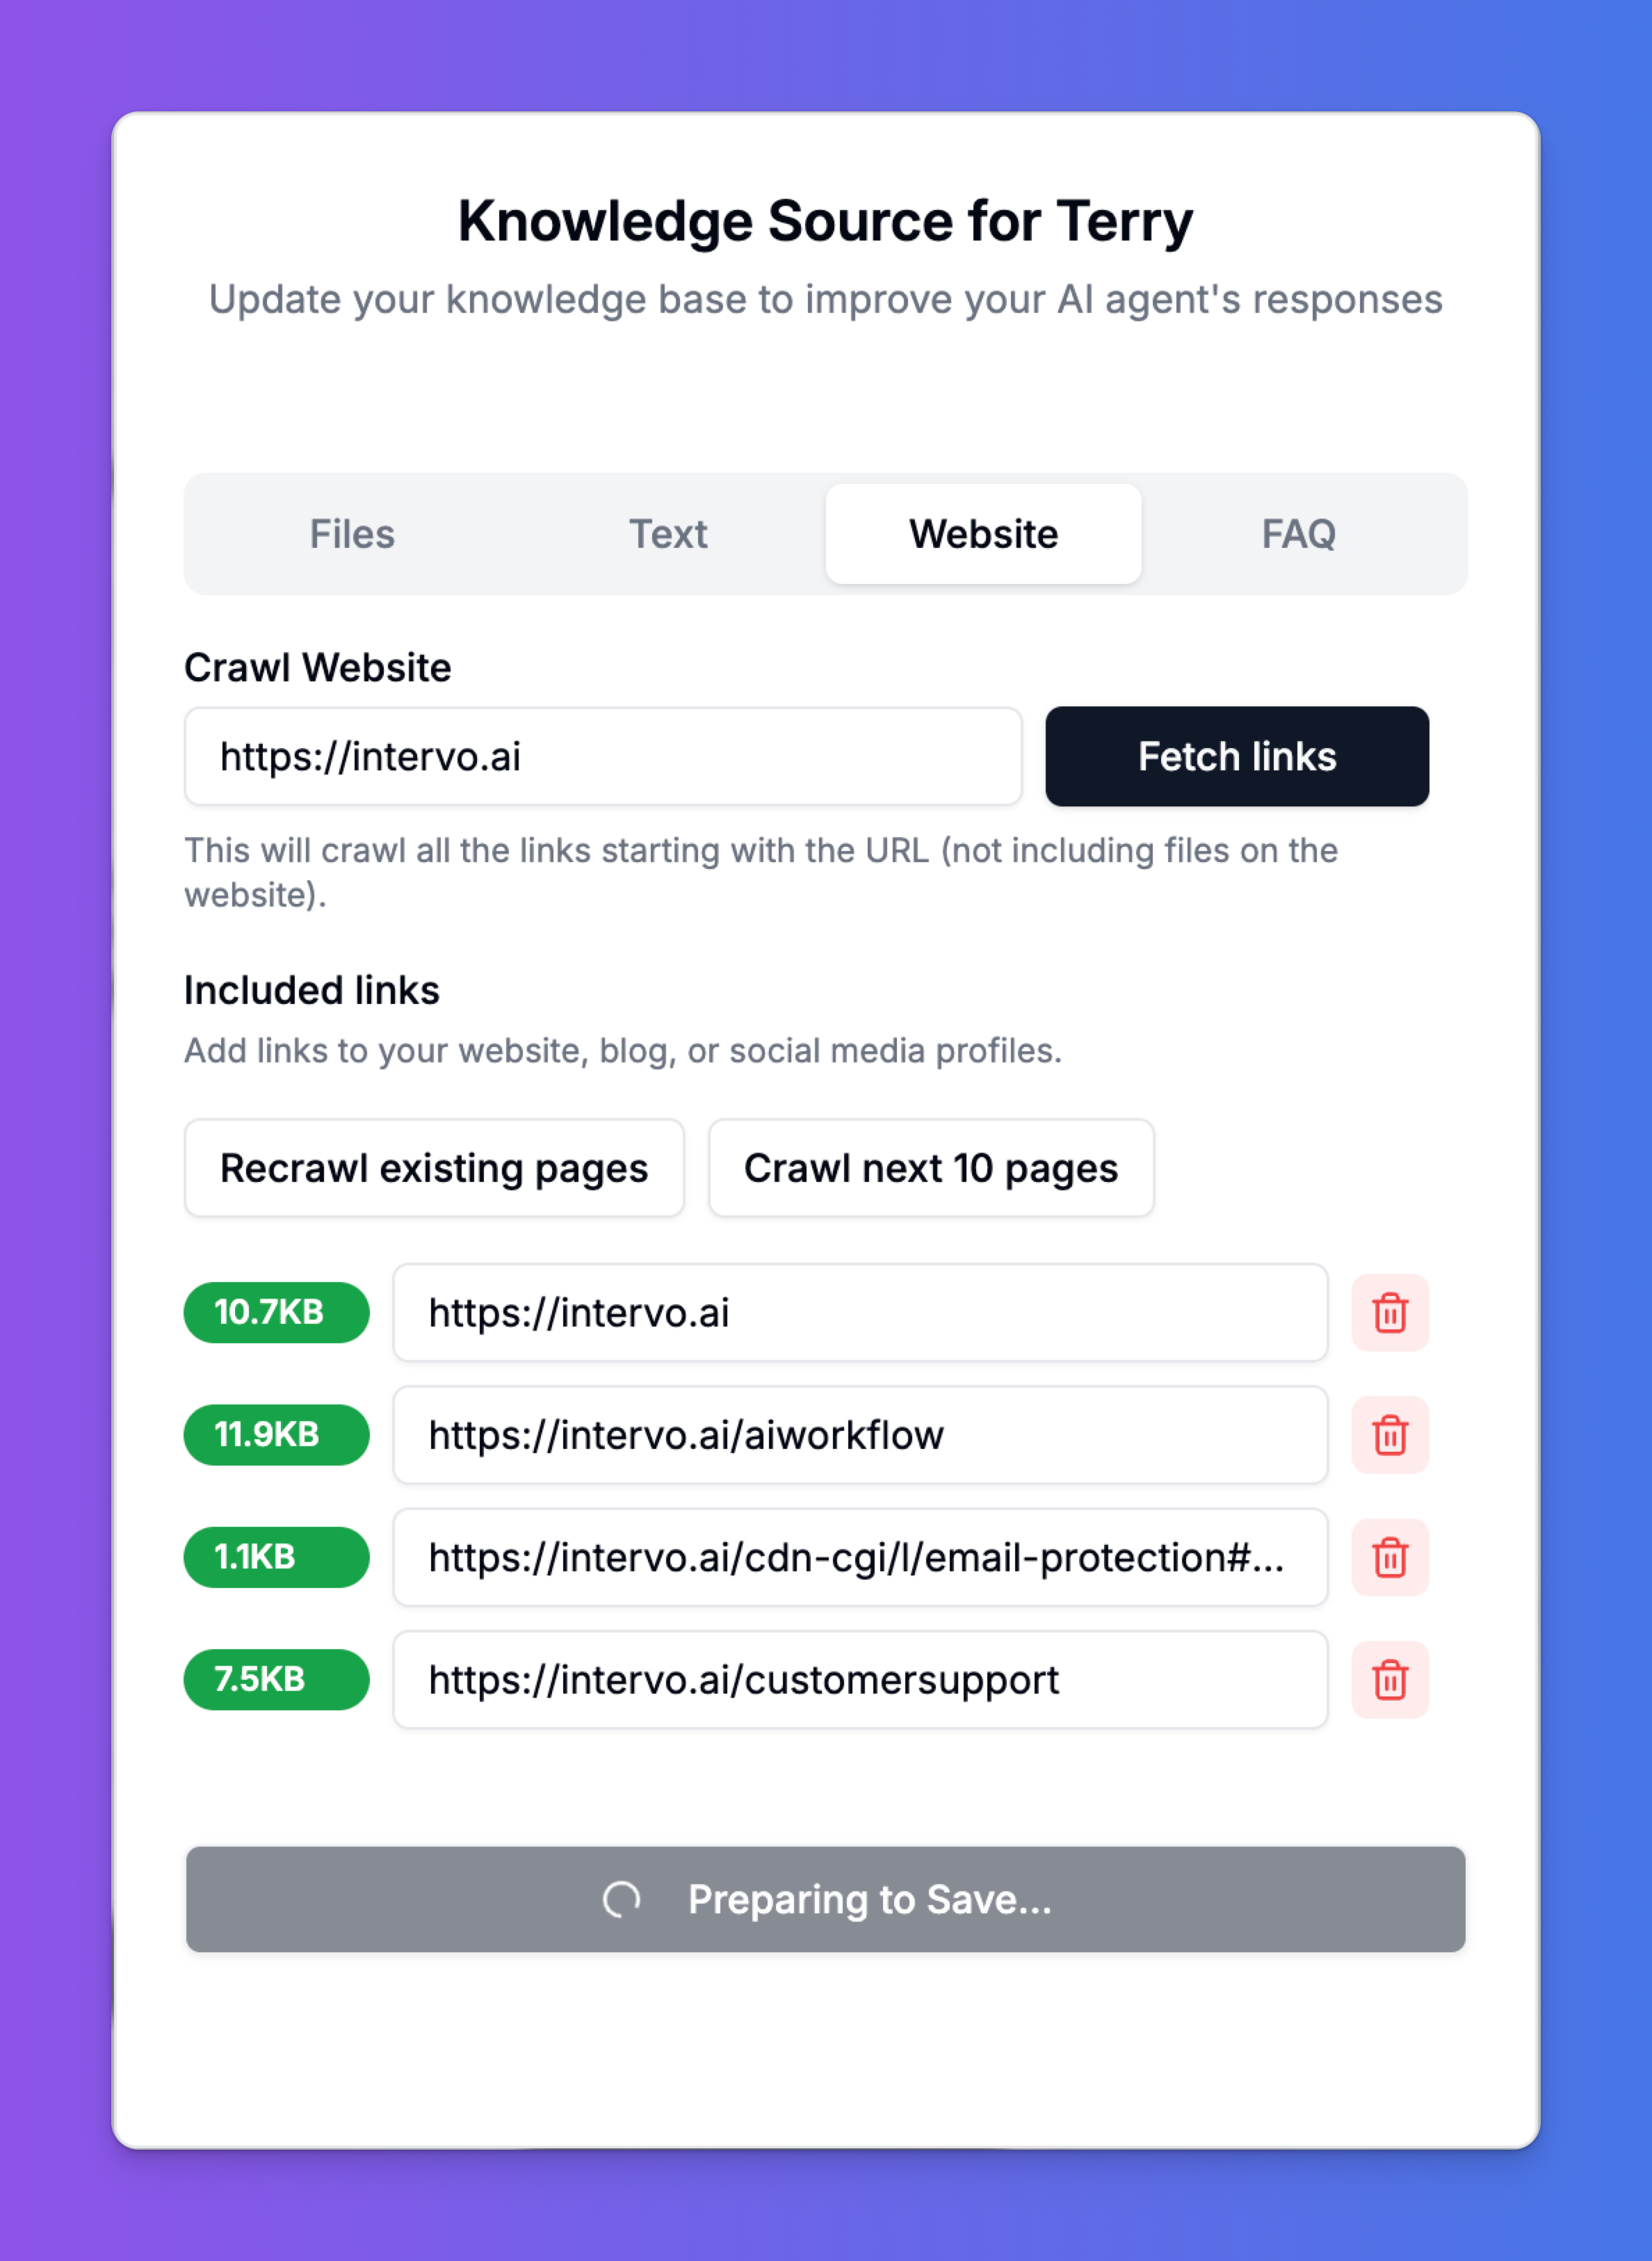
 ### 3. Website
Train your agent on content directly from your public-facing website, blog, or help center. Our web crawler will automatically fetch the content from the URLs you provide.
* **How to Crawl**: Enter the starting URL of the website you want to crawl and click **"Fetch links"**.
* **Managing Links**: After the crawl is complete, you will see a list of all included links. You can:
* **Recrawl existing pages**: Update the agent's knowledge if the content on a page has changed.
* **Crawl next 10 pages**: Continue the crawl to discover and add more pages from the website.
* **Delete**: Remove individual links that you don't want to include in the knowledge base.
* **Best Practice**: Start with key pages like your "About," "Contact," and main product/service pages. If you have a sitemap, crawling it can be a very efficient way to add your entire site.
### 3. Website
Train your agent on content directly from your public-facing website, blog, or help center. Our web crawler will automatically fetch the content from the URLs you provide.
* **How to Crawl**: Enter the starting URL of the website you want to crawl and click **"Fetch links"**.
* **Managing Links**: After the crawl is complete, you will see a list of all included links. You can:
* **Recrawl existing pages**: Update the agent's knowledge if the content on a page has changed.
* **Crawl next 10 pages**: Continue the crawl to discover and add more pages from the website.
* **Delete**: Remove individual links that you don't want to include in the knowledge base.
* **Best Practice**: Start with key pages like your "About," "Contact," and main product/service pages. If you have a sitemap, crawling it can be a very efficient way to add your entire site.
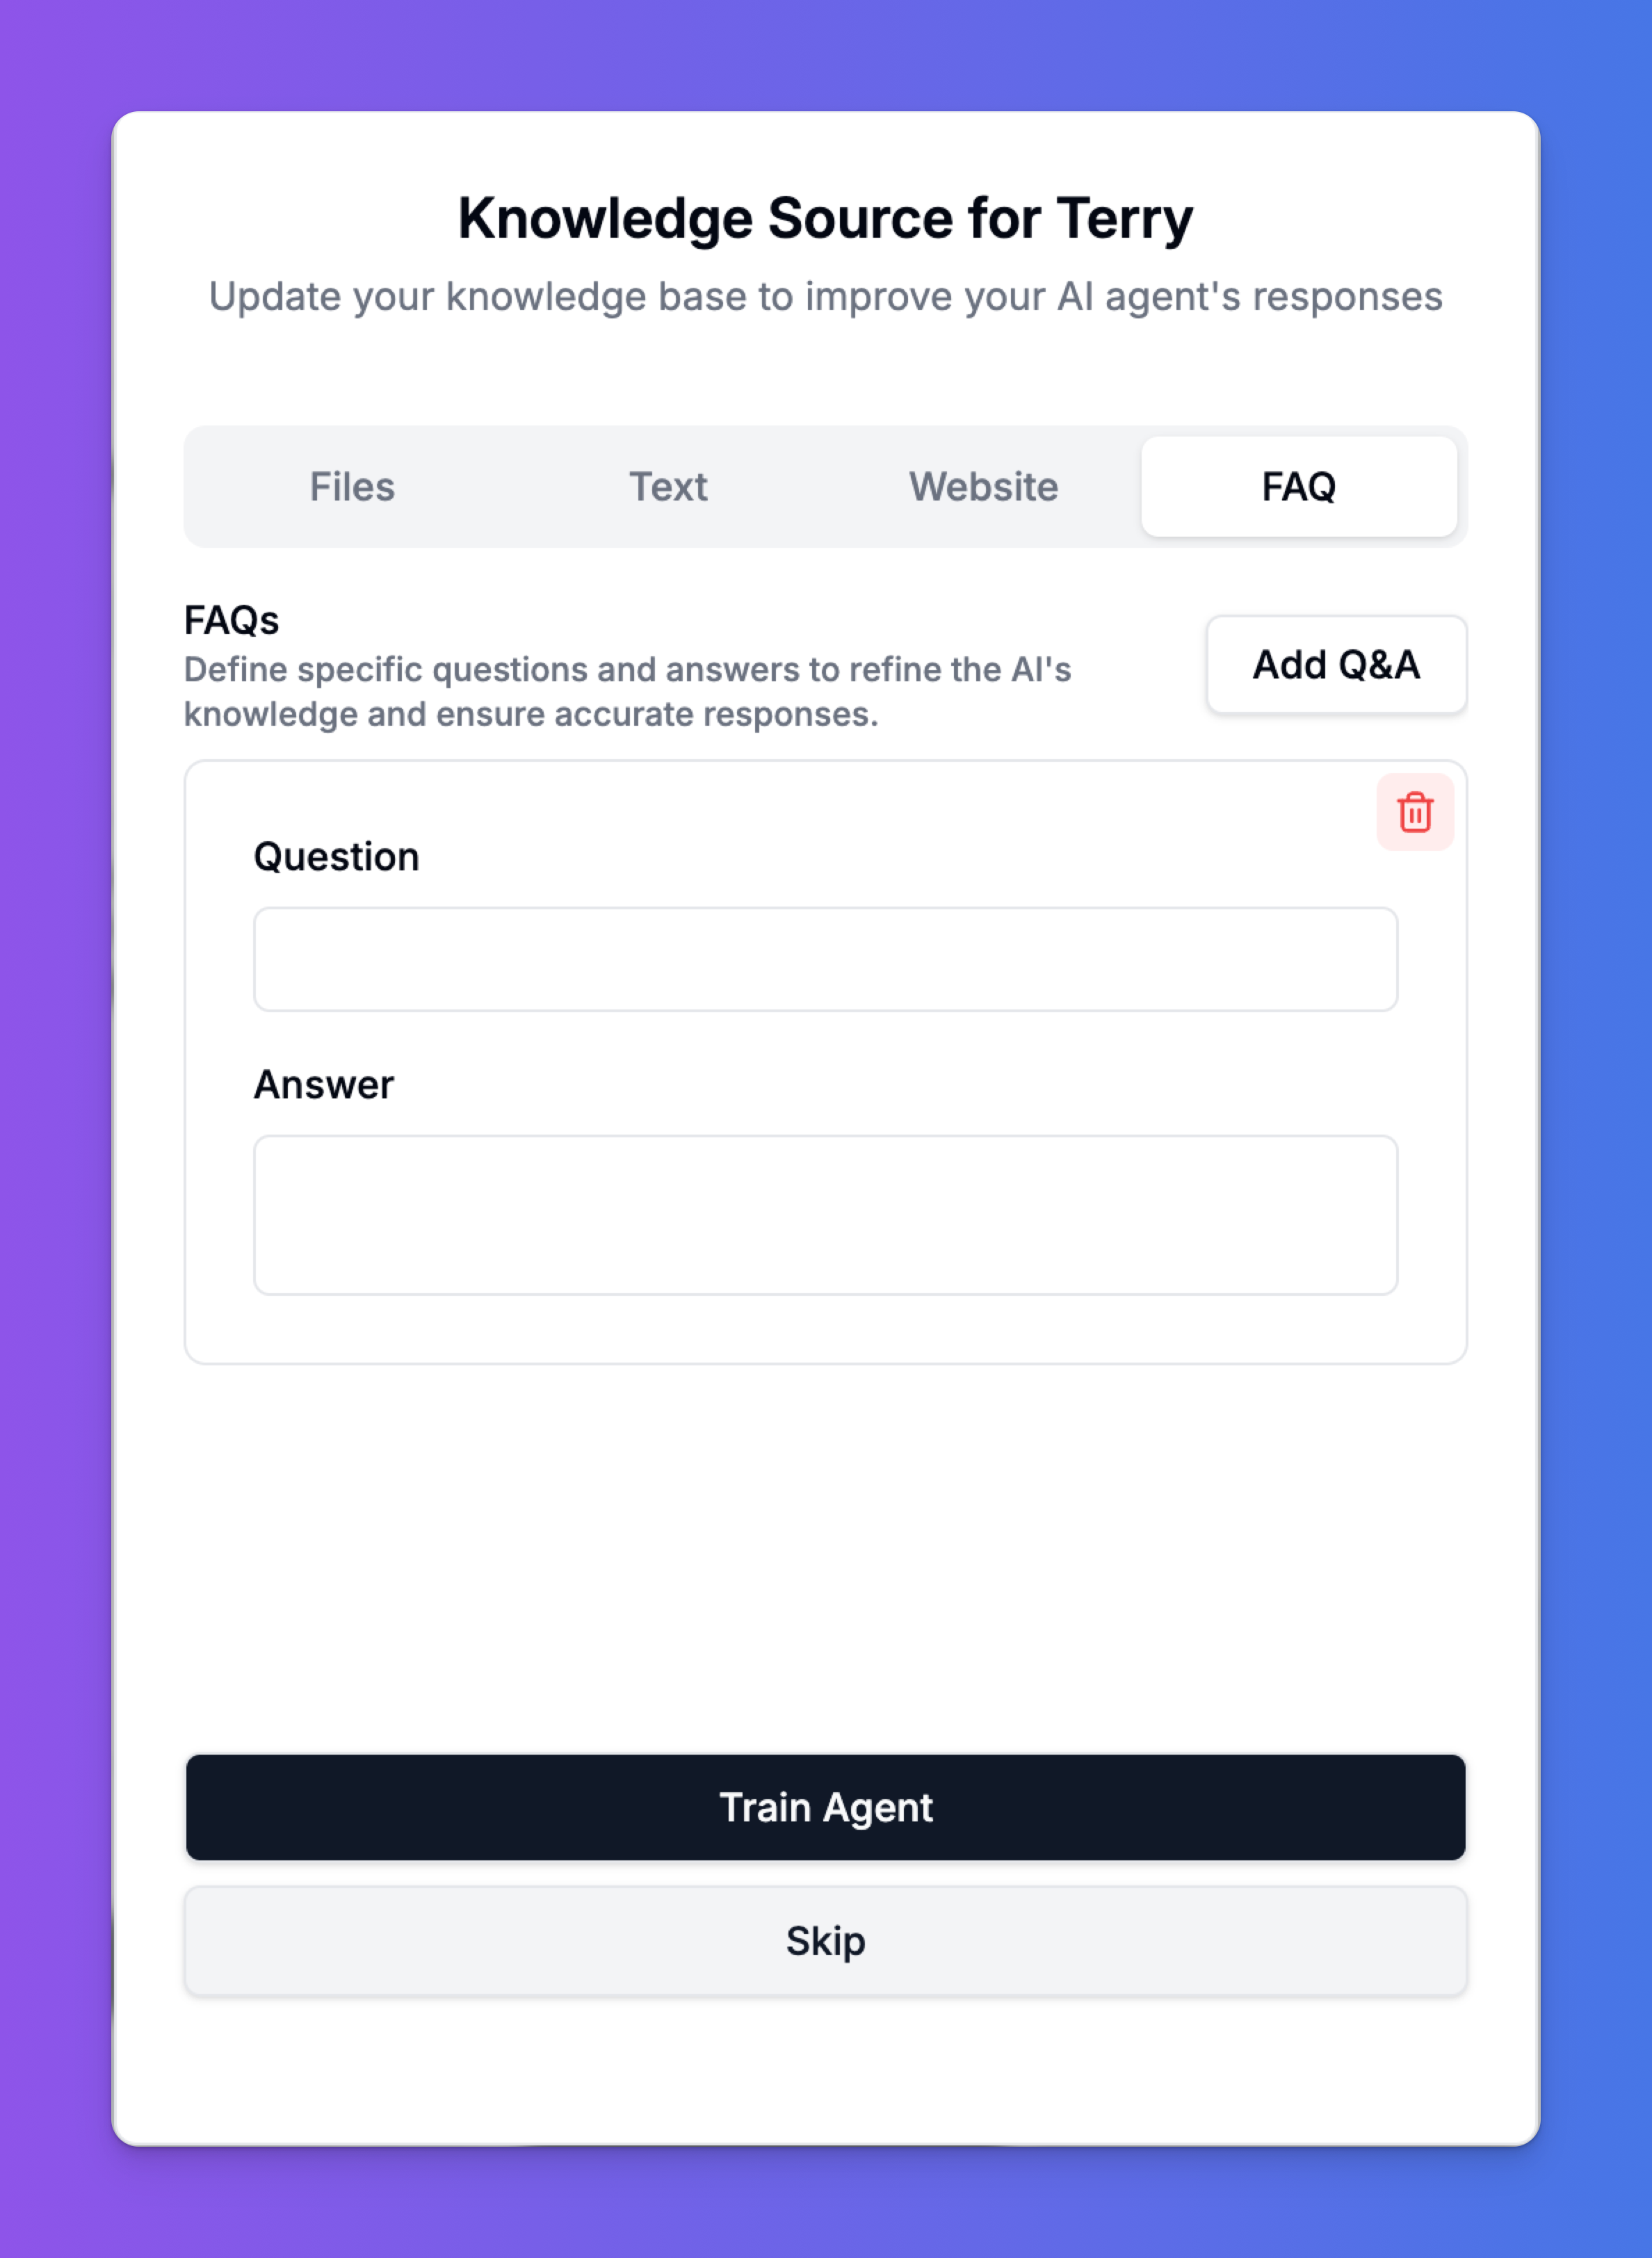
 ### 4. FAQ
The FAQ tab allows you to create a structured list of specific questions and their corresponding answers. This is the best way to ensure the agent responds with a precise, pre-defined answer to common queries. This method gives you the most control over the agent's output for specific questions.
* **How to Add**: Click the **"Add Q\&A"** button. An input area will appear for you to type a **Question** and its corresponding **Answer**. You can add as many Q\&A pairs as you need.
* **Best Practice**: Think of the top 10-20 questions your customers ask. Add them here with concise, approved answers. You can also add variations of a question to improve the agent's recognition.
### 4. FAQ
The FAQ tab allows you to create a structured list of specific questions and their corresponding answers. This is the best way to ensure the agent responds with a precise, pre-defined answer to common queries. This method gives you the most control over the agent's output for specific questions.
* **How to Add**: Click the **"Add Q\&A"** button. An input area will appear for you to type a **Question** and its corresponding **Answer**. You can add as many Q\&A pairs as you need.
* **Best Practice**: Think of the top 10-20 questions your customers ask. Add them here with concise, approved answers. You can also add variations of a question to improve the agent's recognition.
 ***
## Training Your Agent
After you add or modify any content in your Knowledge Base, you must retrain the agent for the changes to take effect.
Simply click the **"Train Agent"** button at the bottom of the screen. The system will process all the new and updated information and make it available to your agent. This process is usually very fast, but may take a few moments if you've added a large amount of content.
If you are not ready to apply your changes, you can click **"Skip"**.
By thoughtfully curating your agent's Knowledge Base, you empower it to be a truly helpful, accurate, and reliable assistant for your customers.
# Introduction
Source: https://docs.intervo.ai/introduction
Welcome to intervo new documentation
***
## Training Your Agent
After you add or modify any content in your Knowledge Base, you must retrain the agent for the changes to take effect.
Simply click the **"Train Agent"** button at the bottom of the screen. The system will process all the new and updated information and make it available to your agent. This process is usually very fast, but may take a few moments if you've added a large amount of content.
If you are not ready to apply your changes, you can click **"Skip"**.
By thoughtfully curating your agent's Knowledge Base, you empower it to be a truly helpful, accurate, and reliable assistant for your customers.
# Introduction
Source: https://docs.intervo.ai/introduction
Welcome to intervo new documentation
 ## Introduction
Welcome to the Quick Start guide for Intervo.ai! This page will help you get up and running with Intervo.ai by walking you through the essential steps to set up your account, create your first AI Voice & Chat Agent, and integrate it into your platform.
## What is Intervo.ai?
Intervo.ai is an advanced AI Voice and Chat agent platform that empowers businesses to create custom, AI-powered assistants tailored to their specific data and needs. By integrating Intervo.ai into your website or contact center, you can revolutionize customer support, automate lead generation, and engage users more effectively through both text and voice.
## Key Features:
1. Customizable AI Agents: Train intelligent voice and chat agents using your own data sources, such as documents, websites, or knowledge bases, to ensure accurate and context-aware responses.
2. Voice & Chat Capabilities: Engage customers on their preferred channel. Our platform seamlessly handles both text-based chat conversations and natural-language voice calls.
3. Simple Web Integration: Easily embed a sleek chat and voice widget on your website without needing extensive coding knowledge.
Telephony Integration: Connect your AI agents to the phone network using Twilio. Automate inbound and outbound calls, answer customer queries, and provide 24/7 voice support.
4. Advanced Analytics: Monitor agent interactions across all channels to gain deep insights into user behavior and continuously improve performance.
Multi-Platform Support: While you can instantly deploy a widget on your website, our upcoming SDK and expanded integrations will allow you to deploy your agents across mobile apps and other platforms.
5. Lead Generation Tools: Capture and qualify leads through automated, intelligent conversations on your website or over the phone, streamlining your sales pipeline.
Privacy and Security: Ensure your data is protected with enterprise-grade encryption and robust access controls.
6. By leveraging Intervo.ai, businesses can provide instantaneous, round-the-clock support, engage users in meaningful voice and text conversations, and automate routine tasks, leading to dramatically increased efficiency and higher customer satisfaction
## How to add the AI agent to your website?
To integrate the AI agent into your website, you can use our easy-to-install widget:
### Website Widget
This method allows you to embed a sleek and modern chat bubble in the corner of your website. The widget remains visible and easily accessible, providing a consistent experience. When a user clicks it, a floating chat window opens, allowing them to type or speak with your AI agent without leaving the current page. The widget is designed to be unobtrusive while offering a seamless and convenient way for users to get the help they need, the moment they need it.
### Connect to Phone Lines
You can also connect your AI agent to a phone number via our Twilio integration. This enables your customers to call in and have a natural conversation with your AI voice agent, receiving support or information just as they would from a human agent.
We are continuously expanding our integration options, with a software development kit (SDK) and more methods coming soon to give you even greater flexibility in deploying your AI agents.
# Environment variables
Source: https://docs.intervo.ai/open-source/environment-variables
This is the full list of environment variables used in the project
# Environment Variables Configuration Guide
This document provides a comprehensive guide to all environment variables used across the Intervo application stack.
## Overview
The Intervo application uses environment variables across three main packages:
* **Backend** (`packages/intervo-backend/`) - Node.js API server
* **Frontend** (`packages/intervo-frontend/`) - Next.js web application
* **Widget** (`packages/intervo-widget/`) - Embeddable widget component
## Backend Environment Variables
Based on `packages/intervo-backend/env.example`, create `.env` file:
### Core Application Settings
```bash
NODE_ENV=development
SESSION_SECRET=your-super-secret-session-key
NEXTAUTH_SECRET=your-jwt-secret-key
ENCRYPTION_KEY=your-32-character-encryption-key
```
### Database
```bash
MONGO_URI=mongodb://admin:password123@localhost:27017/intervo?authSource=admin
```
### Twilio Communication
```bash
TWILIO_ACCOUNT_SID=ACxxxxxxxxxxxxxxxxxxxxxxxxxxxxx
TWILIO_AUTH_TOKEN=your-twilio-auth-token
TWILIO_API_KEY=SKxxxxxxxxxxxxxxxxxxxxxxxxxxxxx
TWILIO_API_SECRET=your-twilio-api-secret
TWILIO_APP_SID=APxxxxxxxxxxxxxxxxxxxxxxxxxxxxx
TWILIO_PHONE_NUMBER=+1234567890
```
### AI Services
```bash
OPENAI_API_KEY=sk-your-openai-api-key
GROQ_API_KEY=gsk_your-groq-api-key
AI_FLOW_API_KEY=your-ai-flow-key
```
### Speech Services
```bash
ASSEMBLYAI_API_KEY=your-assemblyai-api-key
AZURE_SPEECH_KEY=your-azure-speech-key
AZURE_SPEECH_REGION=eastus
ELEVENLABS_API_KEY=your-elevenlabs-api-key
ELEVENLABS_VOICE_ID=21m00Tcm4TlvDq8ikWAM
```
### Cloud Storage
```bash
AWS_ACCESS_KEY_ID=AKIAIOSFODNN7EXAMPLE
AWS_SECRET_ACCESS_KEY=wJalrXUtnFEMI/K7MDENG/bPxRfiCYEXAMPLEKEY
AWS_REGION=us-east-1
```
### Google Services
```bash
GOOGLE_CLIENT_ID=your-google-client-id.googleusercontent.com
GOOGLE_CLIENT_SECRET=your-google-client-secret
```
## Frontend Environment Variables
Create `.env.local` in `packages/intervo-frontend/`:
```bash
NODE_ENV=development
NEXT_PUBLIC_API_URL_DEVELOPMENT=http://localhost:3001
NEXT_PUBLIC_API_URL_PRODUCTION=https://api.yourdomain.com
NEXT_PUBLIC_STRIPE_PUBLISHABLE_KEY=pk_test_your-stripe-publishable-key
```
## Widget Environment Variables
Create `.env` in `packages/intervo-widget/`:
```bash
VITE_API_URL_DEVELOPMENT=http://localhost:3001
VITE_API_URL_PRODUCTION=https://api.yourdomain.com
```
## Quick Development Setup
### 1. Backend Setup
```bash
# Copy example file
cp packages/intervo-backend/env.example packages/intervo-backend/.env
# Edit with minimum required variables:
NODE_ENV=development
MONGO_URI=mongodb://admin:password123@localhost:27017/intervo?authSource=admin
SESSION_SECRET=dev-session-secret-minimum-32-chars
NEXTAUTH_SECRET=dev-jwt-secret-minimum-32-characters
ENCRYPTION_KEY=dev-encryption-key-exactly-32-chars
```
### 2. Frontend Setup
```bash
# Create frontend environment file
cat > packages/intervo-frontend/.env.local << EOF
NODE_ENV=development
NEXT_PUBLIC_API_URL_DEVELOPMENT=http://localhost:3001
EOF
```
### 3. Widget Setup
```bash
# Create widget environment file
cat > packages/intervo-widget/.env << EOF
VITE_API_URL_DEVELOPMENT=http://localhost:3001
EOF
```
## Service Integration Guides
### Twilio Setup
1. Create account at [Twilio](https://www.twilio.com/)
2. Get Account SID and Auth Token from Console
3. Create API Key and Secret
4. Purchase phone number
5. Create TwiML Application
### OpenAI Setup
1. Create account at [OpenAI](https://platform.openai.com/)
2. Generate API key from dashboard
3. Set usage limits and billing
### Stripe Setup
1. Create account at [Stripe](https://stripe.com/)
2. Get publishable and secret keys
3. Set up webhook endpoints
4. Configure test/production modes
### Speech Services
* **AssemblyAI**: Get API key from [AssemblyAI](https://www.assemblyai.com/)
* **Azure Speech**: Create Speech service in Azure portal
* **ElevenLabs**: Get API key from [ElevenLabs](https://elevenlabs.io/)
## Environment-Specific Configuration
### Development
* Use test/sandbox API keys
* Local database connection
* HTTP URLs acceptable
### Production
* Production API keys only
* Secure database connection
* HTTPS URLs required
* Strong secrets (32+ characters)
## Security Best Practices
1. **Never commit .env files to version control**
2. **Use different API keys per environment**
3. **Rotate secrets regularly**
4. **Use secure secret management in production**
## Troubleshooting
### Common Issues
1. **Missing environment variables**: Check server logs for undefined errors
2. **Frontend API connection**: Verify NEXT\_PUBLIC\_API\_URL\_DEVELOPMENT
3. **Database connection**: Check MONGO\_URI format and MongoDB status
4. **Widget not loading**: Rebuild after environment changes
### Debugging
```javascript
// Backend - check environment loading
console.log('Environment check:', {
NODE_ENV: process.env.NODE_ENV,
MONGO_URI: process.env.MONGO_URI ? 'Set' : 'Missing'
});
// Frontend - check public variables
console.log('Frontend env:', {
API_URL: process.env.NEXT_PUBLIC_API_URL_DEVELOPMENT
});
// Widget - check Vite variables
console.log('Widget env:', {
API_URL: import.meta.env.VITE_API_URL_DEVELOPMENT
});
```
## Complete Variable Reference
### Backend Variables (23 total from env.example)
| Variable | Required | Purpose |
| ----------------------- | -------- | ------------------------- |
| `TWILIO_ACCOUNT_SID` | ✅ | Twilio account identifier |
| `TWILIO_AUTH_TOKEN` | ✅ | Twilio authentication |
| `TWILIO_API_KEY` | ✅ | Twilio API access |
| `TWILIO_API_SECRET` | ✅ | Twilio API security |
| `TWILIO_APP_SID` | ✅ | Twilio application ID |
| `TWILIO_PHONE_NUMBER` | ✅ | Twilio phone number |
| `OPENAI_API_KEY` | ✅ | OpenAI API access |
| `AWS_ACCESS_KEY_ID` | ✅ | AWS access credentials |
| `AWS_SECRET_ACCESS_KEY` | ✅ | AWS secret credentials |
| `AWS_REGION` | ✅ | AWS region setting |
| `MONGO_URI` | ✅ | MongoDB connection |
| `GOOGLE_CLIENT_ID` | ✅ | Google OAuth ID |
| `GOOGLE_CLIENT_SECRET` | ✅ | Google OAuth secret |
| `SESSION_SECRET` | ✅ | Session encryption |
| `NEXTAUTH_SECRET` | ✅ | JWT token secret |
| `NODE_ENV` | ✅ | Environment mode |
| `ASSEMBLYAI_API_KEY` | ✅ | Speech recognition |
| `AI_FLOW_API_KEY` | ❌ | AI workflow service |
| `GROQ_API_KEY` | ✅ | Groq AI service |
| `ELEVENLABS_API_KEY` | ✅ | Text-to-speech |
| `ELEVENLABS_VOICE_ID` | ❌ | Default voice |
| `AZURE_SPEECH_KEY` | ✅ | Azure speech service |
| `AZURE_SPEECH_REGION` | ✅ | Azure region |
### Additional Backend Variables (Found in codebase)
* `STRIPE_SECRET_KEY` - Stripe payment processing
* `STRIPE_WEBHOOK_SECRET` - Stripe webhook validation
* `BASE_URL` - Application base domain
* `ENCRYPTION_KEY` - Data encryption key
* `HETZNER_STORAGE_*` - Hetzner cloud storage
* `DEEPGRAM_API_KEY` - Deepgram speech service
* `VOYAGE_API_KEY` - Voyage embeddings
* `MAILCOACH_TOKEN` - Email marketing
### Frontend Variables
* `NEXT_PUBLIC_API_URL_DEVELOPMENT` - Dev API endpoint
* `NEXT_PUBLIC_API_URL_PRODUCTION` - Prod API endpoint
* `NEXT_PUBLIC_STRIPE_PUBLISHABLE_KEY` - Stripe public key
### Widget Variables
* `VITE_API_URL_DEVELOPMENT` - Dev API endpoint
* `VITE_API_URL_PRODUCTION` - Prod API endpoint
***
This configuration enables the complete Intervo application stack with all integrations. Adjust API keys and endpoints based on your specific deployment requirements.
# Intervo.ai - Open Source Edition
Source: https://docs.intervo.ai/open-source/introduction
The open-source framework for building powerful AI-powered voice and chat agents. Freely available under the MIT License.
## Intervo.ai - Open Source Edition
Welcome to the open-source version of Intervo.ai! This repository contains the core framework for building, deploying, and managing sophisticated AI voice and chat agents. We believe in democratizing access to powerful conversational AI, and by open-sourcing our core technology, we hope to empower developers and businesses to create innovative solutions.
This project is for you if you want to:
* Build a custom AI chat or voice agent with complete control over the code.
* Integrate conversational AI into your own applications and infrastructure.
* Contribute to a community-driven project shaping the future of human-computer interaction.
* Understand the inner workings of a production-grade conversational AI platform.
### Key Features
* **Dual Voice & Chat Channels:** A unified framework to handle both text-based conversations and real-time voice interactions.
* **Extensible Core:** A modular architecture that allows you to easily add new features, integrations, and capabilities.
* **Custom Knowledge Sources:** Train your agents on your own documents, websites, and APIs for accurate, context-aware responses.
* **Telephony Integration Hooks:** Includes the necessary components to connect your agents to telephony providers like Twilio for handling phone calls.
* **Full Data Control:** Self-host your agents and maintain complete ownership and privacy of your data and user interactions.
### Getting Started
To get started with your own instance of Intervo.ai, please refer to the **[Documentation](link-to-your-docs)** for detailed installation and configuration instructions. The documentation will guide you through setting up the environment, creating your first agent, and deploying it.
### License
Intervo.ai Open Source Edition is released under the **MIT License**.
This is a permissive open-source license, which means you are free to use, copy, modify, merge, publish, distribute, sublicense, and/or sell copies of the software. You can use it in your own personal or commercial projects with very few restrictions. For the full license text, please see the `LICENSE` file in this repository.
### How to Contribute
We welcome contributions from the community! Whether you're fixing a bug, improving documentation, or building a new feature, your help is valued. To contribute, please follow these steps:
1. **Fork the repository.**
2. **Create a new branch** for your feature or bug fix (`git checkout -b feature/your-feature-name`).
3. **Make your changes** and commit them with clear, descriptive messages.
4. **Push your branch** to your fork (`git push origin feature/your-feature-name`).
5. **Open a Pull Request** against our `main` branch.
Please read our `CONTRIBUTING.md` file for more detailed guidelines on our development process and standards. We look forward to seeing what you'll build!
# Setup & Installation Guide
Source: https://docs.intervo.ai/open-source/setup
A complete guide to setting up and running the Intervo.ai open-source application using Docker for local development.
# Intervo.ai: Application Setup Guide
This guide will walk you through setting up and running the **Intervo.ai** application using Docker Compose in a local development environment.
***
## 📦 Prerequisites
Before you start, ensure the following software is installed:
### Required Tools
* **Docker & Docker Compose**\
Install [Docker Desktop](https://www.docker.com/products/docker-desktop) (includes Docker Engine + Compose).
* **Git**\
[Install Git](https://git-scm.com/downloads) for your operating system.
* **FFmpeg**\
Required for audio processing.
#### FFmpeg Installation
**macOS (Homebrew)**
```bash
brew install ffmpeg
```
**Ubuntu/Debian**
```bash
sudo apt update && sudo apt install ffmpeg
```
**Windows**
```bash
choco install ffmpeg
# or
scoop install ffmpeg
```
***
## 🖥️ Minimum System Requirements
* **RAM**: 4GB (8GB recommended)
* **Disk Space**: 10GB minimum (Docker images, volumes, source files)
***
## 🗂 Project Structure
```
intervo-react/
├── packages/
│ ├── intervo-frontend/
│ ├── intervo-backend/
│ │ └── rag_py/
│ │ ├── requirements.txt
│ │ └── api.py
│ └── intervo-widget/
├── package.json
└── docker-compose.yml
```
***
## 🚀 Setup Instructions
### 1. Clone the Repository
```bash
git clone https://github.com/intervo/intervo
cd intervo-react
```
### 2. Verify Directory Structure
Ensure the structure matches the layout above. Docker volumes and npm workspaces depend on this.
### 3. Start the Application
**Foreground (with logs)**
```bash
docker-compose -f docker-compose.yml up
```
**Detached Mode**
```bash
docker-compose -f docker-compose.yml up -d
```
### 4. First-Time Setup
On the first run, Docker will:
* Pull base images
* Install npm and pip dependencies
* Initialize MongoDB
**Startup Order:**
1. MongoDB
2. Backend (after MongoDB is ready)
3. Frontend and RAG API (in parallel)
***
## 🌐 Accessing Services
| Service | URL/Port |
| ----------- | ---------------------------------------------------------------------- |
| Frontend | [http://localhost:3000](http://localhost:3000) |
| Backend API | [http://localhost:3001](http://localhost:3001) |
| RAG API | [http://localhost:4003](http://localhost:4003) |
| MongoDB URI | `mongodb://admin:password123@localhost:27017/intervo?authSource=admin` |
***
## 🛠 Development Workflow
### Code Changes
* **Frontend**: Auto-reloads via Next.js
* **Backend**: Auto-restarts via `nodemon`
* **RAG API**: Restart container manually after changes
### View Logs
```bash
# All logs
docker-compose -f docker-compose.yml logs
# Specific service
docker-compose -f docker-compose.yml logs backend
# Real-time logs
docker-compose -f docker-compose.yml logs -f
```
***
## 🧪 Managing the Application
### Stop Services
```bash
docker-compose -f docker-compose.yml down
```
### Clean Reset (Remove Volumes)
```bash
docker-compose -f docker-compose.yml down -v
```
### Rebuild Services
```bash
docker-compose -f docker-compose.yml up --build
```
### Restart Specific Service
```bash
docker-compose -f docker-compose.yml restart frontend
```
***
## 🛢️ Database Access
### Connection Info
* Host: `localhost:27017`
* Username: `admin`
* Password: `password123`
* DB Name: `intervo`
* Auth Source: `admin`
### MongoDB Compass
Use:
```
mongodb://admin:password123@localhost:27017/intervo?authSource=admin
```
### Command Line
```bash
docker-compose -f docker-compose.yml exec mongodb mongosh -u admin -p password123 --authenticationDatabase admin
```
***
## 🧩 Troubleshooting
### Common Issues
* **Port Conflicts**\
Check with: `sudo lsof -i :3000`
* **Docker Stuck**\
Restart Docker or run: `docker system prune`
* **Corrupt Volumes**\
Run: `docker-compose -f docker-compose.yml down -v`
* **Build Failures**\
Clean and rebuild:
```bash
docker-compose -f docker-compose.yml down -v
docker-compose -f docker-compose.yml up --build
```
### Debugging Services
```bash
# Container status
docker-compose -f docker-compose.yml ps
# Open shell in backend
docker-compose -f docker-compose.yml exec backend sh
```
***
## 💡 Development Tips
* **Live Reload**: Code changes reflect instantly due to mounted volumes
* **Persistent MongoDB**: Data is stored in Docker volume `mongodb_data`
* **Clean Fix**: If stuck, run:
```bash
docker-compose -f docker-compose.yml down -v && docker-compose -f docker-compose.yml up
```
***
## 🔑 Environment Variables
Defined in `docker-compose.yml`:
```env
NODE_ENV=development
MONGO_URI=mongodb://admin:password123@mongodb:27017/intervo?authSource=admin
PYTHONPATH=/app/packages/intervo-backend
```
***
## ✅ Next Steps
* Visit the app at: [http://localhost:3000](http://localhost:3000)
* Test API endpoints via Postman or browser at [http://localhost:3001](http://localhost:3001)
* Check RAG API status at [http://localhost:4003](http://localhost:4003)
***
## 🚀 Production Deployment
For production, create a dedicated and secure `docker-compose.prod.yml` and update environment variables and secrets accordingly.
***
Happy coding! 🎉
# Phone Agent
Source: https://docs.intervo.ai/publishing-an-agent/phone-agent
Learn how to connect your Intervo.ai agent to the telephone network using Twilio, enabling it to handle both incoming and outgoing calls automatically.
# Connecting Your Agent to the World: A Guide to the Phone Agent
Take your AI agent beyond the web and onto the global telephone network. By integrating with Twilio, you can assign a real phone number to your Intervo.ai agent, allowing it to answer customer calls 24/7, make outbound calls programmatically, and provide a seamless voice experience over the phone.
This comprehensive guide will walk you through every step of the setup process, from configuring your Twilio account to making your first API-driven outbound call.
***
## The Big Picture: How it Works
The process involves three main stages:
1. **Setting up Twilio**: You will create a Twilio account, secure your API credentials, and purchase a phone number.
2. **Connecting Twilio to Intervo.ai**: You will provide your Twilio credentials to Intervo.ai, allowing our platform to manage calls on your behalf.
3. **Assigning a Number and Making Calls**: You will link your new phone number to your AI agent and learn how to handle both incoming and outgoing calls.
***
## Step 1: Prerequisites - Setting Up Your Twilio Account
Before you can configure your Phone Agent in Intervo.ai, you need to complete two essential tasks in your Twilio account.
## Introduction
Welcome to the Quick Start guide for Intervo.ai! This page will help you get up and running with Intervo.ai by walking you through the essential steps to set up your account, create your first AI Voice & Chat Agent, and integrate it into your platform.
## What is Intervo.ai?
Intervo.ai is an advanced AI Voice and Chat agent platform that empowers businesses to create custom, AI-powered assistants tailored to their specific data and needs. By integrating Intervo.ai into your website or contact center, you can revolutionize customer support, automate lead generation, and engage users more effectively through both text and voice.
## Key Features:
1. Customizable AI Agents: Train intelligent voice and chat agents using your own data sources, such as documents, websites, or knowledge bases, to ensure accurate and context-aware responses.
2. Voice & Chat Capabilities: Engage customers on their preferred channel. Our platform seamlessly handles both text-based chat conversations and natural-language voice calls.
3. Simple Web Integration: Easily embed a sleek chat and voice widget on your website without needing extensive coding knowledge.
Telephony Integration: Connect your AI agents to the phone network using Twilio. Automate inbound and outbound calls, answer customer queries, and provide 24/7 voice support.
4. Advanced Analytics: Monitor agent interactions across all channels to gain deep insights into user behavior and continuously improve performance.
Multi-Platform Support: While you can instantly deploy a widget on your website, our upcoming SDK and expanded integrations will allow you to deploy your agents across mobile apps and other platforms.
5. Lead Generation Tools: Capture and qualify leads through automated, intelligent conversations on your website or over the phone, streamlining your sales pipeline.
Privacy and Security: Ensure your data is protected with enterprise-grade encryption and robust access controls.
6. By leveraging Intervo.ai, businesses can provide instantaneous, round-the-clock support, engage users in meaningful voice and text conversations, and automate routine tasks, leading to dramatically increased efficiency and higher customer satisfaction
## How to add the AI agent to your website?
To integrate the AI agent into your website, you can use our easy-to-install widget:
### Website Widget
This method allows you to embed a sleek and modern chat bubble in the corner of your website. The widget remains visible and easily accessible, providing a consistent experience. When a user clicks it, a floating chat window opens, allowing them to type or speak with your AI agent without leaving the current page. The widget is designed to be unobtrusive while offering a seamless and convenient way for users to get the help they need, the moment they need it.
### Connect to Phone Lines
You can also connect your AI agent to a phone number via our Twilio integration. This enables your customers to call in and have a natural conversation with your AI voice agent, receiving support or information just as they would from a human agent.
We are continuously expanding our integration options, with a software development kit (SDK) and more methods coming soon to give you even greater flexibility in deploying your AI agents.
# Environment variables
Source: https://docs.intervo.ai/open-source/environment-variables
This is the full list of environment variables used in the project
# Environment Variables Configuration Guide
This document provides a comprehensive guide to all environment variables used across the Intervo application stack.
## Overview
The Intervo application uses environment variables across three main packages:
* **Backend** (`packages/intervo-backend/`) - Node.js API server
* **Frontend** (`packages/intervo-frontend/`) - Next.js web application
* **Widget** (`packages/intervo-widget/`) - Embeddable widget component
## Backend Environment Variables
Based on `packages/intervo-backend/env.example`, create `.env` file:
### Core Application Settings
```bash
NODE_ENV=development
SESSION_SECRET=your-super-secret-session-key
NEXTAUTH_SECRET=your-jwt-secret-key
ENCRYPTION_KEY=your-32-character-encryption-key
```
### Database
```bash
MONGO_URI=mongodb://admin:password123@localhost:27017/intervo?authSource=admin
```
### Twilio Communication
```bash
TWILIO_ACCOUNT_SID=ACxxxxxxxxxxxxxxxxxxxxxxxxxxxxx
TWILIO_AUTH_TOKEN=your-twilio-auth-token
TWILIO_API_KEY=SKxxxxxxxxxxxxxxxxxxxxxxxxxxxxx
TWILIO_API_SECRET=your-twilio-api-secret
TWILIO_APP_SID=APxxxxxxxxxxxxxxxxxxxxxxxxxxxxx
TWILIO_PHONE_NUMBER=+1234567890
```
### AI Services
```bash
OPENAI_API_KEY=sk-your-openai-api-key
GROQ_API_KEY=gsk_your-groq-api-key
AI_FLOW_API_KEY=your-ai-flow-key
```
### Speech Services
```bash
ASSEMBLYAI_API_KEY=your-assemblyai-api-key
AZURE_SPEECH_KEY=your-azure-speech-key
AZURE_SPEECH_REGION=eastus
ELEVENLABS_API_KEY=your-elevenlabs-api-key
ELEVENLABS_VOICE_ID=21m00Tcm4TlvDq8ikWAM
```
### Cloud Storage
```bash
AWS_ACCESS_KEY_ID=AKIAIOSFODNN7EXAMPLE
AWS_SECRET_ACCESS_KEY=wJalrXUtnFEMI/K7MDENG/bPxRfiCYEXAMPLEKEY
AWS_REGION=us-east-1
```
### Google Services
```bash
GOOGLE_CLIENT_ID=your-google-client-id.googleusercontent.com
GOOGLE_CLIENT_SECRET=your-google-client-secret
```
## Frontend Environment Variables
Create `.env.local` in `packages/intervo-frontend/`:
```bash
NODE_ENV=development
NEXT_PUBLIC_API_URL_DEVELOPMENT=http://localhost:3001
NEXT_PUBLIC_API_URL_PRODUCTION=https://api.yourdomain.com
NEXT_PUBLIC_STRIPE_PUBLISHABLE_KEY=pk_test_your-stripe-publishable-key
```
## Widget Environment Variables
Create `.env` in `packages/intervo-widget/`:
```bash
VITE_API_URL_DEVELOPMENT=http://localhost:3001
VITE_API_URL_PRODUCTION=https://api.yourdomain.com
```
## Quick Development Setup
### 1. Backend Setup
```bash
# Copy example file
cp packages/intervo-backend/env.example packages/intervo-backend/.env
# Edit with minimum required variables:
NODE_ENV=development
MONGO_URI=mongodb://admin:password123@localhost:27017/intervo?authSource=admin
SESSION_SECRET=dev-session-secret-minimum-32-chars
NEXTAUTH_SECRET=dev-jwt-secret-minimum-32-characters
ENCRYPTION_KEY=dev-encryption-key-exactly-32-chars
```
### 2. Frontend Setup
```bash
# Create frontend environment file
cat > packages/intervo-frontend/.env.local << EOF
NODE_ENV=development
NEXT_PUBLIC_API_URL_DEVELOPMENT=http://localhost:3001
EOF
```
### 3. Widget Setup
```bash
# Create widget environment file
cat > packages/intervo-widget/.env << EOF
VITE_API_URL_DEVELOPMENT=http://localhost:3001
EOF
```
## Service Integration Guides
### Twilio Setup
1. Create account at [Twilio](https://www.twilio.com/)
2. Get Account SID and Auth Token from Console
3. Create API Key and Secret
4. Purchase phone number
5. Create TwiML Application
### OpenAI Setup
1. Create account at [OpenAI](https://platform.openai.com/)
2. Generate API key from dashboard
3. Set usage limits and billing
### Stripe Setup
1. Create account at [Stripe](https://stripe.com/)
2. Get publishable and secret keys
3. Set up webhook endpoints
4. Configure test/production modes
### Speech Services
* **AssemblyAI**: Get API key from [AssemblyAI](https://www.assemblyai.com/)
* **Azure Speech**: Create Speech service in Azure portal
* **ElevenLabs**: Get API key from [ElevenLabs](https://elevenlabs.io/)
## Environment-Specific Configuration
### Development
* Use test/sandbox API keys
* Local database connection
* HTTP URLs acceptable
### Production
* Production API keys only
* Secure database connection
* HTTPS URLs required
* Strong secrets (32+ characters)
## Security Best Practices
1. **Never commit .env files to version control**
2. **Use different API keys per environment**
3. **Rotate secrets regularly**
4. **Use secure secret management in production**
## Troubleshooting
### Common Issues
1. **Missing environment variables**: Check server logs for undefined errors
2. **Frontend API connection**: Verify NEXT\_PUBLIC\_API\_URL\_DEVELOPMENT
3. **Database connection**: Check MONGO\_URI format and MongoDB status
4. **Widget not loading**: Rebuild after environment changes
### Debugging
```javascript
// Backend - check environment loading
console.log('Environment check:', {
NODE_ENV: process.env.NODE_ENV,
MONGO_URI: process.env.MONGO_URI ? 'Set' : 'Missing'
});
// Frontend - check public variables
console.log('Frontend env:', {
API_URL: process.env.NEXT_PUBLIC_API_URL_DEVELOPMENT
});
// Widget - check Vite variables
console.log('Widget env:', {
API_URL: import.meta.env.VITE_API_URL_DEVELOPMENT
});
```
## Complete Variable Reference
### Backend Variables (23 total from env.example)
| Variable | Required | Purpose |
| ----------------------- | -------- | ------------------------- |
| `TWILIO_ACCOUNT_SID` | ✅ | Twilio account identifier |
| `TWILIO_AUTH_TOKEN` | ✅ | Twilio authentication |
| `TWILIO_API_KEY` | ✅ | Twilio API access |
| `TWILIO_API_SECRET` | ✅ | Twilio API security |
| `TWILIO_APP_SID` | ✅ | Twilio application ID |
| `TWILIO_PHONE_NUMBER` | ✅ | Twilio phone number |
| `OPENAI_API_KEY` | ✅ | OpenAI API access |
| `AWS_ACCESS_KEY_ID` | ✅ | AWS access credentials |
| `AWS_SECRET_ACCESS_KEY` | ✅ | AWS secret credentials |
| `AWS_REGION` | ✅ | AWS region setting |
| `MONGO_URI` | ✅ | MongoDB connection |
| `GOOGLE_CLIENT_ID` | ✅ | Google OAuth ID |
| `GOOGLE_CLIENT_SECRET` | ✅ | Google OAuth secret |
| `SESSION_SECRET` | ✅ | Session encryption |
| `NEXTAUTH_SECRET` | ✅ | JWT token secret |
| `NODE_ENV` | ✅ | Environment mode |
| `ASSEMBLYAI_API_KEY` | ✅ | Speech recognition |
| `AI_FLOW_API_KEY` | ❌ | AI workflow service |
| `GROQ_API_KEY` | ✅ | Groq AI service |
| `ELEVENLABS_API_KEY` | ✅ | Text-to-speech |
| `ELEVENLABS_VOICE_ID` | ❌ | Default voice |
| `AZURE_SPEECH_KEY` | ✅ | Azure speech service |
| `AZURE_SPEECH_REGION` | ✅ | Azure region |
### Additional Backend Variables (Found in codebase)
* `STRIPE_SECRET_KEY` - Stripe payment processing
* `STRIPE_WEBHOOK_SECRET` - Stripe webhook validation
* `BASE_URL` - Application base domain
* `ENCRYPTION_KEY` - Data encryption key
* `HETZNER_STORAGE_*` - Hetzner cloud storage
* `DEEPGRAM_API_KEY` - Deepgram speech service
* `VOYAGE_API_KEY` - Voyage embeddings
* `MAILCOACH_TOKEN` - Email marketing
### Frontend Variables
* `NEXT_PUBLIC_API_URL_DEVELOPMENT` - Dev API endpoint
* `NEXT_PUBLIC_API_URL_PRODUCTION` - Prod API endpoint
* `NEXT_PUBLIC_STRIPE_PUBLISHABLE_KEY` - Stripe public key
### Widget Variables
* `VITE_API_URL_DEVELOPMENT` - Dev API endpoint
* `VITE_API_URL_PRODUCTION` - Prod API endpoint
***
This configuration enables the complete Intervo application stack with all integrations. Adjust API keys and endpoints based on your specific deployment requirements.
# Intervo.ai - Open Source Edition
Source: https://docs.intervo.ai/open-source/introduction
The open-source framework for building powerful AI-powered voice and chat agents. Freely available under the MIT License.
## Intervo.ai - Open Source Edition
Welcome to the open-source version of Intervo.ai! This repository contains the core framework for building, deploying, and managing sophisticated AI voice and chat agents. We believe in democratizing access to powerful conversational AI, and by open-sourcing our core technology, we hope to empower developers and businesses to create innovative solutions.
This project is for you if you want to:
* Build a custom AI chat or voice agent with complete control over the code.
* Integrate conversational AI into your own applications and infrastructure.
* Contribute to a community-driven project shaping the future of human-computer interaction.
* Understand the inner workings of a production-grade conversational AI platform.
### Key Features
* **Dual Voice & Chat Channels:** A unified framework to handle both text-based conversations and real-time voice interactions.
* **Extensible Core:** A modular architecture that allows you to easily add new features, integrations, and capabilities.
* **Custom Knowledge Sources:** Train your agents on your own documents, websites, and APIs for accurate, context-aware responses.
* **Telephony Integration Hooks:** Includes the necessary components to connect your agents to telephony providers like Twilio for handling phone calls.
* **Full Data Control:** Self-host your agents and maintain complete ownership and privacy of your data and user interactions.
### Getting Started
To get started with your own instance of Intervo.ai, please refer to the **[Documentation](link-to-your-docs)** for detailed installation and configuration instructions. The documentation will guide you through setting up the environment, creating your first agent, and deploying it.
### License
Intervo.ai Open Source Edition is released under the **MIT License**.
This is a permissive open-source license, which means you are free to use, copy, modify, merge, publish, distribute, sublicense, and/or sell copies of the software. You can use it in your own personal or commercial projects with very few restrictions. For the full license text, please see the `LICENSE` file in this repository.
### How to Contribute
We welcome contributions from the community! Whether you're fixing a bug, improving documentation, or building a new feature, your help is valued. To contribute, please follow these steps:
1. **Fork the repository.**
2. **Create a new branch** for your feature or bug fix (`git checkout -b feature/your-feature-name`).
3. **Make your changes** and commit them with clear, descriptive messages.
4. **Push your branch** to your fork (`git push origin feature/your-feature-name`).
5. **Open a Pull Request** against our `main` branch.
Please read our `CONTRIBUTING.md` file for more detailed guidelines on our development process and standards. We look forward to seeing what you'll build!
# Setup & Installation Guide
Source: https://docs.intervo.ai/open-source/setup
A complete guide to setting up and running the Intervo.ai open-source application using Docker for local development.
# Intervo.ai: Application Setup Guide
This guide will walk you through setting up and running the **Intervo.ai** application using Docker Compose in a local development environment.
***
## 📦 Prerequisites
Before you start, ensure the following software is installed:
### Required Tools
* **Docker & Docker Compose**\
Install [Docker Desktop](https://www.docker.com/products/docker-desktop) (includes Docker Engine + Compose).
* **Git**\
[Install Git](https://git-scm.com/downloads) for your operating system.
* **FFmpeg**\
Required for audio processing.
#### FFmpeg Installation
**macOS (Homebrew)**
```bash
brew install ffmpeg
```
**Ubuntu/Debian**
```bash
sudo apt update && sudo apt install ffmpeg
```
**Windows**
```bash
choco install ffmpeg
# or
scoop install ffmpeg
```
***
## 🖥️ Minimum System Requirements
* **RAM**: 4GB (8GB recommended)
* **Disk Space**: 10GB minimum (Docker images, volumes, source files)
***
## 🗂 Project Structure
```
intervo-react/
├── packages/
│ ├── intervo-frontend/
│ ├── intervo-backend/
│ │ └── rag_py/
│ │ ├── requirements.txt
│ │ └── api.py
│ └── intervo-widget/
├── package.json
└── docker-compose.yml
```
***
## 🚀 Setup Instructions
### 1. Clone the Repository
```bash
git clone https://github.com/intervo/intervo
cd intervo-react
```
### 2. Verify Directory Structure
Ensure the structure matches the layout above. Docker volumes and npm workspaces depend on this.
### 3. Start the Application
**Foreground (with logs)**
```bash
docker-compose -f docker-compose.yml up
```
**Detached Mode**
```bash
docker-compose -f docker-compose.yml up -d
```
### 4. First-Time Setup
On the first run, Docker will:
* Pull base images
* Install npm and pip dependencies
* Initialize MongoDB
**Startup Order:**
1. MongoDB
2. Backend (after MongoDB is ready)
3. Frontend and RAG API (in parallel)
***
## 🌐 Accessing Services
| Service | URL/Port |
| ----------- | ---------------------------------------------------------------------- |
| Frontend | [http://localhost:3000](http://localhost:3000) |
| Backend API | [http://localhost:3001](http://localhost:3001) |
| RAG API | [http://localhost:4003](http://localhost:4003) |
| MongoDB URI | `mongodb://admin:password123@localhost:27017/intervo?authSource=admin` |
***
## 🛠 Development Workflow
### Code Changes
* **Frontend**: Auto-reloads via Next.js
* **Backend**: Auto-restarts via `nodemon`
* **RAG API**: Restart container manually after changes
### View Logs
```bash
# All logs
docker-compose -f docker-compose.yml logs
# Specific service
docker-compose -f docker-compose.yml logs backend
# Real-time logs
docker-compose -f docker-compose.yml logs -f
```
***
## 🧪 Managing the Application
### Stop Services
```bash
docker-compose -f docker-compose.yml down
```
### Clean Reset (Remove Volumes)
```bash
docker-compose -f docker-compose.yml down -v
```
### Rebuild Services
```bash
docker-compose -f docker-compose.yml up --build
```
### Restart Specific Service
```bash
docker-compose -f docker-compose.yml restart frontend
```
***
## 🛢️ Database Access
### Connection Info
* Host: `localhost:27017`
* Username: `admin`
* Password: `password123`
* DB Name: `intervo`
* Auth Source: `admin`
### MongoDB Compass
Use:
```
mongodb://admin:password123@localhost:27017/intervo?authSource=admin
```
### Command Line
```bash
docker-compose -f docker-compose.yml exec mongodb mongosh -u admin -p password123 --authenticationDatabase admin
```
***
## 🧩 Troubleshooting
### Common Issues
* **Port Conflicts**\
Check with: `sudo lsof -i :3000`
* **Docker Stuck**\
Restart Docker or run: `docker system prune`
* **Corrupt Volumes**\
Run: `docker-compose -f docker-compose.yml down -v`
* **Build Failures**\
Clean and rebuild:
```bash
docker-compose -f docker-compose.yml down -v
docker-compose -f docker-compose.yml up --build
```
### Debugging Services
```bash
# Container status
docker-compose -f docker-compose.yml ps
# Open shell in backend
docker-compose -f docker-compose.yml exec backend sh
```
***
## 💡 Development Tips
* **Live Reload**: Code changes reflect instantly due to mounted volumes
* **Persistent MongoDB**: Data is stored in Docker volume `mongodb_data`
* **Clean Fix**: If stuck, run:
```bash
docker-compose -f docker-compose.yml down -v && docker-compose -f docker-compose.yml up
```
***
## 🔑 Environment Variables
Defined in `docker-compose.yml`:
```env
NODE_ENV=development
MONGO_URI=mongodb://admin:password123@mongodb:27017/intervo?authSource=admin
PYTHONPATH=/app/packages/intervo-backend
```
***
## ✅ Next Steps
* Visit the app at: [http://localhost:3000](http://localhost:3000)
* Test API endpoints via Postman or browser at [http://localhost:3001](http://localhost:3001)
* Check RAG API status at [http://localhost:4003](http://localhost:4003)
***
## 🚀 Production Deployment
For production, create a dedicated and secure `docker-compose.prod.yml` and update environment variables and secrets accordingly.
***
Happy coding! 🎉
# Phone Agent
Source: https://docs.intervo.ai/publishing-an-agent/phone-agent
Learn how to connect your Intervo.ai agent to the telephone network using Twilio, enabling it to handle both incoming and outgoing calls automatically.
# Connecting Your Agent to the World: A Guide to the Phone Agent
Take your AI agent beyond the web and onto the global telephone network. By integrating with Twilio, you can assign a real phone number to your Intervo.ai agent, allowing it to answer customer calls 24/7, make outbound calls programmatically, and provide a seamless voice experience over the phone.
This comprehensive guide will walk you through every step of the setup process, from configuring your Twilio account to making your first API-driven outbound call.
***
## The Big Picture: How it Works
The process involves three main stages:
1. **Setting up Twilio**: You will create a Twilio account, secure your API credentials, and purchase a phone number.
2. **Connecting Twilio to Intervo.ai**: You will provide your Twilio credentials to Intervo.ai, allowing our platform to manage calls on your behalf.
3. **Assigning a Number and Making Calls**: You will link your new phone number to your AI agent and learn how to handle both incoming and outgoing calls.
***
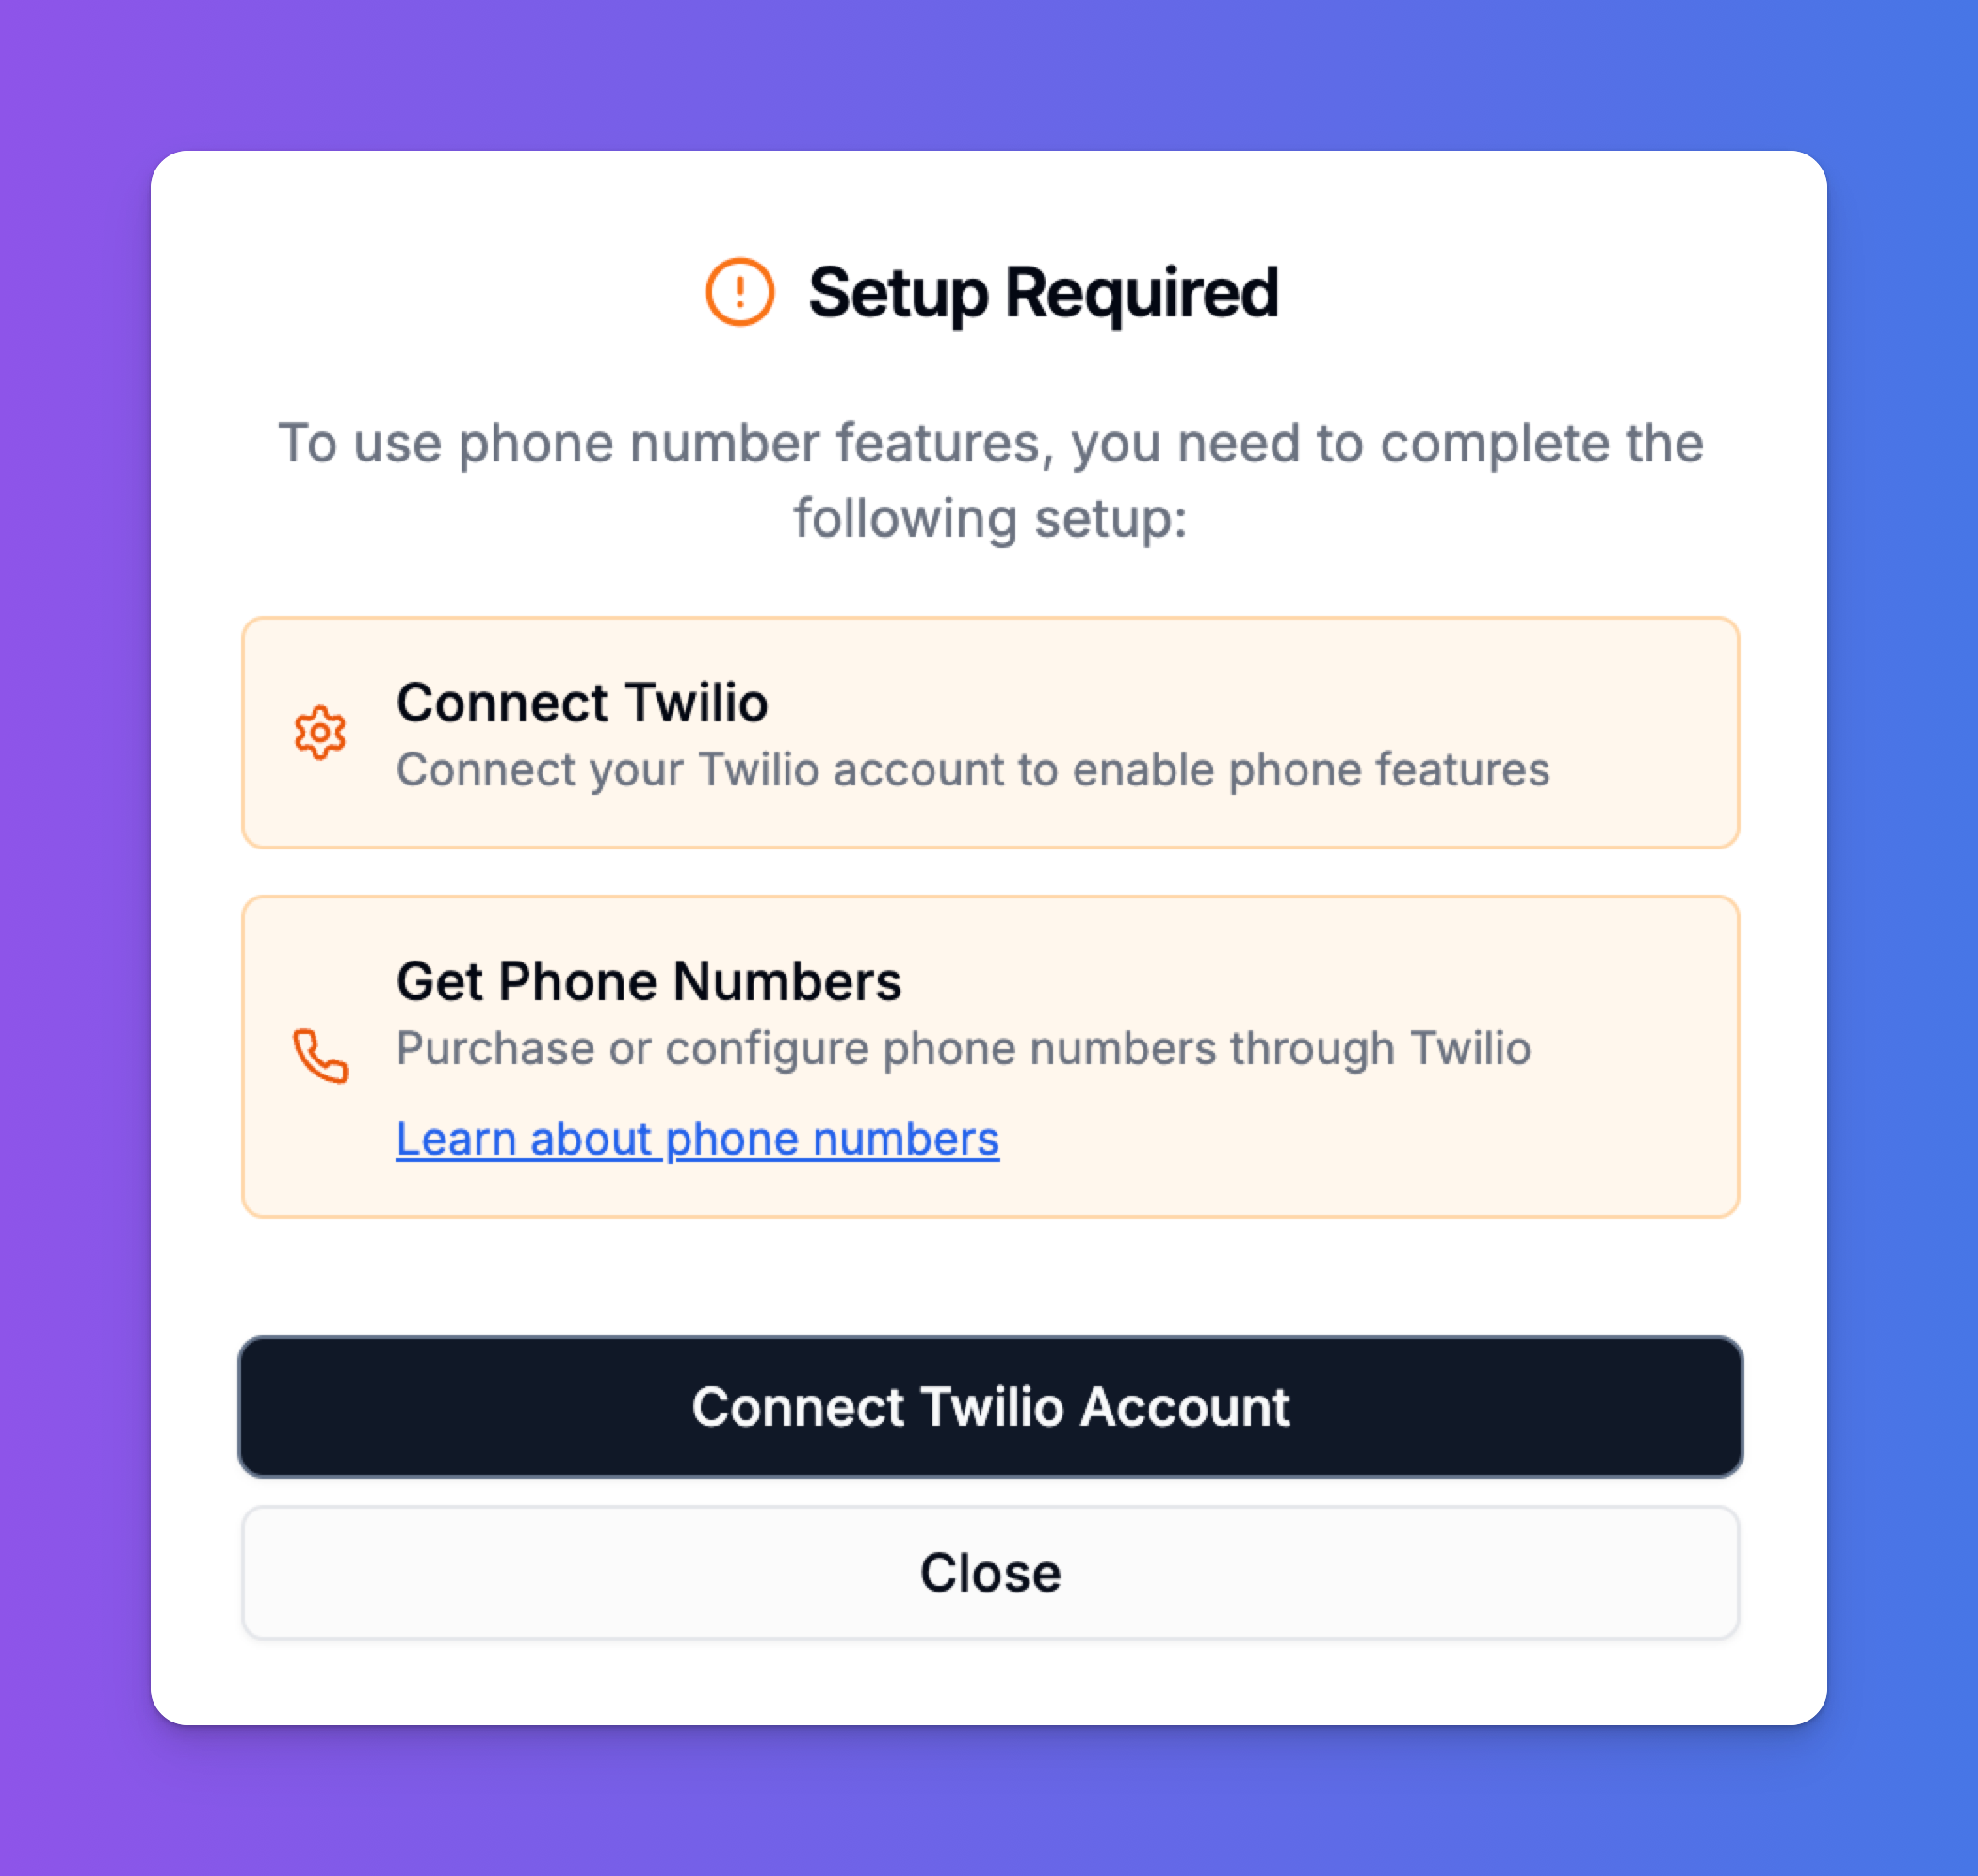
## Step 1: Prerequisites - Setting Up Your Twilio Account
Before you can configure your Phone Agent in Intervo.ai, you need to complete two essential tasks in your Twilio account.
 ### A. Create a Twilio Account & Find Your Credentials
First, you need an active Twilio account.
1. If you don't have one, go to [twilio.com](https://www.twilio.com/) and sign up.
2. Once logged in, navigate to your main Account Dashboard.
3. On the dashboard, you will find your **Account SID** and **Auth Token**. These are your master credentials. Keep them safe and do not share them publicly.
You will need these two values in a moment.
### B. Purchase a Phone Number
Your AI agent needs a dedicated phone number.
1. In your Twilio Console, navigate to the "Phone Numbers" section.
2. Go to `Manage > Buy a number`.
3. Search for a number based on your country, desired capabilities (ensure it has **Voice** capability), and area code.
4. Purchase the number. It will now be listed under your "Active Numbers."
***
## Step 2: Connecting Twilio to Intervo.ai
Now that you have your Twilio credentials and a phone number, it's time to connect the two platforms.
1. In your Intervo.ai dashboard, navigate to the main **Settings**.
2. Select the **"Connect Twilio"** tab.
3. Carefully enter the **Twilio Account SID** and **Twilio Auth Token** that you retrieved in the previous step.
4. Click **"Save & Authenticate Twilio"**.
Our system will verify the credentials. A successful connection is the first prerequisite for enabling phone features.
### A. Create a Twilio Account & Find Your Credentials
First, you need an active Twilio account.
1. If you don't have one, go to [twilio.com](https://www.twilio.com/) and sign up.
2. Once logged in, navigate to your main Account Dashboard.
3. On the dashboard, you will find your **Account SID** and **Auth Token**. These are your master credentials. Keep them safe and do not share them publicly.
You will need these two values in a moment.
### B. Purchase a Phone Number
Your AI agent needs a dedicated phone number.
1. In your Twilio Console, navigate to the "Phone Numbers" section.
2. Go to `Manage > Buy a number`.
3. Search for a number based on your country, desired capabilities (ensure it has **Voice** capability), and area code.
4. Purchase the number. It will now be listed under your "Active Numbers."
***
## Step 2: Connecting Twilio to Intervo.ai
Now that you have your Twilio credentials and a phone number, it's time to connect the two platforms.
1. In your Intervo.ai dashboard, navigate to the main **Settings**.
2. Select the **"Connect Twilio"** tab.
3. Carefully enter the **Twilio Account SID** and **Twilio Auth Token** that you retrieved in the previous step.
4. Click **"Save & Authenticate Twilio"**.
Our system will verify the credentials. A successful connection is the first prerequisite for enabling phone features.
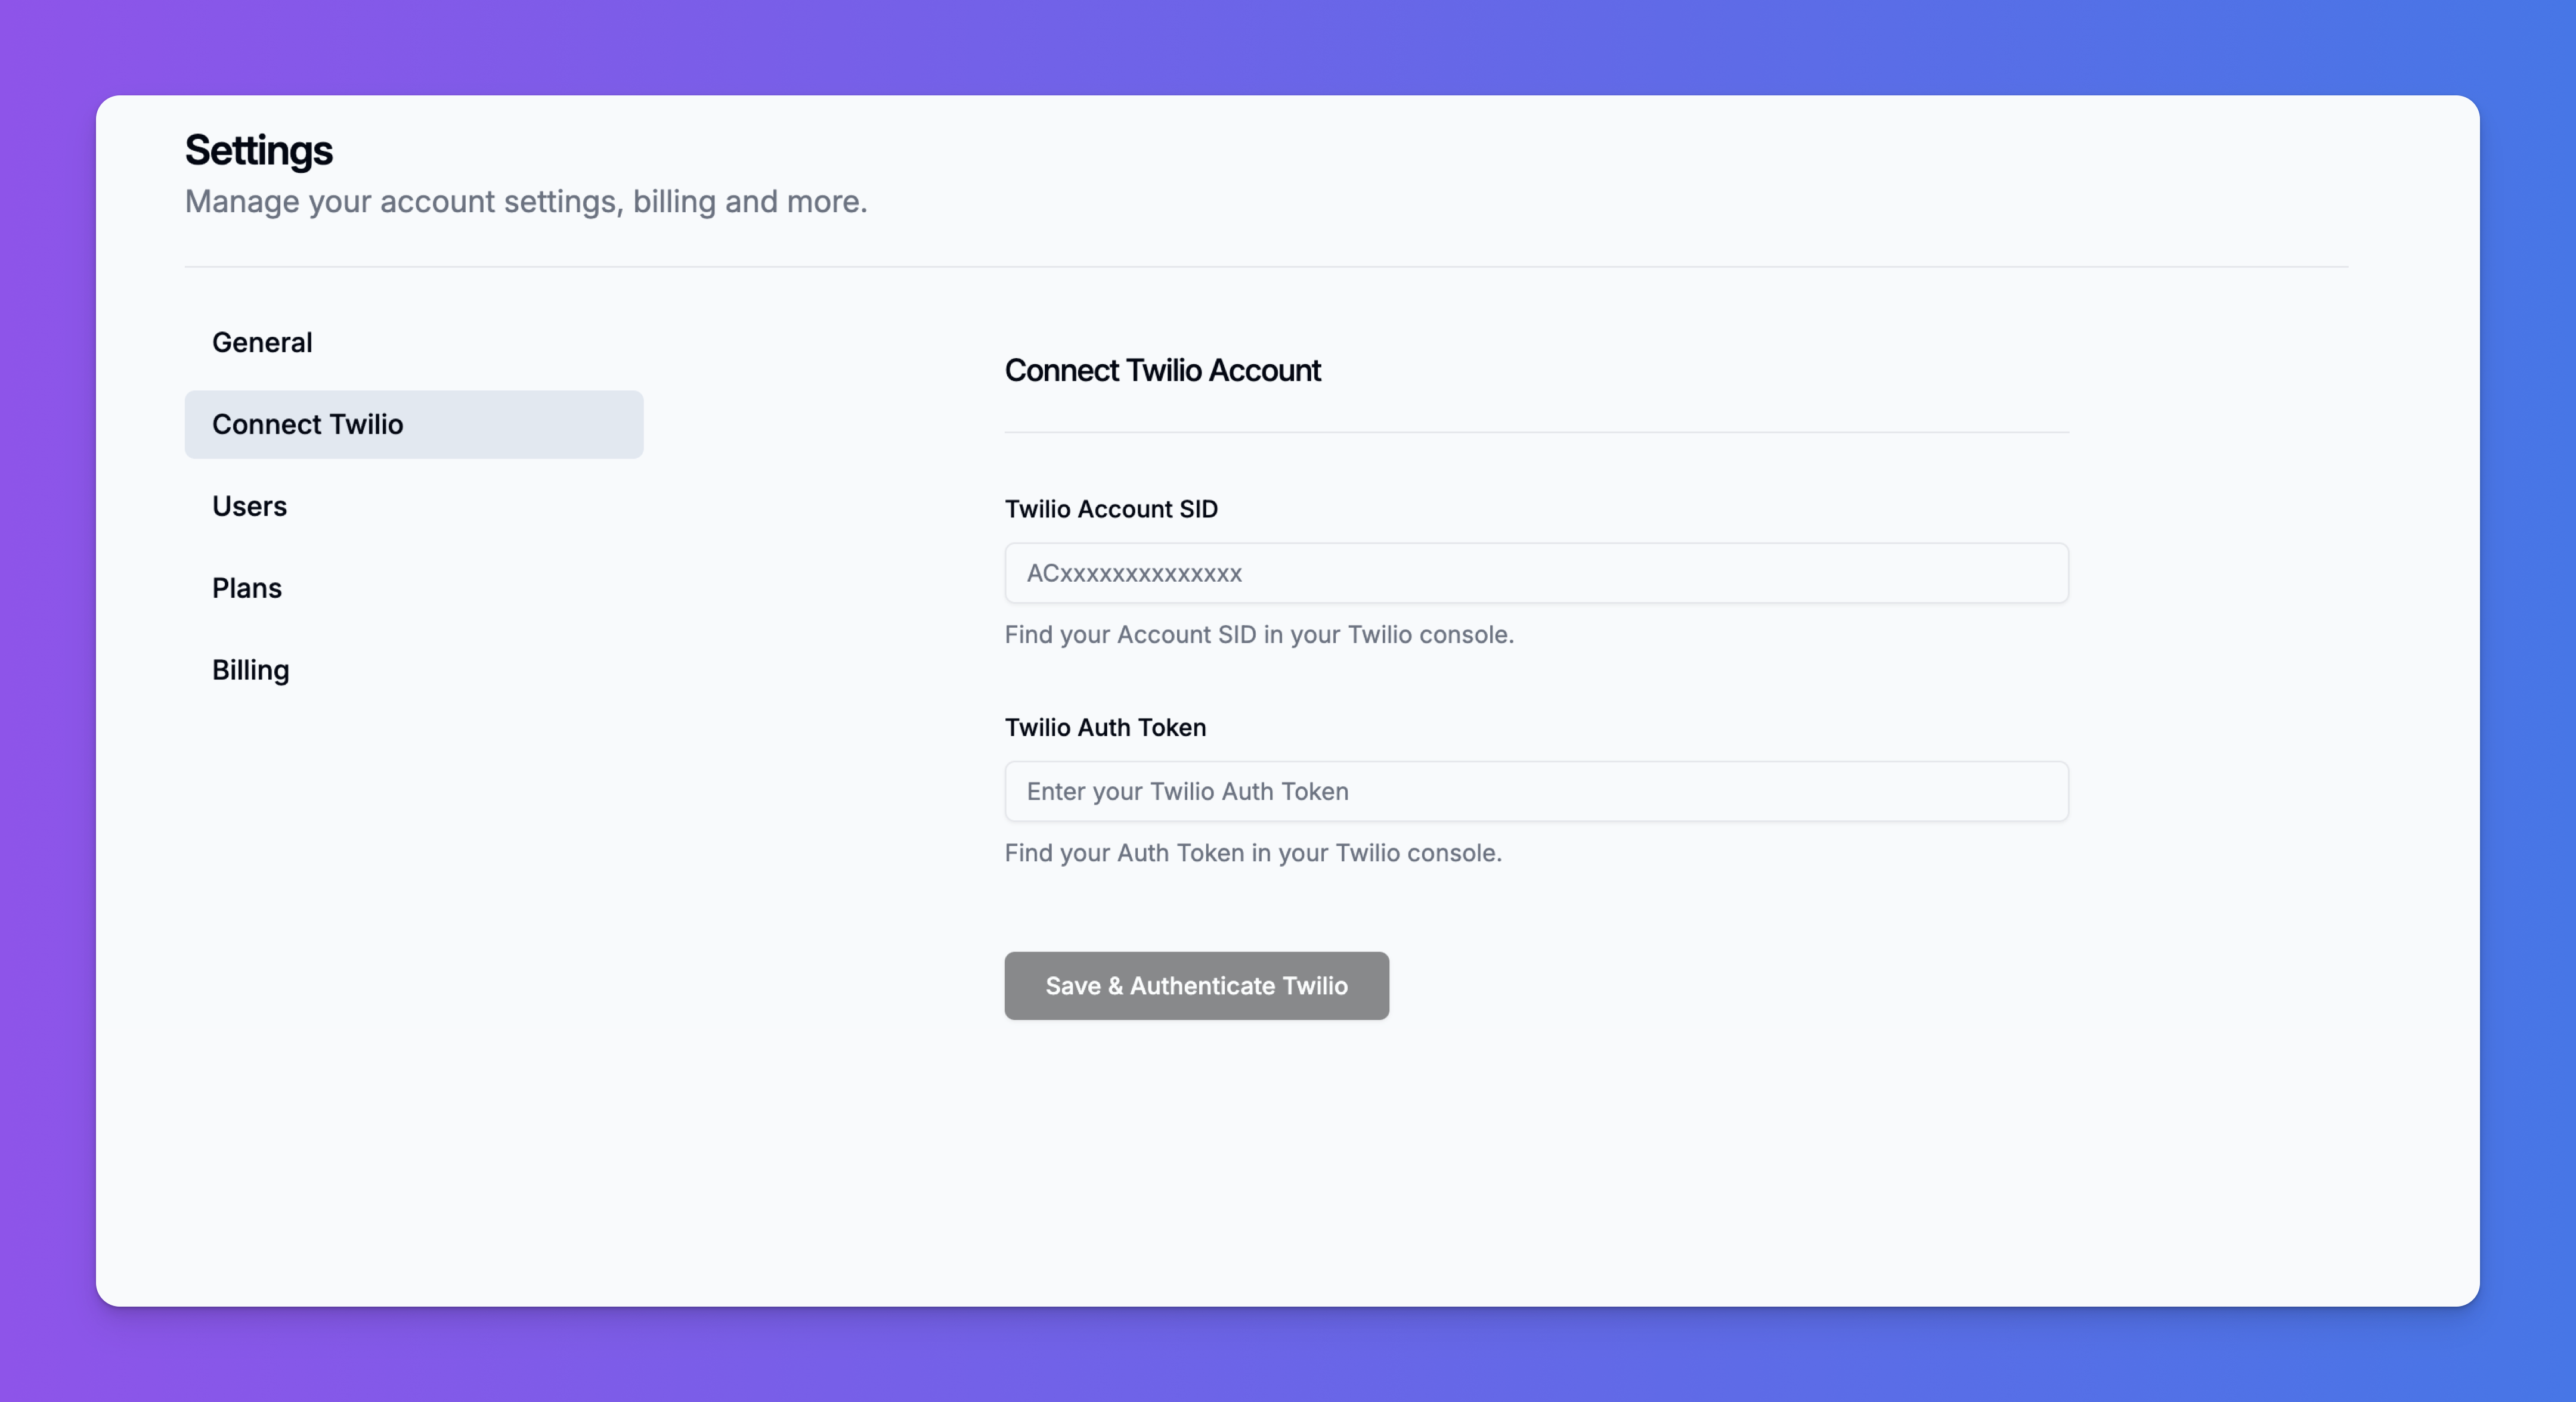 ***
## Step 3: Assigning a Phone Number to Your Agent
With Twilio connected, you can now assign your purchased phone number to a specific AI agent.
1. Ensure the agent you want to use has been configured and **published** from the Agent Playground.
2. In the Intervo.ai dashboard, navigate to the **Phone Numbers** section (e.g., `app.intervo.ai/default/phonenumber`).
3. Click **"Add New Phone Number"**. A popup will appear.
4. **Select phone number**: This dropdown will automatically list all the phone numbers you own in your connected Twilio account. Choose the number you want to use.
5. **Select Agent**: Choose the published AI agent you want to answer calls on this number.
6. Click **"Add Phone Number"**.
***
## Step 3: Assigning a Phone Number to Your Agent
With Twilio connected, you can now assign your purchased phone number to a specific AI agent.
1. Ensure the agent you want to use has been configured and **published** from the Agent Playground.
2. In the Intervo.ai dashboard, navigate to the **Phone Numbers** section (e.g., `app.intervo.ai/default/phonenumber`).
3. Click **"Add New Phone Number"**. A popup will appear.
4. **Select phone number**: This dropdown will automatically list all the phone numbers you own in your connected Twilio account. Choose the number you want to use.
5. **Select Agent**: Choose the published AI agent you want to answer calls on this number.
6. Click **"Add Phone Number"**.
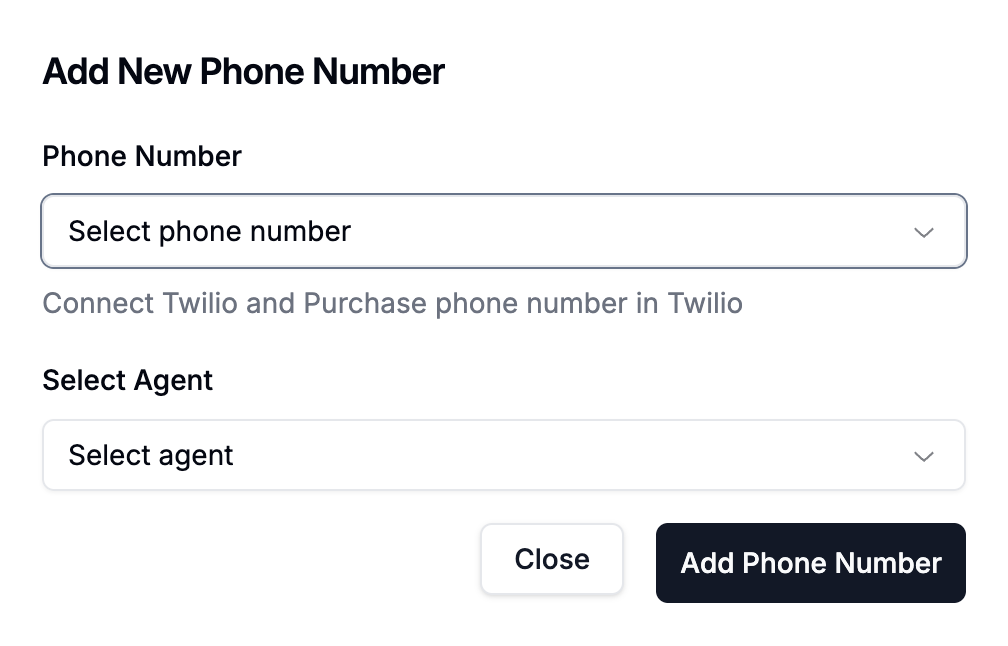 Now, if you return to your agent's **Connect** settings, you will see green checkmarks next to both prerequisites, indicating that your Phone Agent is fully configured and ready.
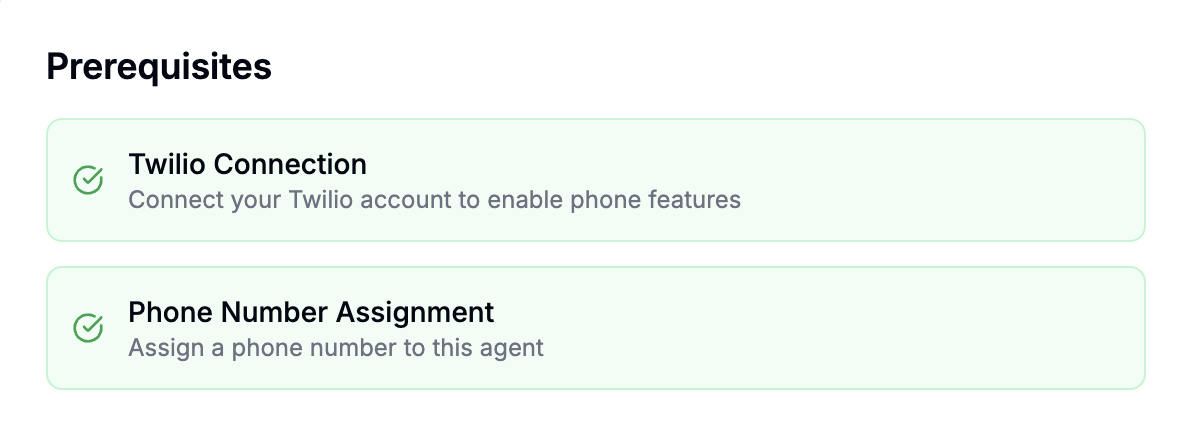 ***
## Step 4: Handling Incoming and Outgoing Calls
### Incoming Calls (Automatic)
This is the easy part. The setup is already complete.
When someone calls the Twilio phone number you assigned, Intervo.ai will automatically route the call to your AI agent. The agent will answer and begin the conversation using the introduction, knowledge, and workflow you configured in the Agent Playground.
***
## Step 4: Handling Incoming and Outgoing Calls
### Incoming Calls (Automatic)
This is the easy part. The setup is already complete.
When someone calls the Twilio phone number you assigned, Intervo.ai will automatically route the call to your AI agent. The agent will answer and begin the conversation using the introduction, knowledge, and workflow you configured in the Agent Playground.
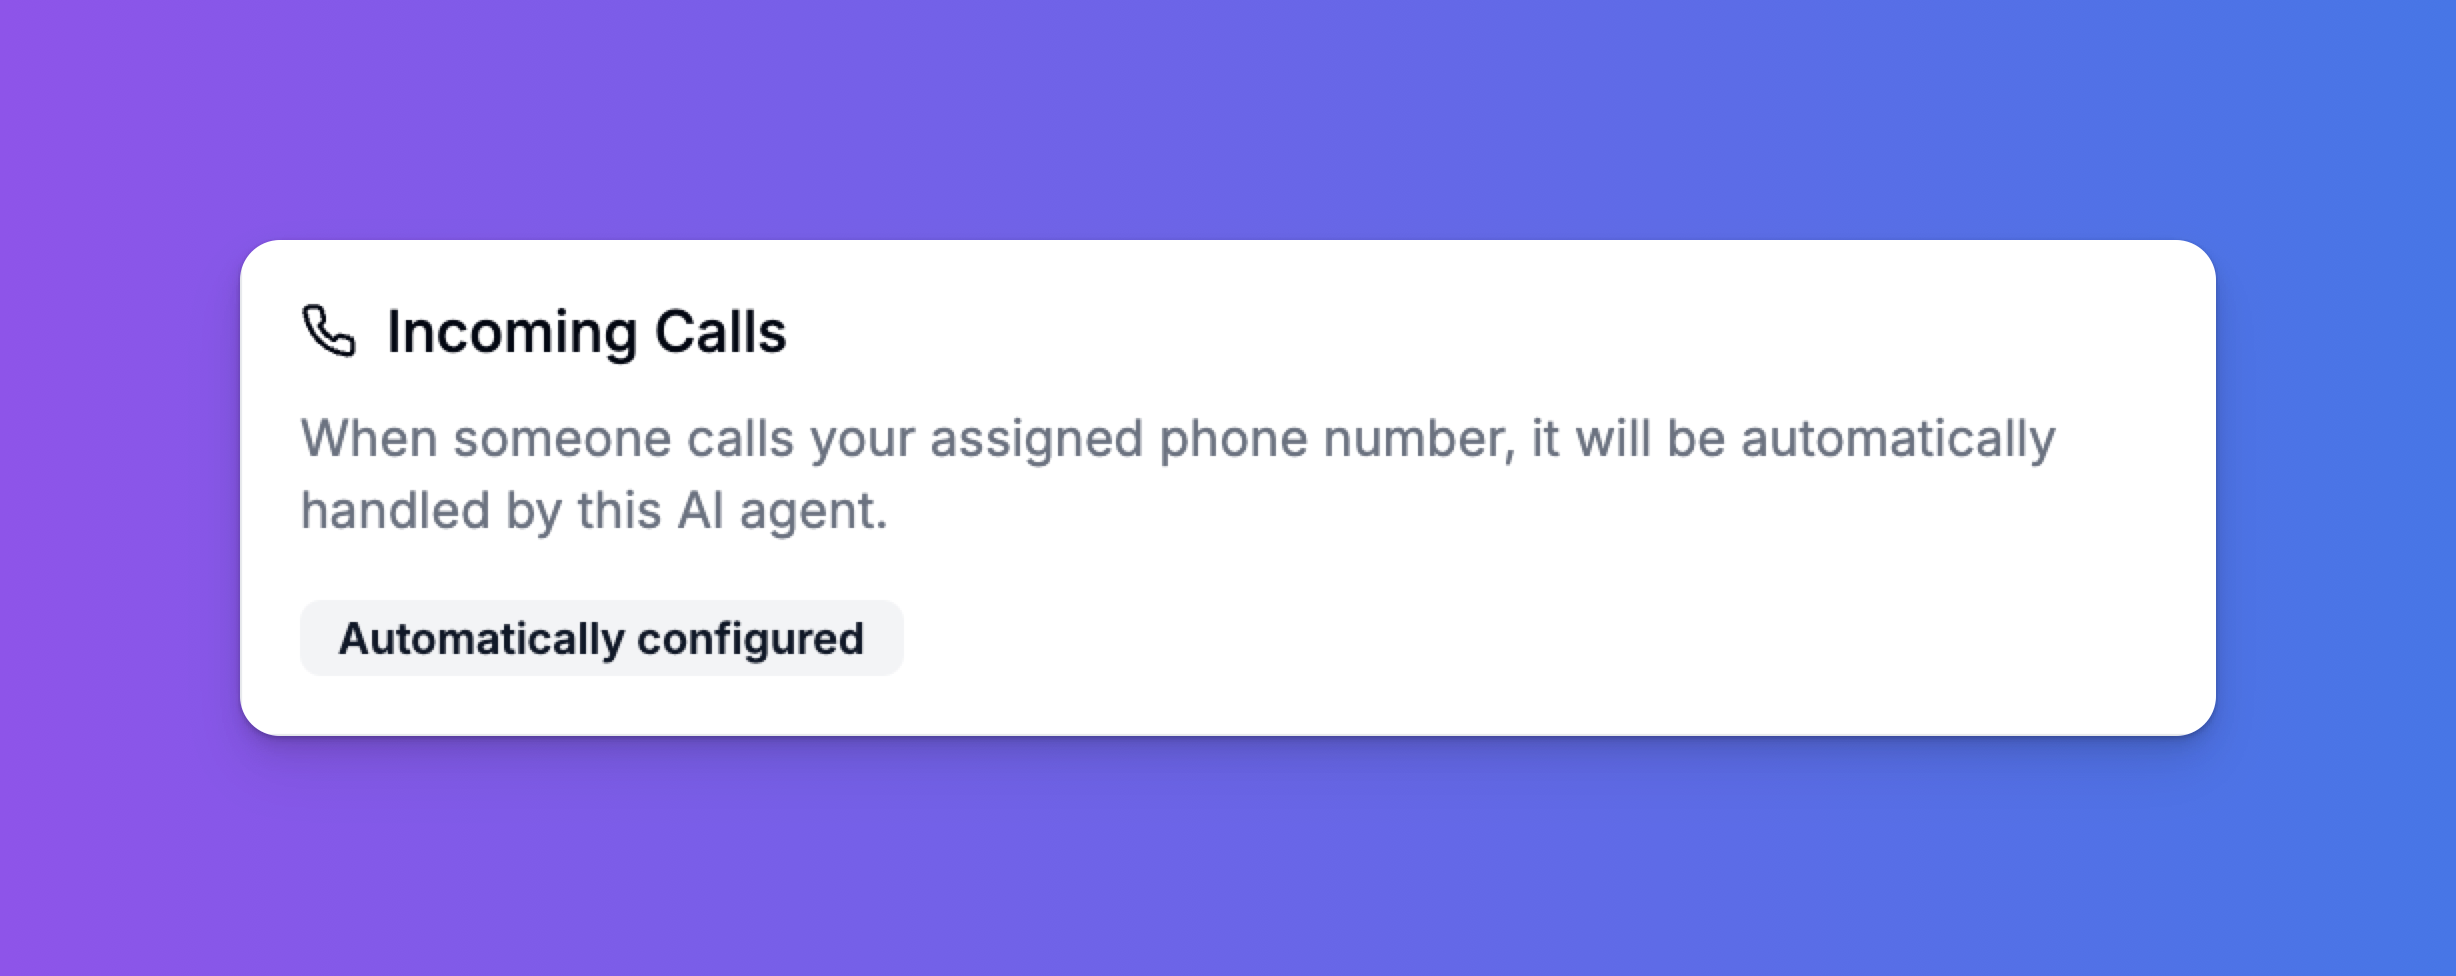 ### Outgoing Calls (via API)
To make your agent initiate a call, you need to use our Outgoing Calls API. This is perfect for proactive notifications, appointment reminders, automated surveys, and more.
You will need two pieces of information from the **Connect** tab of your agent:
* **API ENDPOINT**: The unique URL for your agent's workflow.
* **API KEY**: Your unique, secret key for authentication.
### Request Structure
* **Method**: `POST`
* **URL**: `YOUR_API_ENDPOINT?` + `QUERY_PARAMETERS`
* **Headers**:
* `x-api-key`: `YOUR_API_KEY`
* `Content-Type`: `application/json`
### Query Parameters
You can pass data to your agent by adding parameters to the request URL. This is useful for personalizing the call (e.g., "Hi John...").
| Parameter | Required | Description | Example |
| :------------ | :------- | :---------------------------------------------------------------- | :--------------------- |
| `phoneNumber` | **Yes** | The destination phone number to call, including the country code. | `+1234567890` |
| `firstName` | No | The first name of the person being called. | `Jane` |
| `lastName` | No | The last name of the person being called. | `Doe` |
| `email` | No | The email address of the person being called. | `jane.doe@example.com` |
| `country` | No | The country of the person being called. | `United States` |
| `callType` | **Yes** | Must be set to `outbound`. | `outbound` |
*`You can also add any custom parameters you need (e.g., &orderId=12345). Your agent can be configured to use this data in its conversation.`*
#### Example API Call
Here are examples of how to initiate an outbound call using `curl` and JavaScript.
**`curl Example:`**
```bash
curl -X POST \
'[https://api.intervo.ai/workflow/YOUR_WORKFLOW_ID?phoneNumber=+1234567890&firstName=John&lastName=Doe&email=john.doe@example.com&callType=outbound&country=United%20States](https://api.intervo.ai/workflow/YOUR_WORKFLOW_ID?phoneNumber=+1234567890&firstName=John&lastName=Doe&email=john.doe@example.com&callType=outbound&country=United%20States)' \
--header 'x-api-key: YOUR_API_KEY' \
--header 'Content-Type: application/json'
```
**`Javascript Example:`**
```js
// You might need to install node-fetch: npm install node-fetch
const fetch = require('node-fetch');
const API_ENDPOINT = '[https://api.intervo.ai/workflow/YOUR_WORKFLOW_ID](https://api.intervo.ai/workflow/YOUR_WORKFLOW_ID)';
const API_KEY = 'YOUR_API_KEY';
async function makeOutboundCall(phoneNumber, firstName) {
const params = new URLSearchParams({
phoneNumber: phoneNumber,
firstName: firstName,
callType: 'outbound'
});
const url = `${API_ENDPOINT}?${params}`;
console.log(`Initiating call to ${url}`);
try {
const response = await fetch(url, {
method: 'POST',
headers: {
'x-api-key': API_KEY,
'Content-Type': 'application/json'
}
});
if (!response.ok) {
throw new Error(`API request failed with status ${response.status}`);
}
const data = await response.json();
console.log('API Response:', data);
return data;
} catch (error) {
console.error('Error initiating call:', error);
}
}
// Example usage:
makeOutboundCall('+1234567890', 'Jane');
```
You have now fully configured your Phone Agent. It can serve as an automated receptionist for inbound calls and a proactive communication tool for outbound campaigns, all powered by the agent you designed.
# Webhooks
Source: https://docs.intervo.ai/publishing-an-agent/webhooks
Learn how to connect Intervo.ai to your other business systems using webhooks. Get real-time notifications for call summaries, new contacts, and more.
# Automating Your Workflows with Webhook Integrations
The Intervo.ai platform is powerful on its own, but its true potential is realized when it communicates with the other tools you use every day. **Webhook Integration** is the bridge that connects your AI agent's activities to your CRM, helpdesk, database, or any other custom application in real-time.
This guide will walk you through setting up webhooks to receive automated notifications for key events, such as when a call is summarized or a new contact is created.
***
## What is a Webhook?
A webhook is an automated message sent from one app to another when a specific event occurs. In the context of Intervo.ai, when a "Trigger Event" (like a completed conversation) happens, our system will automatically send an HTTP request with a detailed data payload to a "Webhook Endpoint" (a URL you provide).
This allows you to:
* Instantly update your CRM with new leads captured by your agent.
* Automatically create support tickets in your helpdesk from a user conversation.
* Log detailed call summaries to a database or spreadsheet for analysis.
* Trigger custom workflows in platforms like Zapier or Make.
***
## How to Configure a Webhook
Setting up a new webhook is a straightforward process.
1. Navigate to the **Webhook Integration** section in your Intervo.ai settings.
2. Click "Add Webhook" or begin filling out the configuration form.
### Outgoing Calls (via API)
To make your agent initiate a call, you need to use our Outgoing Calls API. This is perfect for proactive notifications, appointment reminders, automated surveys, and more.
You will need two pieces of information from the **Connect** tab of your agent:
* **API ENDPOINT**: The unique URL for your agent's workflow.
* **API KEY**: Your unique, secret key for authentication.
### Request Structure
* **Method**: `POST`
* **URL**: `YOUR_API_ENDPOINT?` + `QUERY_PARAMETERS`
* **Headers**:
* `x-api-key`: `YOUR_API_KEY`
* `Content-Type`: `application/json`
### Query Parameters
You can pass data to your agent by adding parameters to the request URL. This is useful for personalizing the call (e.g., "Hi John...").
| Parameter | Required | Description | Example |
| :------------ | :------- | :---------------------------------------------------------------- | :--------------------- |
| `phoneNumber` | **Yes** | The destination phone number to call, including the country code. | `+1234567890` |
| `firstName` | No | The first name of the person being called. | `Jane` |
| `lastName` | No | The last name of the person being called. | `Doe` |
| `email` | No | The email address of the person being called. | `jane.doe@example.com` |
| `country` | No | The country of the person being called. | `United States` |
| `callType` | **Yes** | Must be set to `outbound`. | `outbound` |
*`You can also add any custom parameters you need (e.g., &orderId=12345). Your agent can be configured to use this data in its conversation.`*
#### Example API Call
Here are examples of how to initiate an outbound call using `curl` and JavaScript.
**`curl Example:`**
```bash
curl -X POST \
'[https://api.intervo.ai/workflow/YOUR_WORKFLOW_ID?phoneNumber=+1234567890&firstName=John&lastName=Doe&email=john.doe@example.com&callType=outbound&country=United%20States](https://api.intervo.ai/workflow/YOUR_WORKFLOW_ID?phoneNumber=+1234567890&firstName=John&lastName=Doe&email=john.doe@example.com&callType=outbound&country=United%20States)' \
--header 'x-api-key: YOUR_API_KEY' \
--header 'Content-Type: application/json'
```
**`Javascript Example:`**
```js
// You might need to install node-fetch: npm install node-fetch
const fetch = require('node-fetch');
const API_ENDPOINT = '[https://api.intervo.ai/workflow/YOUR_WORKFLOW_ID](https://api.intervo.ai/workflow/YOUR_WORKFLOW_ID)';
const API_KEY = 'YOUR_API_KEY';
async function makeOutboundCall(phoneNumber, firstName) {
const params = new URLSearchParams({
phoneNumber: phoneNumber,
firstName: firstName,
callType: 'outbound'
});
const url = `${API_ENDPOINT}?${params}`;
console.log(`Initiating call to ${url}`);
try {
const response = await fetch(url, {
method: 'POST',
headers: {
'x-api-key': API_KEY,
'Content-Type': 'application/json'
}
});
if (!response.ok) {
throw new Error(`API request failed with status ${response.status}`);
}
const data = await response.json();
console.log('API Response:', data);
return data;
} catch (error) {
console.error('Error initiating call:', error);
}
}
// Example usage:
makeOutboundCall('+1234567890', 'Jane');
```
You have now fully configured your Phone Agent. It can serve as an automated receptionist for inbound calls and a proactive communication tool for outbound campaigns, all powered by the agent you designed.
# Webhooks
Source: https://docs.intervo.ai/publishing-an-agent/webhooks
Learn how to connect Intervo.ai to your other business systems using webhooks. Get real-time notifications for call summaries, new contacts, and more.
# Automating Your Workflows with Webhook Integrations
The Intervo.ai platform is powerful on its own, but its true potential is realized when it communicates with the other tools you use every day. **Webhook Integration** is the bridge that connects your AI agent's activities to your CRM, helpdesk, database, or any other custom application in real-time.
This guide will walk you through setting up webhooks to receive automated notifications for key events, such as when a call is summarized or a new contact is created.
***
## What is a Webhook?
A webhook is an automated message sent from one app to another when a specific event occurs. In the context of Intervo.ai, when a "Trigger Event" (like a completed conversation) happens, our system will automatically send an HTTP request with a detailed data payload to a "Webhook Endpoint" (a URL you provide).
This allows you to:
* Instantly update your CRM with new leads captured by your agent.
* Automatically create support tickets in your helpdesk from a user conversation.
* Log detailed call summaries to a database or spreadsheet for analysis.
* Trigger custom workflows in platforms like Zapier or Make.
***
## How to Configure a Webhook
Setting up a new webhook is a straightforward process.
1. Navigate to the **Webhook Integration** section in your Intervo.ai settings.
2. Click "Add Webhook" or begin filling out the configuration form.
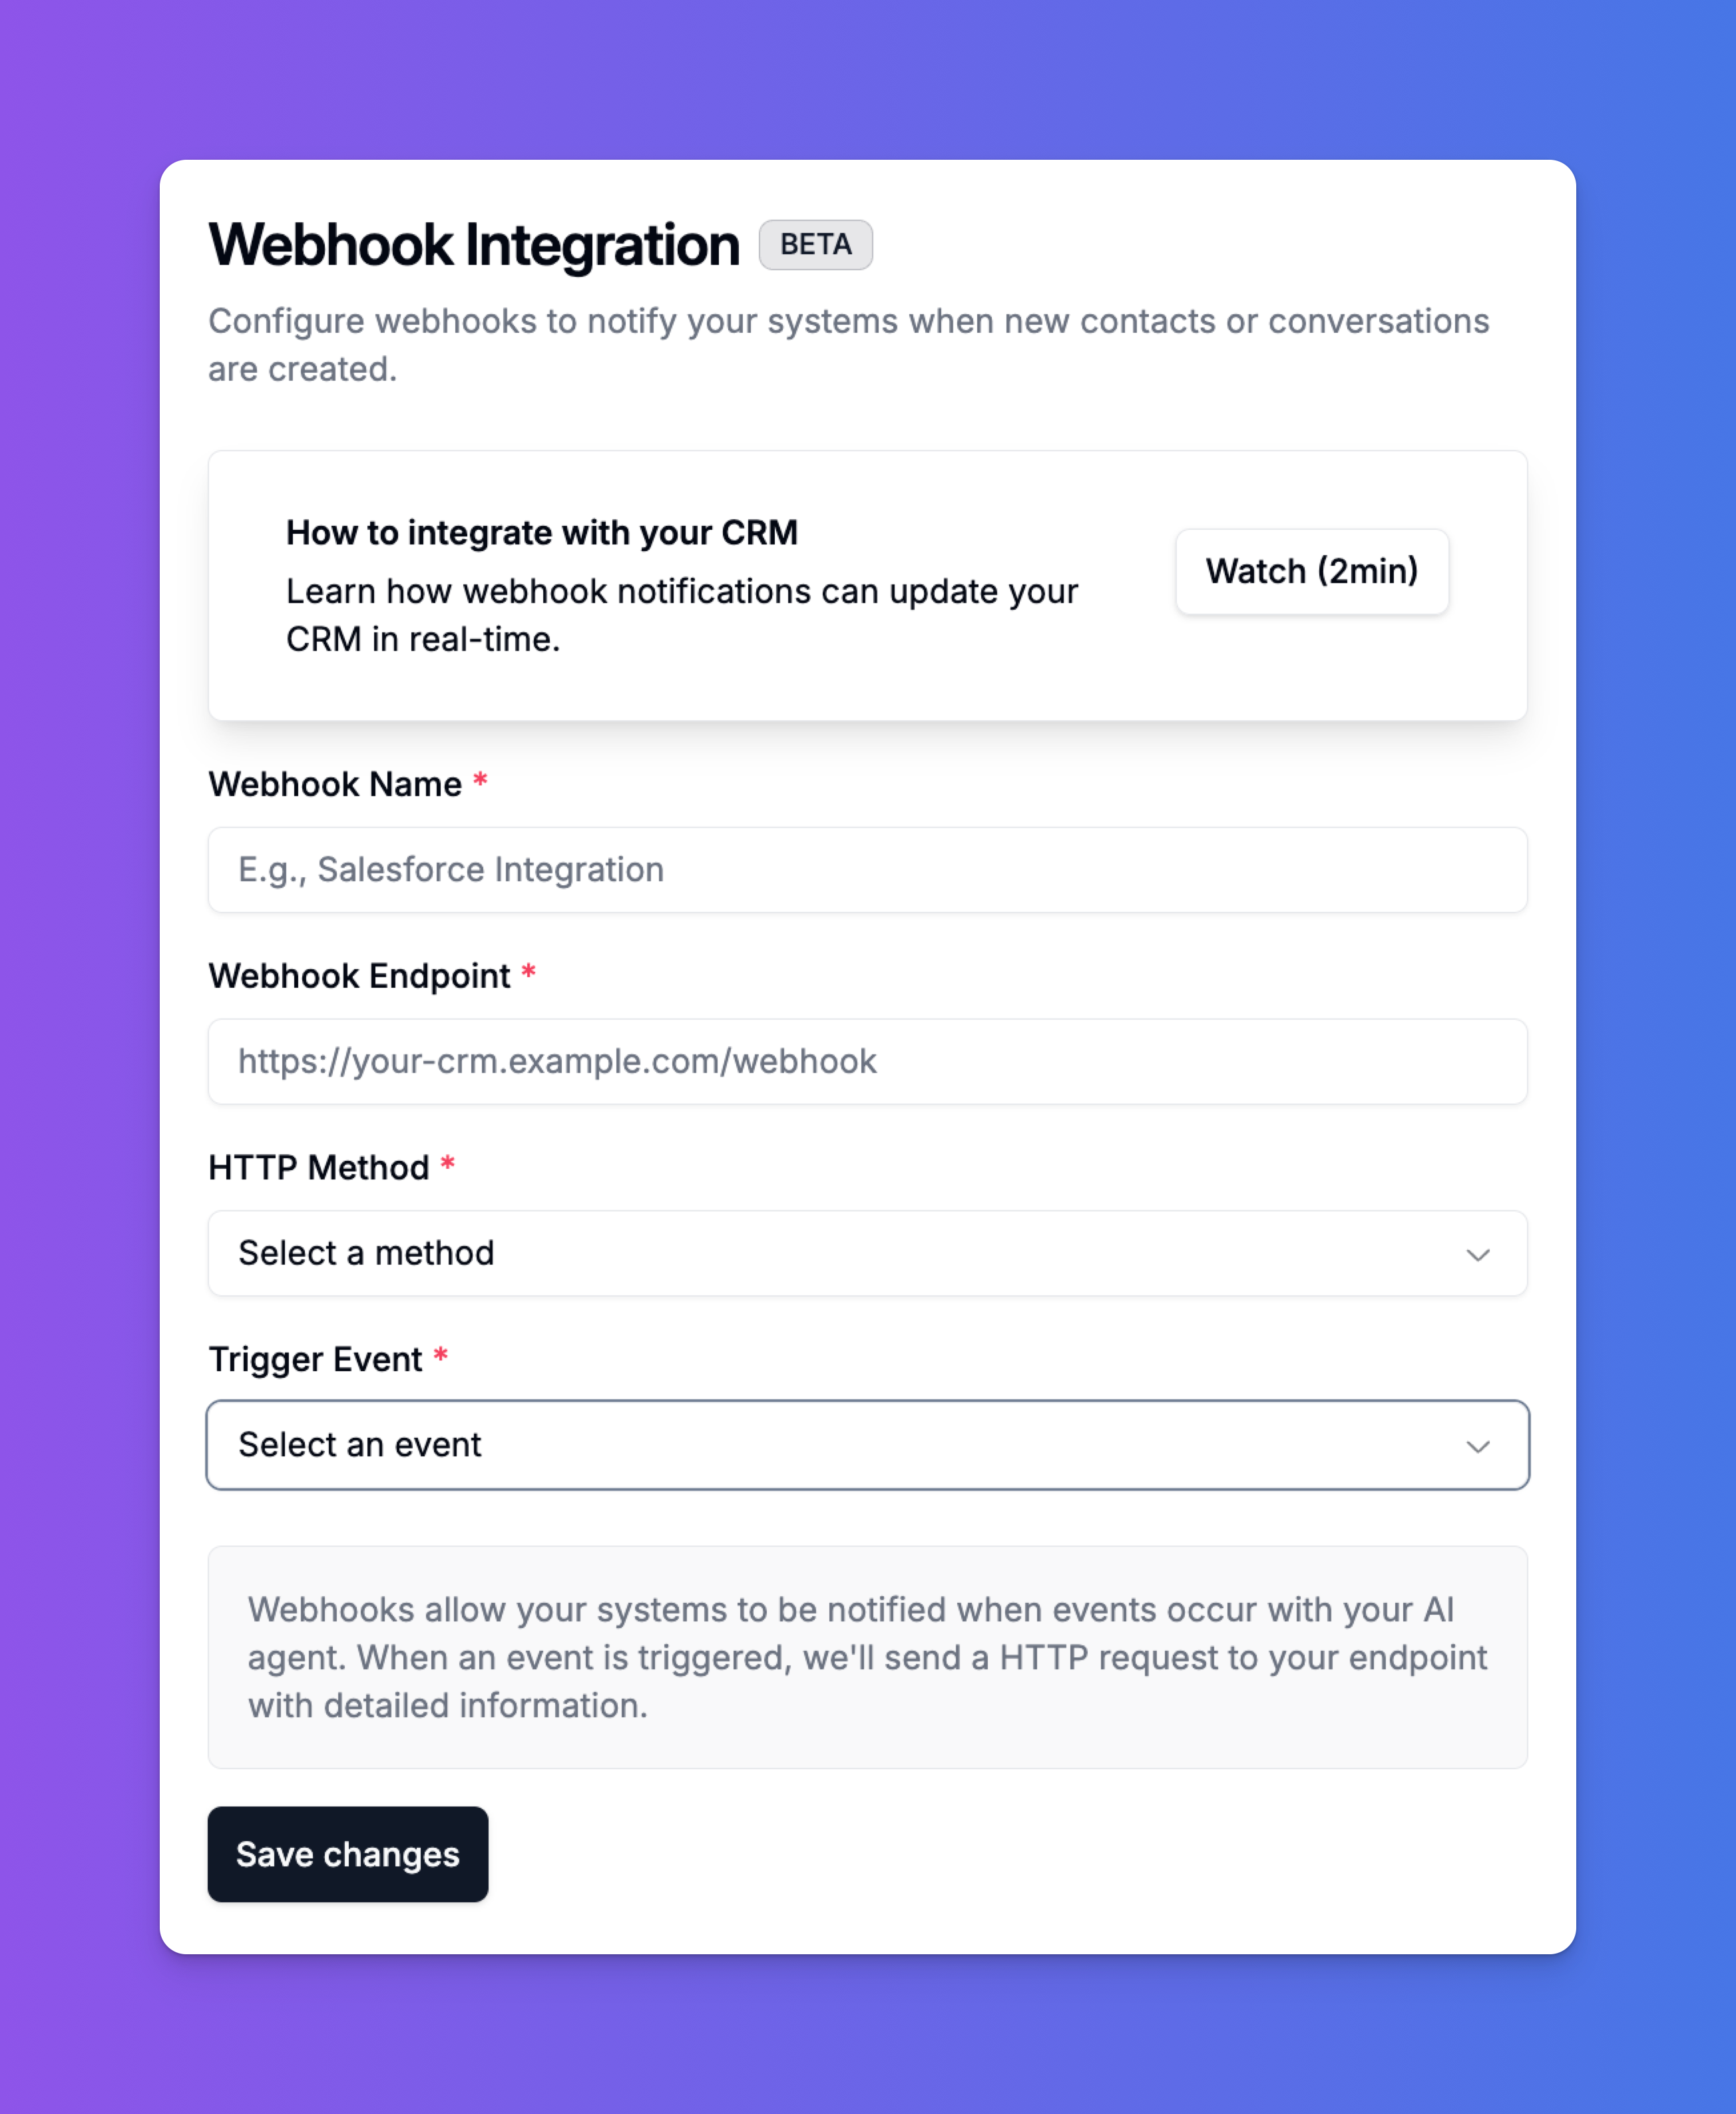 You will need to configure the following fields:
* **Webhook Name**: A friendly, descriptive name for your integration so you can easily identify it. For example, "Salesforce New Lead" or "Zendesk Ticket Creator".
* **Webhook Endpoint**: This is the most critical part. It's the unique URL of the application that will receive the data from Intervo.ai. You must get this URL from the receiving system (e.g., your CRM's API documentation, Zapier, etc.).
* **HTTP Method**: Select the HTTP method for the request. `POST` is the most common method for sending data via webhooks and is recommended in most cases.
* **Trigger Event**: Choose the specific event in Intervo.ai that will trigger this webhook to be sent.
Once configured, click **"Save Changes"**. Your webhook is now active.
***
## Understanding Trigger Events and Data Payloads
When a trigger event occurs, we will send a JSON payload to your endpoint with all the relevant information. Below are the available events and examples of the data they send.
### 1. AI Call Summary
This event triggers after a call has ended and our AI has generated a summary of the conversation.
* **Use Case**: Perfect for logging the outcome of a support call in a helpdesk ticket or adding detailed notes to a contact in your CRM.
* **Example Payload**:
```json
{
"event": "ai_call_summary",
"timestamp": "2025-06-12T10:30:00Z",
"agent": {
"id": "agent_12345",
"name": "Support Bot"
},
"contact": {
"id": "contact_67890",
"phoneNumber": "+1234567890",
"firstName": "Jane",
"lastName": "Doe"
},
"call": {
"sid": "CAxxxxxxxxxxxxxxxxxxxxxxxxxxxxxxxx",
"duration": 125,
"transcript": "User: Hi, my order is late. Agent: I'm sorry to hear that...",
"summary": "The user, Jane Doe, called to inquire about a late order (ID #54321). The agent apologized, confirmed the new delivery date is tomorrow, and offered a 10% discount on her next purchase."
}
}
```
### 2. New Contact Created
This event triggers when your agent interacts with a phone number for the first time and captures their details, effectively creating a new contact.
* **Use Case**: Automatically create a new lead or contact record in your CRM (like Salesforce, HubSpot, or Zoho) the moment your agent identifies a potential customer.
* **Example Payload**:
```json
{
"event": "new_contact_created",
"timestamp": "2025-06-12T11:00:00Z",
"agent": {
"id": "agent_54321",
"name": "Lead Qualification Bot"
},
"contact": {
"id": "contact_11223",
"phoneNumber": "+19876543210",
"firstName": "John",
"lastName": "Smith",
"email": "john.smith@example.com"
}
}
```
### 3. Conversation Completed
This event triggers every time a conversation with a user ends, regardless of the outcome.
* **Use Case**: Useful for general-purpose logging, analytics, or triggering follow-up sequences for every interaction.
* **Example Payload**:
```json
{
"event": "conversation_completed",
"timestamp": "2025-06-12T12:00:00Z",
"agent": {
"id": "agent_12345",
"name": "Support Bot"
},
"contact": {
"id": "contact_67890",
"phoneNumber": "+1234567890"
},
"conversation": {
"id": "conv_abc123",
"duration": 125,
"channel": "voice"
}
}
```
***
## Best Practices for Security
When you expose an endpoint to receive webhooks, it's a good practice to verify that the incoming requests are genuinely from Intervo.ai. While not shown in the UI, we include a unique signature in each request's header that you can use to validate the payload. Please refer to our developer documentation for instructions on implementing webhook signature verification.
By leveraging webhooks, you can transform your Intervo.ai agent from a standalone tool into a fully integrated component of your business automation strategy.
# Website Widget
Source: https://docs.intervo.ai/publishing-an-agent/website-widget
A complete guide on how to configure, customize, and embed the Intervo.ai Website Widget to provide live voice and chat assistance on your site.
# Integrating the Agent to Your Website with our Widget
The Intervo.ai Website Widget is the easiest way to bring your powerful voice and chat agent to your audience. With a simple copy-paste installation, you can provide instant, 24/7 conversational assistance directly on your website, engaging visitors and answering their questions in real-time.
This guide will walk you through the entire process, from configuration to deployment.
***
## Prerequisite: Publish Your Agent
Before you can set up the widget, you must have a fully configured agent. Make sure you have:
1. Set up your agent's **Knowledge Base** and **Prompt**.
2. Configured its voice and behavior and the workflows.
3. Clicked **"Publish Agent"** from the Agent Playground to make it live.
Once your agent is published, you can proceed to the **Connect** tab for that agent to set up the widget.
***
## 1. Installation: Embedding the Widget
The first step is to get the widget code onto your website.
1. Navigate to the **Connect** settings for your published agent.
2. Select the **Website Widget** deployment option.
3. You will be presented with two methods: **Embed a chat Bubble** and **Embed the iframe directly** (coming soon). Choose **Embed a chat Bubble**.
4. Copy the provided `
You will need to configure the following fields:
* **Webhook Name**: A friendly, descriptive name for your integration so you can easily identify it. For example, "Salesforce New Lead" or "Zendesk Ticket Creator".
* **Webhook Endpoint**: This is the most critical part. It's the unique URL of the application that will receive the data from Intervo.ai. You must get this URL from the receiving system (e.g., your CRM's API documentation, Zapier, etc.).
* **HTTP Method**: Select the HTTP method for the request. `POST` is the most common method for sending data via webhooks and is recommended in most cases.
* **Trigger Event**: Choose the specific event in Intervo.ai that will trigger this webhook to be sent.
Once configured, click **"Save Changes"**. Your webhook is now active.
***
## Understanding Trigger Events and Data Payloads
When a trigger event occurs, we will send a JSON payload to your endpoint with all the relevant information. Below are the available events and examples of the data they send.
### 1. AI Call Summary
This event triggers after a call has ended and our AI has generated a summary of the conversation.
* **Use Case**: Perfect for logging the outcome of a support call in a helpdesk ticket or adding detailed notes to a contact in your CRM.
* **Example Payload**:
```json
{
"event": "ai_call_summary",
"timestamp": "2025-06-12T10:30:00Z",
"agent": {
"id": "agent_12345",
"name": "Support Bot"
},
"contact": {
"id": "contact_67890",
"phoneNumber": "+1234567890",
"firstName": "Jane",
"lastName": "Doe"
},
"call": {
"sid": "CAxxxxxxxxxxxxxxxxxxxxxxxxxxxxxxxx",
"duration": 125,
"transcript": "User: Hi, my order is late. Agent: I'm sorry to hear that...",
"summary": "The user, Jane Doe, called to inquire about a late order (ID #54321). The agent apologized, confirmed the new delivery date is tomorrow, and offered a 10% discount on her next purchase."
}
}
```
### 2. New Contact Created
This event triggers when your agent interacts with a phone number for the first time and captures their details, effectively creating a new contact.
* **Use Case**: Automatically create a new lead or contact record in your CRM (like Salesforce, HubSpot, or Zoho) the moment your agent identifies a potential customer.
* **Example Payload**:
```json
{
"event": "new_contact_created",
"timestamp": "2025-06-12T11:00:00Z",
"agent": {
"id": "agent_54321",
"name": "Lead Qualification Bot"
},
"contact": {
"id": "contact_11223",
"phoneNumber": "+19876543210",
"firstName": "John",
"lastName": "Smith",
"email": "john.smith@example.com"
}
}
```
### 3. Conversation Completed
This event triggers every time a conversation with a user ends, regardless of the outcome.
* **Use Case**: Useful for general-purpose logging, analytics, or triggering follow-up sequences for every interaction.
* **Example Payload**:
```json
{
"event": "conversation_completed",
"timestamp": "2025-06-12T12:00:00Z",
"agent": {
"id": "agent_12345",
"name": "Support Bot"
},
"contact": {
"id": "contact_67890",
"phoneNumber": "+1234567890"
},
"conversation": {
"id": "conv_abc123",
"duration": 125,
"channel": "voice"
}
}
```
***
## Best Practices for Security
When you expose an endpoint to receive webhooks, it's a good practice to verify that the incoming requests are genuinely from Intervo.ai. While not shown in the UI, we include a unique signature in each request's header that you can use to validate the payload. Please refer to our developer documentation for instructions on implementing webhook signature verification.
By leveraging webhooks, you can transform your Intervo.ai agent from a standalone tool into a fully integrated component of your business automation strategy.
# Website Widget
Source: https://docs.intervo.ai/publishing-an-agent/website-widget
A complete guide on how to configure, customize, and embed the Intervo.ai Website Widget to provide live voice and chat assistance on your site.
# Integrating the Agent to Your Website with our Widget
The Intervo.ai Website Widget is the easiest way to bring your powerful voice and chat agent to your audience. With a simple copy-paste installation, you can provide instant, 24/7 conversational assistance directly on your website, engaging visitors and answering their questions in real-time.
This guide will walk you through the entire process, from configuration to deployment.
***
## Prerequisite: Publish Your Agent
Before you can set up the widget, you must have a fully configured agent. Make sure you have:
1. Set up your agent's **Knowledge Base** and **Prompt**.
2. Configured its voice and behavior and the workflows.
3. Clicked **"Publish Agent"** from the Agent Playground to make it live.
Once your agent is published, you can proceed to the **Connect** tab for that agent to set up the widget.
***
## 1. Installation: Embedding the Widget
The first step is to get the widget code onto your website.
1. Navigate to the **Connect** settings for your published agent.
2. Select the **Website Widget** deployment option.
3. You will be presented with two methods: **Embed a chat Bubble** and **Embed the iframe directly** (coming soon). Choose **Embed a chat Bubble**.
4. Copy the provided `